
Global Site
Displaying present location in the site.
December 13th, 2024
Machine translation is used partially for this article. See the Japanese version for the original article.
Introduction
There is a method for building infrastructure environments such as servers and networks called Infrastructure as Code (hereinafter called “IaC”), which involves managing the configuration and settings of infrastructure as code, thereby automating environment construction.
EXPRESSCLUSTER provides a command line tool to realize infrastructure construction with IaC. In this article explains how to modify a cluster configuration data files built in an on-premises environment(Linux) so that it can be used in an Amazon Web Services(hereinafter called "AWS") environment.
Please refer to the following for an explanation of the cluster configuration data files creation command and basic usage, as well as construction procedures on a Windows environment.
Contents
1. About the Cluster Configuration Data Files Creation Command
In this article introduces the procedure for creating a clp.conf for an HA cluster running in the AWS environment from a cluster configuration data files(hereinafter called "clp.conf") for an HA cluster created in an on-premises environment.
For details on the cluster configuration data files creation command(hereinafter called "clpcfadm.py"), see the following.
[Reference]
 Documentation - Manuals
Documentation - Manuals- EXPRESSCLUSTER X 5.2 > EXPRESSCLUSTER X 5.2 for Linux > Command Reference Guide for Cluster Configuration
- -> 2. Command reference
- -> 2.1. clpcfadm.py command
2. HA Cluster Configuration and Changes to Configuration Data Files
The HA cluster configurations for the on-premises environment(source) to be changed and the AWS environment(destination) are as follows. Since floating IP resource cannot be used in the AWS environment, we will change to an HA cluster configuration that uses AWS virtual IP resource. Please refer to the following guide for building an HA cluster in the AWS environment.
[Reference]
Documentation - Setup Guides
Documentation - Setup Guides- Linux > Cloud > Amazon Web Services > EXPRESSCLUSTER X 5.2 for Linux HA Cluster Configuration Guide for Amazon Web Services
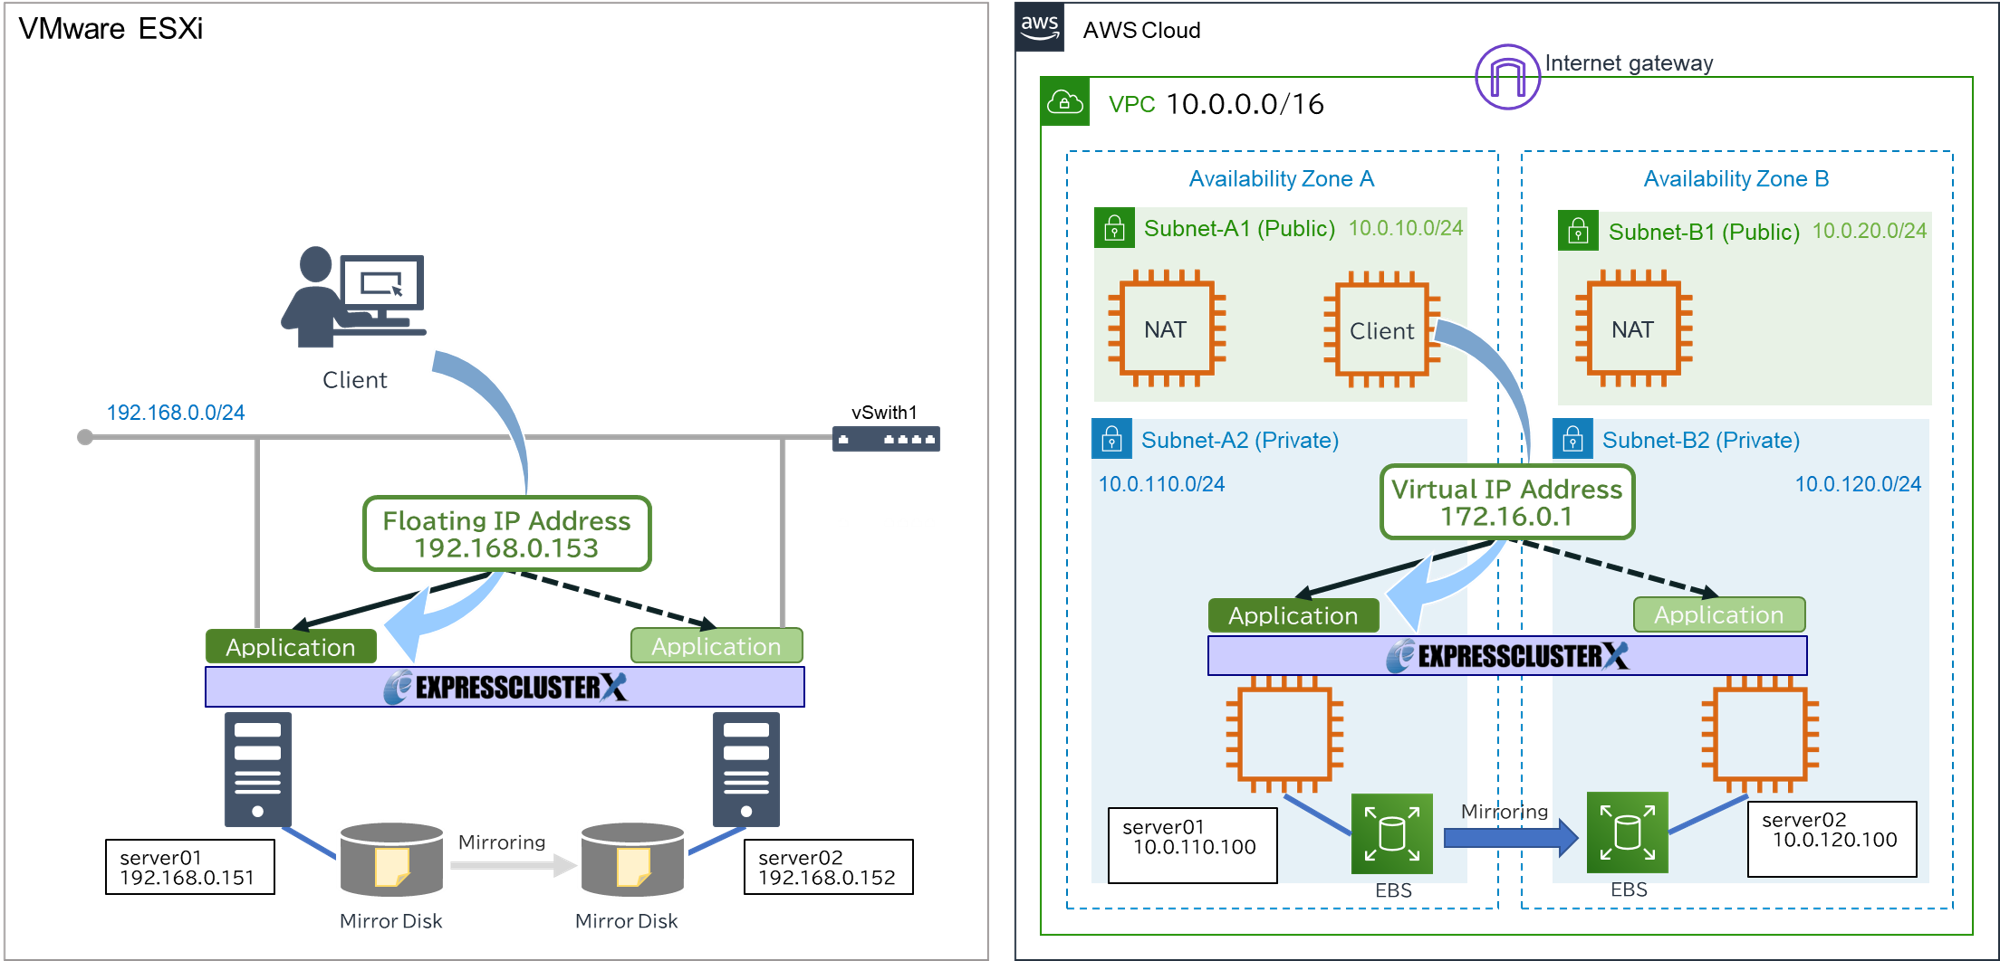
The main changes to the environment are as follows. In principle, parameters other than the changes and the OS used will be the same between the on-premises environment and the AWS environment.
- In the AWS environment, the cluster is accessed from the 10.0.0.0/16 IP address range, so change the IP addresses of the interconnects and MDC and delete any unnecessary IPs.
- In the AWS environment, the floating IP resource cannot be used, so delete the floating IP resource.
- When deleting the floating IP resource, delete the floating IP monitor resource as well.
- Add the AWS virtual IP resource instead of the floating IP resource.
- Add the AWS virtual IP monitor resource for monitor the AWS virtual IP resource.
- Since the device file name will of the disk change when migrating from an on-premises environment to the AWS environment, change the device file name of the mirror disk resource.
The items to be changed in the clp.conf of the on-premises environment are as follows. The clp.conf (ZIP format) of the HA cluster created in the on-premises environment can be obtained by accessing the Cluster WebUI of the on-premises environment in "Config mode" and executing "Export."
| Item name | Resource Name | Changes |
| Cluster | cluster1 | No change |
| Server | server01,server02 | No change |
| Interconnect | lan0 | Change IP address |
| lan1 | Delete | |
| Mirror disk connect(MDC) | mdc0 | Change IP address |
| mdc1 | Delete | |
| LAN heartbeat | lankhb0 | No change |
| lankhb1 | Delete | |
| Failover group | failover1 | No change |
| Floating IP resource | fip1 | Delete |
| AWS virtual IP resource | awsvip1 | Add new |
| Mirror disk resource | md1 | Change the device file name of the mirror disk |
| EXEC resource | exec1 | No change |
| Floating IP monitor resource | fipw1 | Delete |
| AWS virtual ip monitor resource | awsvipw1 | Add new |
| Mirror disk monitor resource | mdw1 | No change |
| Mirror disk connect monitor resource | mdnw1 | No change |
| Custom monitor resource | genw1 | No change |
| User mode monitor resource | userw1 | No change |
3. HA Cluster Migration Procedure
3.1 Preparation
If you are also upgrading EXPRESSCLUSTER when migrating from an on-premises environment to the AWS environment, you need to convert clp.conf before executing clpcfadm.py. To convert clp.conf for EXPRESSCLUSTER X 5.x, execute the command for converting cluster configuration data. For information on how to use the command, see the following.
[Reference]
Documentation - Manuals
Documentation - Manuals- EXPRESSCLUSTER X 5.2 > EXPRESSCLUSTER X 5.2 for Linux > Getting Started Guide
- -> 7. Upgrading EXPRESSCLUSTER
- -> 7.1. How to upgrade from EXPRESSCLUSTER
- -> 7.1.1. How to upgrade from X3.3 or X4.x to X 5.2
Check the following items in advance to be changed from clp.conf in the on-premises environment.
- VPC ID and ENI ID used in the AWS virtual IP resource.
- Device file name used in the mirror disk resource.
As explained in our previous article, Points to Note When Building a Mirror Disk Type Cluster on Linux in a Cloud Environment, device file name may change during operation in the AWS environment. Therefore, this time we will use by-id. by-id creates a unique name based on the hardware serial number.
The methods to check VPC ID, ENI ID, and by-id are as follows:
- 1.Access the AWS Management Console and select "VPC" from Services.
- 2.Select your VPC from the menu on the left, and confirm the VPC ID to use from the VPCs displayed.
- 3.Select "EC2" from Services in the AWS Management Console.
- 4.Select "Network Interfaces" from the menu on the left, and confirm the network interface ID (ENI ID) to use from the network interfaces displayed.
- 5.Log in to server01 and server02.
- 6.Enter the following command to confirm the device names on which the cluster partition and data partition were created. The command execution example shows only the relevant parts.
# lsblkNAME MAJ:MIN RM SIZE RO TYPE MOUNTPOINT
NMP1 218:1 0 4G 0 disk
nvme1n1 259:1 0 5G 0 disk
├─nvme1n1p1 259:4 0 1G 0 part <- Cluster partition
└─nvme1n1p2 259:5 0 4G 0 part <- Data partition
- 7.Enter the following command to confirm the by-id corresponding to the device name on which the cluster partition and data partition were created. The command execution example shows only the relevant parts.
# ls -l /dev/disk/by-id
total 0
lrwxrwxrwx 1 root root 13 Jul 25 02:10 nvme-Amazon_Elastic_Block_Store_vol1234567890abcdefg-> ../../nvme1n1
lrwxrwxrwx 1 root root 15 Jul 25 05:06 nvme-Amazon_Elastic_Block_Store_vol1234567890abcdefg-part1 -> ../../nvme1n1p1 <- Cluster partition
lrwxrwxrwx 1 root root 15 Jul 25 04:42 nvme-Amazon_Elastic_Block_Store_vol1234567890abcdefg-part2 -> ../../nvme1n1p2 <- Data partition
3.2 Changing clp.conf Using clpcfadm.py
The steps to change clp.conf using clpcfadm.py are as follows:
- 1.Log in to server01.
- 2.Copy the clp.conf created on the on-premises environment to the AWS environment. In this example, store clp.conf in "/tmp/expresscluster/".
- 3.To execute clpcfadm.py, move to the folder where clp.conf is stored.
cd /tmp/expresscluster/
- 4.Execute the clpcfadm.py command with the mod option to check whether the clp.conf created in the on-premises environment can be read and written in the AWS environment. If clp.conf is loaded correctly, the settings in clp.conf are displayed in a list.
(The following commands must be executed by a user with root privileges.)
# clpcfadm.py mod -t
all
cluster
group@failover1
heartbeat
messages
monitor
networkpartition [None]
pm
resource
rm
server@server01
server@server02
servergroup
webalert
webmgr
If the command execution result displays "Invalid config file," clp.conf was not read correctly.
# clpcfadm.py mod -t
Invalid config file. Use the 'create' option.
If the "Invalid config file" message is displayed, check the following items or perform "Export" in the Cluster WebUI to obtain clp.conf again.
- Check whether the setting value of clp.conf are garbled.
- Check whether the setting value of clp.conf contain multibyte characters.
- Check whether there are any errors in the setting value of clp.conf, such as input errors or forgotten closing XML tags.
- 5.Execute the following command to modify clp.conf. For "VPCID", "ENIID", "CLUSTERPARTITION", and "DATAPARTITION", which are the parts that define the variables, set the values confirmed in the "3.1 Preparation".
# Define variables
FAILOVERNAME="failover1"
SERVER1NAME="server01"
SERVER2NAME="server02"
SERVER1IPADDRESS1="10.0.110.100"
SERVER2IPADDRESS1="10.0.120.100"
AWSVIP="172.16.0.1"
VPCID="vpc-1234567890abcdefg"
SERVER1ENIID="eni-1234567890abcdefg"
SERVER2ENIID="eni-abcdefg1234567890"
MOUNTPOINT="/mnt/mirror"
SERVER1CLUSTERPARTITION="/dev/disk/by-id/nvme-Amazon_Elastic_Block_Store_vol1234567890abcdefg-part1"
SERVER1DATAPARTITION="/dev/disk/by-id/nvme-Amazon_Elastic_Block_Store_vol1234567890abcdefg-part2"
SERVER2CLUSTERPARTITION="/dev/disk/by-id/nvme-Amazon_Elastic_Block_Store_volabcdefg1234567890-part1"
SERVER2DATAPARTITION="/dev/disk/by-id/nvme-Amazon_Elastic_Block_Store_volabcdefg1234567890-part2"
# Fix interconnect(lan0)
clpcfadm.py mod -t server@$SERVER1NAME/device@0/info --set $SERVER1IPADDRESS1
clpcfadm.py mod -t server@$SERVER2NAME/device@0/info --set $SERVER2IPADDRESS1
# Delete interconnect(lan1)
clpcfadm.py del device $SERVER1NAME 1
clpcfadm.py del device $SERVER2NAME 1
# Fix MDC(mdc0)
clpcfadm.py mod -t server@$SERVER1NAME/device@400/info --set $SERVER1IPADDRESS1
clpcfadm.py mod -t server@$SERVER2NAME/device@400/info --set $SERVER2IPADDRESS1
clpcfadm.py mod -t server@$SERVER1NAME/device@400/mdc/info --set $SERVER1IPADDRESS1
clpcfadm.py mod -t server@$SERVER2NAME/device@400/mdc/info --set $SERVER2IPADDRESS1
# Delete MDC(mdc1)
clpcfadm.py del device $SERVER1NAME 401
clpcfadm.py del device $SERVER2NAME 401
clpcfadm.py mod -t resource/md@md1/parameters/netdev@1/device --delete
clpcfadm.py mod -t resource/md@md1/parameters/netdev@1/mdcname --delete
clpcfadm.py mod -t resource/md@md1/parameters/netdev@1/priority --delete
# Delete LAN heartbeat(lankhb1)
clpcfadm.py del hb lankhb 1
# Delete floating IP resource(fip1)
clpcfadm.py del rsc $FAILOVERNAME fip fip1
# Add AWS virtual IP resource(awsvip1)
clpcfadm.py add rsc $FAILOVERNAME awsvip awsvip1
# Add virtual IP address to the AWS virtual IP resource
clpcfadm.py mod -t resource/awsvip@awsvip1/parameters/ip --set $AWSVIP
# Add "VPC ID" and "ENI ID" values to the "Common" tab of the AWS virtual IP resource
clpcfadm.py mod -t resource/awsvip@awsvip1/parameters/vpcid --set $VPCID
clpcfadm.py mod -t resource/awsvip@awsvip1/parameters/eniid --set $SERVER1ENIID
# Add "VPC ID" and "ENI ID" values to the “server01” tab and “server02” tab of the AWS virtual IP resource
clpcfadm.py mod -t resource/awsvip@awsvip1/server@$SERVER1NAME/parameters/vpcid --set $VPCID --nocheck
clpcfadm.py mod -t resource/awsvip@awsvip1/server@$SERVER1NAME/parameters/eniid --set $SERVER1ENIID --nocheck
clpcfadm.py mod -t resource/awsvip@awsvip1/server@$SERVER2NAME/parameters/vpcid --set $VPCID --nocheck
clpcfadm.py mod -t resource/awsvip@awsvip1/server@$SERVER2NAME/parameters/eniid --set $SERVER2ENIID --nocheck
# Change device name of cluster partition and data partition
clpcfadm.py mod -t resource/md@md1/parameters/diskdev/cppath --set $CLUSTERPARTITION --nocheck
clpcfadm.py mod -t resource/md@md1/parameters/diskdev/dppath --set $DATAPARTITION --nocheck
# Add mount points, cluster partition device name, and data partition device name to server01 and server02
clpcfadm.py mod -t resource/md@md1/server@$SERVER1NAME/parameters/mount/point --set $MOUNTPOINT --nocheck
clpcfadm.py mod -t resource/md@md1/server@$SERVER1NAME/parameters/diskdev/cppath --set $SERVER1CLUSTERPARTITION --nocheck
clpcfadm.py mod -t resource/md@md1/server@$SERVER1NAME/parameters/diskdev/dppath --set $SERVER1DATAPARTITION --nocheck
clpcfadm.py mod -t resource/md@md1/server@$SERVER2NAME/parameters/mount/point --set $MOUNTPOINT --nocheck
clpcfadm.py mod -t resource/md@md1/server@$SERVER2NAME/parameters/diskdev/cppath --set $SERVER2CLUSTERPARTITION --nocheck
clpcfadm.py mod -t resource/md@md1/server@$SERVER2NAME/parameters/diskdev/dppath --set $SERVER2DATAPARTITION --nocheck
# Delete the floating IP monitor resource(fipw1)
clpcfadm.py del mon fipw fipw1
# Add AWS virtual IP monitor resource(awsvipw1)
clpcfadm.py add mon awsvipw awsvipw1
clpcfadm.py mod -t monitor/awsvipw@awsvipw1/target --set awsvip1
clpcfadm.py mod -t monitor/awsvipw@awsvipw1/relation/type --set rsc --nocheck
clpcfadm.py mod -t monitor/awsvipw@awsvipw1/relation/name --set awsvip1 --nocheck
Once the above command has been executed, the changes to clp.conf are complete.
Command samples can be downloaded from the link below. Also, please note that the sample is not guaranteed to work.
 ZIP script file
3.3 Applying clp.conf
The procedure to apply the created clp.conf to the servers is as follows.
(The following commands must be executed by a user with root privileges.)
- 1.Log in to server01.
- 2.Check the status of the HA cluster with the following command.
# clpstat -s
If the HA cluster is not yet built, the following message will be displayed. If the HA cluster has already been configured and server01 and server02 are Online with an existing HA cluster, please stop the HA cluster.
The cluster is not created.
- 3.After checking the status of the HA cluster, apply the configuration information with the following command.
# clpcfctrl --push -x /tmp/expresscluster/
If you see "succeeded" as shown below, the configuration file is successfully applied.
file delivery to server 10.0.110.100 success.
file delivery to server 10.0.120.100 success.
The upload is completed successfully.
To apply the changes you made, restart the Node Manager service.
To apply the changes you made, restart the Alert Sync service.
To apply the changes you made, restart the WebManager service.
To apply the changes you made, restart the Information Base service.
To apply the changes you made, restart the API service.
Command succeeded.
- 4.Restart each service displayed after executing the clpcfctrl command above with the following command.
# clpcl -r -a --nm
# clpcl -r -a --alert
# clpcl -r -a --web
# clpcl -r -a --ib
# clpcl -r -a --api
Confirm that "Command succeeded" is displayed for each.
Start server01 : Command succeeded.
Start server02 : Command succeeded.
- 5.Start the mirror agent with the following command.
# clpcl -s -a --md
Confirm that "Command succeeded" is displayed.
Start server01 : Command succeeded.
Start server02 : Command succeeded.
- 6.Start the EXPRESSCLUSTER service with the following command.
# clpcl -s -a
Confirm that "Command succeeded" is displayed.
Start server01 : Command succeeded.
Start server02 : Command succeeded.
- 7.Check the status of the HA cluster with the following command.
# clpstat -s
Confirm that the statuses of server01 and server02 are "Online" and the statuses of the resources under them are "Normal". If they are not "Online", wait for a while and then try to execute the command again. If the status is "Error" or "Caution", check if there are any mistakes in the settings values of clp.conf.
======================== CLUSTER STATUS ===========================
Cluster : cluster1
<server>
*server01 ........: Online
lankhb1 : Normal Kernel Mode LAN Heartbeat
server02 ........: Online
lankhb1 : Normal Kernel Mode LAN Heartbeat
<group>
failover1 .......: Online
current : server01
awsvip1 : Online
exec1 : Online
md1 : Online
<monitor>
awsvipw1 : Normal
genw1 : Normal
mdw1 : Normal
mdnw1 : Normal
userw1 : Normal
=====================================================================
4. Checking the Operation
Follow the steps below to check if the HA cluster has been built successfully.
- 1.Start a web browser on the client and access the following URL to display the Cluster WebUI.
http://<IP address set in the AWS virtual IP resource>:29003
- 2.From the Cluster WebUI status screen, confirm that the failover group (failover1) is started on server01, and that [Server], [Group], and [Monitor] are started normally.
- 3.From the Cluster WebUI, manually move the failover group (failover1) from server01 to server02.
- 4.From the Cluster WebUI, confirm that the failover group (failover1) has been moved to server02, and that [Server], [Group], and [Monitor] are started normally.
By confirming that failover was successful, we were able to confirm that the migration of the existing system from an on-premises environment to the AWS environment was complete.
Conclusion
This time, we used the clpcfadm.py command to modify the cluster configuration data files built in an on-premises environment so that it can be used in the AWS environment. By applying the commands introduced in this article, configuration management tools such as Ansible and Terraform can be used to automate cluster construction and facilitate IaC.
If you consider introducing the configuration described in this article, you can perform a validation with the trial module of EXPRESSCLUSTER. Please do not hesitate to contact us if you have any questions.