
Global Site
Displaying present location in the site.
December 11th, 2024
Machine translation is used partially for this article. See the Japanese version for the original article.
Introduction
There is a method for building infrastructure environments such as servers and networks called Infrastructure as Code (hereinafter called “IaC”), which involves managing the configuration and settings of infrastructure as code, thereby automating environment construction.
EXPRESSCLUSTER provides a command line tool to realize infrastructure construction via IaC. This time, we will introduce how to use the cluster configuration data file creation command to create EXPRESSCLUSTER configuration data via command and build an HA cluster.
Contents
- 1. About the Cluster Configuration Data File Creation Command
- 1.1 What is the Cluster Configuration Data File Creation Command?
- 1.2 What is clpcfset?
- 1.3 What is clpcfadm.py?
- 1.4 Use Case
- 2. HA Cluster Configuration
- 3. HA Cluster Configuration Procedure
- 3.1 On-Premises Environment Settings
- 3.2 Creation of clp.conf Using clpcfadm.py
- 3.3 Applying clp.conf
- 4. Checking the Operation
1. About the Cluster Configuration Data File Creation Command
1.1 What is the Cluster Configuration Data File Creation Command?
In EXPRESSCLUSTER, when configuring an HA cluster using the Cluster WebUI, a cluster configuration data file (hereinafter called “clp.conf”) is created on the server. The command to create the clp.conf from the command line is the cluster configuration data file creation command (clpcfset, clpcfadm.py).
By using the cluster configuration data file creation command, you can script the creation of clp.conf, thereby automating time-consuming configuration tasks in the Cluster WebUI and preventing configuration errors due to manual operations.
1.2 What is clpcfset?
clpcfset is a command available in EXPRESSCLUSTER X 4.3 and EXPRESSCLUSTER X 5.0, and it is compatible with both Windows and Linux. For detailed information about the command, please refer to the following.
[Reference]
 Documentation - Previous Versions
Documentation - Previous Versions- EXPRESSCLUSTER X 5.0 > EXPRESSCLUSTER X 5.0 for Windows > Reference Guide
- -> 9 EXPRESSCLUSTER command reference
- -> 9.30 Creating a cluster configuration data file (clpcfset, clpcfadm.py command)
- -> 9.30.1 clpcfset command
- EXPRESSCLUSTER X 5.0 > EXPRESSCLUSTER X 5.0 for Linux > Reference Guide
- -> 9 EXPRESSCLUSTER command reference
- -> 9.32 Creating a cluster configuration data file (clpcfset, clpcfadm.py command)
- -> 9.32.1 clpcfset command
1.3 What is clpcfadm.py?
The clpcfadm.py command is the successor to clpcfset. It is available from EXPRESSCLUSTER X 5.0 and supports both Windows and Linux.
For versions of EXPRESSCLUSTER X 5.0 and later, the use of this command is recommended, and future feature enhancements will be made to clpcfadm.py. For detailed information about the command, please refer to the following.
[Reference]
Documentation - Manuals
Documentation - Manuals- EXPRESSCLUSTER X 5.2 > EXPRESSCLUSTER X 5.2 for Windows > Command Reference Guide for Cluster Configuration
- -> 2. Command reference
- -> 2.1. clpcfadm.py command
- EXPRESSCLUSTER X 5.2 > EXPRESSCLUSTER X 5.2 for Linux > Command Reference Guide for Cluster Configuration
- -> 2. Command reference
- -> 2.1. clpcfadm.py command
1.4 Use Case
In cases where the Cluster WebUI cannot be used, or when creating multiple HA clusters with different parameters such as server names or IP addresses, but otherwise similar settings, it is recommended to use the cluster configuration data file creation command.
Furthermore, by using the cluster configuration data file creation command to automate the creation of clp.conf, it leads to the realization of IaC, including the construction of HA clusters. The parameters used with the cluster configuration data file creation command include those that can be arbitrarily determined, such as cluster names and resource names, and those that require references after the environment has been built, such as disk GUIDs.
For a reference example of obtaining parameters that require references after the environment has been built and automating the creation of clp.conf, please refer to the following article on automated HA cluster construction using Ansible.
2. HA Cluster Configuration
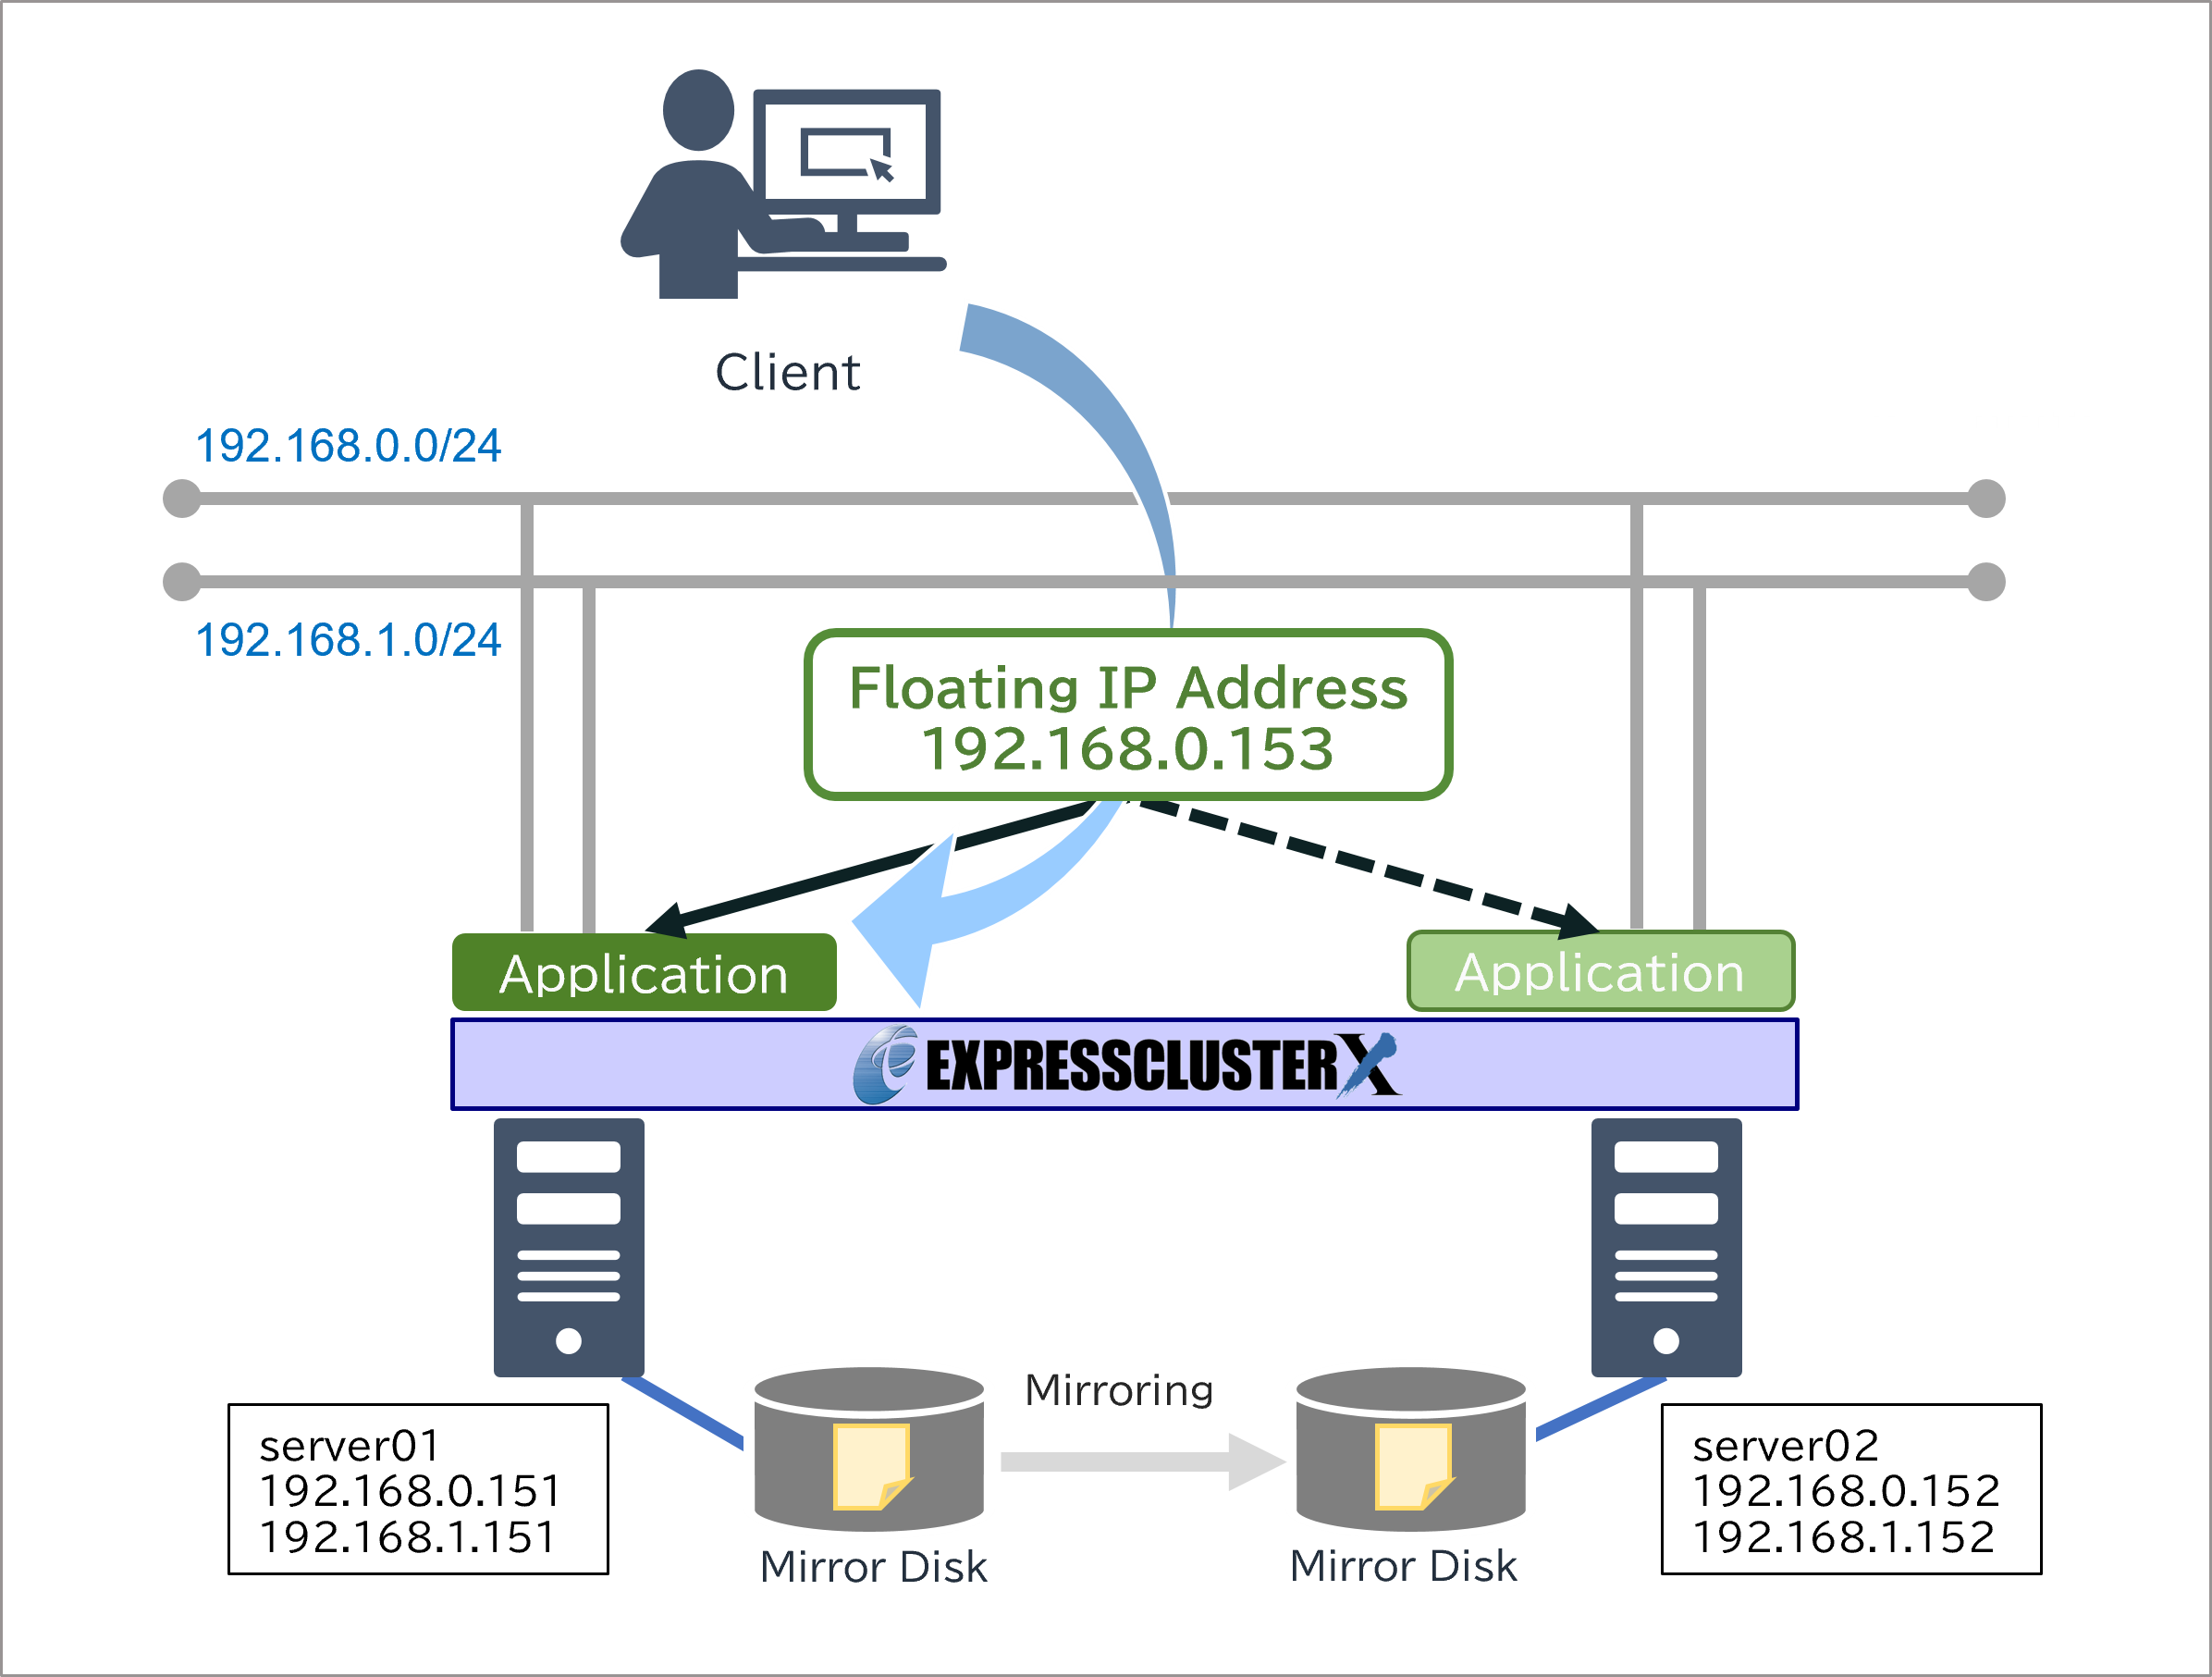
This article introduces the procedure to build a "mirror disk type HA cluster using Floating IP resources" in an on-premises environment using clpcfadm.py. The procedure introduced is for Windows. Since some resource names and parameters differ between Windows and Linux, please refer to the guides and reference links for command examples to execute on Linux.
3. HA Cluster Configuration Procedure
3.1 On-Premises Environment Settings
The environment will be built with the following settings. The installation methods for EXPRESSCLUSTER X and IIS on server01 and server02 are omitted.
■OS and EXPRESSCLUSTER
- Windows Server 2022
- EXPRESSCLUSTER X 5.2 for Windows (Internal Version: 13.21)
- Client
- IP Address: 192.168.0.150
- server01
- IP Address: 192.168.0.151, 192.168.1.151
- Hard Disk (E Drive, F Drive, for Mirror Disk): 5GB
- server02
- IP Address: 192.168.0.152, 192.168.1.152
- Hard Disk (E Drive, F Drive, for Mirror Disk): 5GB
3.2 Creation of clp.conf Using clpcfadm.py
The configuration of the HA cluster to be built is as follows.
■Failover group (failover1)
・Floating IP resource (fip1)
- IP Address: 192.168.0.153
・Mirror disk resource (md1)
- Cluster partition: E:
- Data partition: F:
・Service resource (service1)
- Service Name: W3SVC ※IIS Service Name
・Floating IP monitor resource (fipw1)
- Target resource: fip1
- Recovery target: fip1
・User mode monitor resource (userw)
- Target resource: - ※No need to specify the monitoring target for user mode monitor resource
- Recovery target: LocalServer
・Mirror disk monitor resource (mdw1)
- Target resource: md1
- Recovery target: md1
・Service monitor resource (servicew1)
- Target resource: service1
- Recovery target: service1
The monitor resource parameters such as "Timeout" and "Interval" use the default values. For example commands to change various parameters, please refer to the guides and reference links.
The procedure to create clp.conf with clpcfadm.py is as follows:
- 1.
Log in to server01 and server02 respectively and open the command prompt with administrative privileges.
- 2.
Enter the following commands to check the GUID of the drives used for the cluster partition and data partition. The confirmed GUID will be used when executing clpcfadm.py.
clpdiskctrl get guid E:
clpdiskctrl get guid F:
- 3.
Log in to server01 and open the command prompt with administrative privileges.
- 4.
clp.conf will be created under the folder where clpcfadm.py is executed. This time, clpcfadm.py will be executed in 'C:\Users\Administrator\', so move to the target folder.
cd C:\Users\Administrator\
- 5.
Execute the following command. Specify the GUID of the drives confirmed in advance for the variables CLUSTERPARTITIONGUID and DATAPARTITIONGUID.
rem Define variables
set CLUSTERNAME=cluster1
set FAILOVERNAME=failover1
set SERVER1NAME=server01
set SERVER2NAME=server02
set SERVER1IPADDRESS1=192.168.0.151
set SERVER1IPADDRESS2=192.168.1.151
set SERVER2IPADDRESS1=192.168.0.152
set SERVER2IPADDRESS2=192.168.1.152
set FLOATINGIP=192.168.0.153
set CLUSTERPARTITION=E:
set DATAPARTITION=F:
set SERVER1CLUSTERPARTITIONGUID=12345678-0000-0000-0000-100000000000
set SERVER1DATAPARTITIONGUID=12345678-0000-0000-0000-104000000000
set SERVER2CLUSTERPARTITIONGUID=23456789-0000-0000-0000-100000000000
set SERVER2DATAPARTITIONGUID=23456789-0000-0000-0000-104000000000
set TARGETSERVICE=W3SVC
rem Add a cluster
clpcfadm.py create %CLUSTERNAME% ASCII
rem Add servers
clpcfadm.py add srv %SERVER1NAME% 0
clpcfadm.py add srv %SERVER2NAME% 1
rem Add interconnects
clpcfadm.py add device %SERVER1NAME% lan 0 %SERVER1IPADDRESS1%
clpcfadm.py add device %SERVER2NAME% lan 0 %SERVER2IPADDRESS1%
clpcfadm.py add device %SERVER1NAME% lan 1 %SERVER1IPADDRESS2%
clpcfadm.py add device %SERVER2NAME% lan 1 %SERVER2IPADDRESS2%
rem Add MDCs
clpcfadm.py add device %SERVER1NAME% mdc 0 %SERVER1IPADDRESS1%
clpcfadm.py add device %SERVER2NAME% mdc 0 %SERVER2IPADDRESS1%
clpcfadm.py add device %SERVER1NAME% mdc 1 %SERVER1IPADDRESS2%
clpcfadm.py add device %SERVER2NAME% mdc 1 %SERVER2IPADDRESS2%
rem Add kernel mode LAN heartbeat
clpcfadm.py add hb lankhb 0 0
clpcfadm.py add hb lankhb 1 1
rem Add failover group
clpcfadm.py add grp failover %FAILOVERNAME%
rem Add floating IP resource
clpcfadm.py add rsc %FAILOVERNAME% fip fip1
clpcfadm.py mod -t resource/fip@fip1/parameters/ip --set %FLOATINGIP%
rem Add mirror disk resource
clpcfadm.py add rsc %FAILOVERNAME% md md1
rem Add cluster partition and data partition
clpcfadm.py mod -t resource/md@md1/parameters/volumemountpoint --set %DATAPARTITION%
clpcfadm.py mod -t resource/md@md1/server@%SERVER1NAME%/parameters/volumeguid --set %SERVER1DATAPARTITIONGUID% --nocheck
clpcfadm.py mod -t resource/md@md1/server@%SERVER2NAME%/parameters/volumeguid --set %SERVER2DATAPARTITIONGUID% --nocheck
clpcfadm.py mod -t resource/md@md1/parameters/cpvolumemountpoint --set %CLUSTERPARTITION%
clpcfadm.py mod -t resource/md@md1/server@%SERVER1NAME%/parameters/cpvolumeguid --set %SERVER1CLUSTERPARTITIONGUID% --nocheck
clpcfadm.py mod -t resource/md@md1/server@%SERVER2NAME%/parameters/cpvolumeguid --set %SERVER2CLUSTERPARTITIONGUID% --nocheck
rem Add MDCs used by mirror disk resource
clpcfadm.py mod -t resource/md@md1/parameters/netdev@0/device --set 400 --nocheck
clpcfadm.py mod -t resource/md@md1/parameters/netdev@0/mdcname --set mdc1 --nocheck
clpcfadm.py mod -t resource/md@md1/parameters/netdev@0/priority --set 1 --nocheck
clpcfadm.py mod -t resource/md@md1/parameters/netdev@1/device --set 401 --nocheck
clpcfadm.py mod -t resource/md@md1/parameters/netdev@1/mdcname --set mdc2 --nocheck
clpcfadm.py mod -t resource/md@md1/parameters/netdev@1/priority --set 2 --nocheck
rem Add service resource
clpcfadm.py add rsc %FAILOVERNAME% service service1
clpcfadm.py mod -t resource/service@service1/parameters/name --set %TARGETSERVICE%
rem Add floating IP monitor resource
clpcfadm.py add mon fipw fipw1
clpcfadm.py mod -t monitor/fipw@fipw1/target --set fip1
clpcfadm.py mod -t monitor/fipw@fipw1/relation/name --set fip1 --nocheck
clpcfadm.py mod -t monitor/fipw@fipw1/relation/type --set rsc --nocheck
rem Add user mode monitor resource
clpcfadm.py add mon userw userw
clpcfadm.py mod -t monitor/userw@userw/relation/name --set LocalServer --nocheck
clpcfadm.py mod -t monitor/userw@userw/relation/type --set cls --nocheck
rem Add mirror disk monitor resource
clpcfadm.py add mon mdw mdw1
clpcfadm.py mod -t monitor/mdw@mdw1/parameters/object --set md1
clpcfadm.py mod -t monitor/mdw@mdw1/relation/name --set md1 --nocheck
clpcfadm.py mod -t monitor/mdw@mdw1/relation/type --set rsc --nocheck
rem Add service monitor resource
clpcfadm.py add mon servicew servicew1
clpcfadm.py mod -t monitor/servicew@servicew1/target --set service1
clpcfadm.py mod -t monitor/servicew@servicew1/relation/name --set service1 --nocheck
clpcfadm.py mod -t monitor/servicew@servicew1/relation/type --set rsc --nocheck
After executing the above command, the creation of clp.conf is complete. You can download command samples from the following link. If you use the sample, change the "_" in the file name to ".". Additionally, please note that the samples do not guarantee operation.
 ZIP script file
3.3 Applying clp.conf
The procedure to apply the created clp.conf to the servers is as follows.
- 1.
Login to server01 and open the command prompt with administrator privileges.
- 2.
Check the status of the HA cluster with the following command.
clpstat -s
If the HA cluster is not yet built, the following message will be displayed. If the HA cluster has already been configured and server01 and server02 are Online with an existing HA cluster, please stop the HA cluster.
The cluster is not created.
- 3.
After checking the status of the HA cluster, apply the configuration information with the following command.
clpcfctrl --push -x C:\Users\Administrator\
If you see "succeeded" as shown below, the configuration file is successfully applied.
file delivery to server 192.168.0.151 succeeded.
file delivery to server 192.168.0.152 succeeded.
clp.conf delivered.
To apply the changes you made, restart the EXPRESSCLUSTER Node Manager service.
To apply the changes you made, restart the EXPRESSCLUSTER Web Alert service.
To apply the changes you made, restart the EXPRESSCLUSTER Manager service.
To apply the changes you made, restart the EXPRESSCLUSTER Information Base service.
To apply the changes you made, restart the EXPRESSCLUSTER API service.
- 4.
Restart each service displayed after executing the clpcfctrl command above with the following command.
clpcl -r -a --nm
clpcl -r -a --alert
clpcl -r -a --web
clpcl -r -a --ib
clpcl -r -a --api
Confirm that "Command succeeded" is displayed for each.
Start server01 : Command succeeded.
Start server02 : Command succeeded
*For Linux, after restarting each service, please start the mirror agent service with the following command.
clpcl -s -a --md
- 5.Start the EXPRESSCLUSTER service with the following command.
clpcl -s -a
Confirm that "Command succeeded" is displayed.
Start server01 : Command succeeded.
Start server02 : Command succeeded.
- 6.Check the status of the HA cluster with the following command.
clpstat -s
Confirm that the statuses of server01 and server02 are "Online" and the statuses of the resources under them are "Normal". If they are not "Online", wait for a while and then try to execute the command again. If the status is "Error" or "Caution", check if there are any mistakes in the settings values of clp.conf.
======================== CLUSTER STATUS ===========================
Cluster : cluster1
<server>
*server01 ........: Online
lankhb1 : Normal LAN Heartbeat
lankhb2 : Normal LAN Heartbeat
server02 ........: Online
lankhb1 : Normal LAN Heartbeat
lankhb2 : Normal LAN Heartbeat
<group>
failover1 .......: Online
current : server01
fip1 : Online
md1 : Online
service1 : Online
<monitor>
fipw1 : Normal
mdw1 : Normal
servicew1 : Normal
userw : Normal
=================================================================
4. Checking the Operation
We will confirm whether the HA cluster is properly constructed by following these steps:
- 1.
Launch a web browser on the Client and access the following URL to display the Cluster WebUI.
http://<IP address of server01>:29003
- 2.
From the status screen of the Cluster WebUI, confirm that the failover group (failover1) is running on server01 and that [Server], [Group], and [Monitor] are all operating normally.
- 3.
Log in to server01 and put the HTML file in the data partition (F:).
- 4.
Start IIS and add the HTML file in the data partition (F:) as a website.
- 5.
From the web browser on the Client, access the IP address of the floating IP resource (fip1) and confirm that the HTML file from server01 is displayed as a web page.
http://<IP address of floating IP resource (fip1)>
- 6.
From the Cluster WebUI, manually move the failover group (failover1) from server01 to server02.
- 7.
From the Cluster WebUI, confirm that the failover group (failover1) has been moved to server02, and that [Server], [Group], and [Monitor] are started normally.
- 8.
Log in to server02, check the HTML file is stored in the data partition (F:), and modify the contents of the HTML file.
- 9.
Start IIS and add the HTML file in the data partition (F:) as a website.
- 10.
From the web browser on the Client, access the IP address of the floating IP resource (fip1) and confirm that the HTML file from server02 is displayed as a web page.
http://<IP address of floating IP resource (fip1)>
Based on the above operation confirmation, it can be confirmed that it is possible to connect to the HA cluster via the floating IP address before and after failover, and that the disk is mirrored.
Conclusion
We tried building an HA cluster in an on-premises environment using the clpcfadm.py command to create the clp.conf for EXPRESSCLUSTER. By applying the commands introduced in this article, you can automate the construction of HA clusters using configuration management tools like Ansible, leading to the realization of IaC.
If you consider introducing the configuration described in this article, you can perform a validation with the trial module of EXPRESSCLUSTER. Please do not hesitate to contact us if you have any questions.