
Global Site
Displaying present location in the site.
December 6th, 2024
Machine translation is used partially for this article. See the Japanese version for the original article.
Introduction
In EXPRESSCLUSTER X 4.2 and later, in addition to the traditional GUI and CUI, a RESTful API is provided. By using the RESTful API, it becomes possible to easily perform operations such as getting the state of the EXPRESSCLUSTER HA cluster from other applications, and starting, stopping, and failover.
As an introduction to using the RESTful API, this article explains the steps to get and use a sample application as an example of an advanced use case involving a RESTful API. For the steps to enable the RESTful API of EXPRESSCLUSTER and simple verification methods, please refer to  “Part 1”.
Contents
1. Sample Application Using RESTful API
The RESTful API can be utilized from the command line, but it truly shines when creating an application tailored to your specific needs. By using the RESTful API of EXPRESSCLUSTER from your application, you can manage the operations of EXPRESSCLUSTER with a layout and user interface of your preference.
1.1 About StatPanel
To actually experiment with the RESTful API of EXPRESSCLUSTER, We created a Node.js-based web application with a custom user interface. This sample application is available on GitHub as StatPanel.
- * StatPanel is a sample application created as an example of using RESTful API, and its operation is not guaranteed.
[Reference]
CLUSTERPRO/REST-API_App repository
CLUSTERPRO/REST-API_App repositoryAs a feature, it is a simple one that displays the status of the HA cluster in real-time on a web browser, but it allows for some cluster operations to be executed as well.
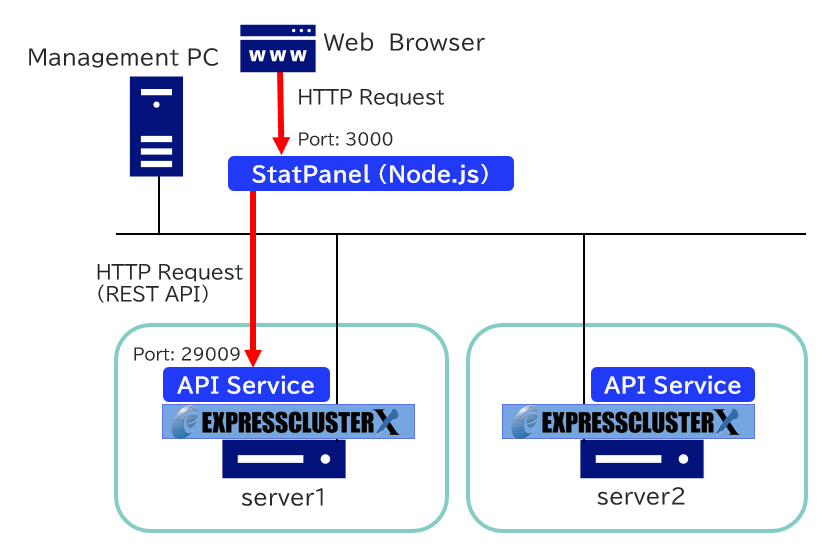
StatPanel starts on the management PC. After starting, it connects to the specified API services (servers running EXPRESSCLUSTER) and collects cluster information via RESTful API. Additionally, it functions as a web server on the management PC and displays the collected cluster information in real-time to a web browser connected to port number 3000 (modifiable in settings).
1.2 Installing Node.js
To run StatPanel, Node.js is required, so make sure to install Node.js on the management PC as well. The management PC can use either Windows or Linux operating systems. Since StatPanel uses Node.js's Fetch API, Node.js version 18 or later is required. Node.js installed via package managers like dnf or apt on Linux might be outdated and may not work properly, depending on the OS. In such cases, install Node.js version 18 or later using nvm or the tar package. For this setup, we will use node-v20.10.0.
[Reference]
Node.js — Download Node.js
Check out all available Node.js download options (Previous version)
Node.js — Download Node.jsCheck out all available Node.js download options (Previous version)We will verify that the RESTful API of EXPRESSCLUSTER can be called by executing the script from a machine where Node.js is installed.
Save the following code as test.js to get server information using Node.js.
// Skip certificate signature verification when connecting to
// the API service on the EXPRESSCLUSTER side.
// If you want to verify the signature, comment it out.
process.env.NODE_TLS_REJECT_UNAUTHORIZED = '0';
// Create a header for Basic Authentication.
const authorizationBasic = 'Basic ' + btoa(‘<user>:<password>');
// Make a request
const request = {
method: 'GET',
headers: {
Authorization: authorizationBasic,
},
};
// Send an HTTP request
// In the case of non-SSL communication, change to 'http://...'.
fetch(
'https://<server>:<port>/api/v1/servers',
request,
).then(async (response) => {
const data = (await response.json());
console.log(`status: ${response.status}, json: ${JSON.stringify(data, null, 4)}`);
});
Specify the user, password, server name (or IP address), and port number (default value is 29009) where the API service is running for <user>, <password>, <server>, and <port> respectively. If connecting to the API service without SSL, change 'https' to 'http' in the fetch() statement.
Execute with the following command.
> node test.js
An example of execution is as follows.
status: 200, json: {
"result": {
"code": 0,
"message": ""
},
"servers": [
{
"name": "server1",
"status": "Online"
},
{
"name": "server2",
"status": "Online"
}
]
}
"result": {
"code": 0,
"message": ""
},
"servers": [
{
"name": "server1",
"status": "Online"
},
{
"name": "server2",
"status": "Online"
}
]
}
As long as there are no errors during the execution of Node.js and the status is 200, there are no issues. If you encounter errors such as "TypeError: fetch failed," please check the settings of EXPRESSCLUSTER, test.js, and Firewall.
Additionally, the following message is a warning outputted due to the setting that skips self-signed certificate verification, so you can safely ignore it.
(node:6196) Warning: Setting the NODE_TLS_REJECT_UNAUTHORIZED environment variable to '0' makes TLS connections and HTTPS requests insecure by disabling certificate verification.
(Use `node --trace-warnings ...` to show where the warning was created)
(Use `node --trace-warnings ...` to show where the warning was created)
1.3 Getting and Building StatPanel
Get the source files for StatPanel from the GitHub repository. Extract the files to any directory on a Windows or Linux machine with Node.js installed.
a) When git command is available
git clone https://github.com/CLUSTERPRO/REST-API_App
b) When downloading a zip file
download fromhttps://github.com/CLUSTERPRO/REST-API_App/archive/refs/heads/master.zip
git clone https://github.com/CLUSTERPRO/REST-API_App
b) When downloading a zip file
download from
https://github.com/CLUSTERPRO/REST-API_App/archive/refs/heads/master.zipThe source code of StatPanel is written in TypeScript, so we build it to make it a file executable by Node.js.
cd statpanel
npm install
npm run build
npm install
npm run build
1.4 Running StatPanel
Before running StatPanel, add the required information to the configuration file (config.json).
An example of the configuration is as follows.
■ Example of Settings for HTTPS Connection
{
"listen": {
"host": "localhost",
"port": 3000,
"ssl": true,
"ssl_cert_file": "./statpanel_server.crt",
"ssl_key_file": "./statpanel_server.key"
},
"servers": [
{
"clpserver": "https://server1:29009",
"user": "user01",
"passwd": "password01"
},
{
"clpserver": "https://server3:29009",
"user": "user99",
"passwd": "password99"
}
],
"skipCertificateCheck": true
}
■ Example of Settings for HTTP Connection.
{
"listen": {
"host": "localhost",
"port": 3000,
"ssl": false
},
"servers": [
:
(omitted)
:
]
}
"listen": {
"host": "localhost",
"port": 3000,
"ssl": false
},
"servers": [
:
(omitted)
:
]
}
"listen" sets the hostname or IP address, port number, and SSL-related settings for which the StatPanel waits as a web server.
For "ssl", specify false when using HTTP. When using HTTPS, set it to true and specify the server certificate in "ssl_cert_file" and the private key path in "ssl_key_file". For instructions on creating server certificates and private keys, please refer to "How to Connect to Cluster WebUI with HTTPS Using OpenSSL 3.0/3.1(Windows/Linux)".
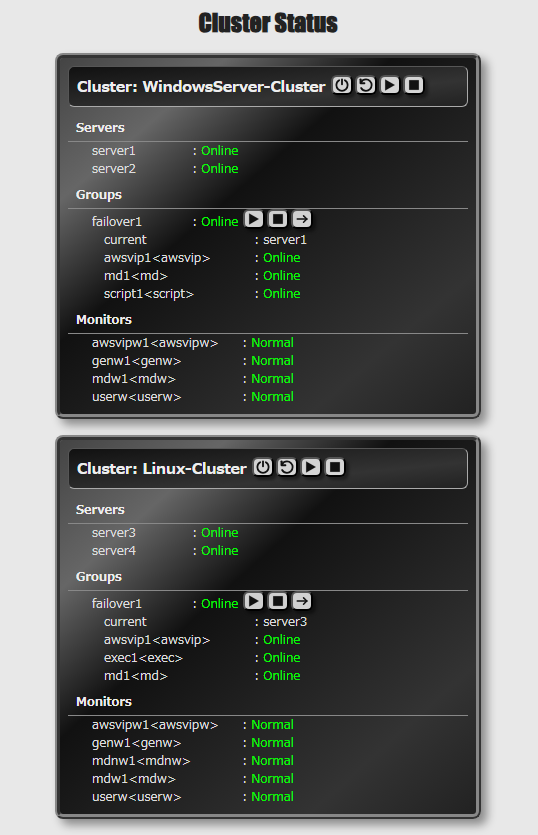
For "servers", specify the information of the API services monitored by StatPanel (servers that have RESTful API enabled running EXPRESSCLUSTER). By listing API service information in "servers", it is also possible to display information on multiple clusters.
If the API service is operating with a self-signed certificate, it will cause signature verification errors during HTTPS connections. To disable signature verification, set "skipCertificateCheck" to true.
Execute StatPanel.
npm start
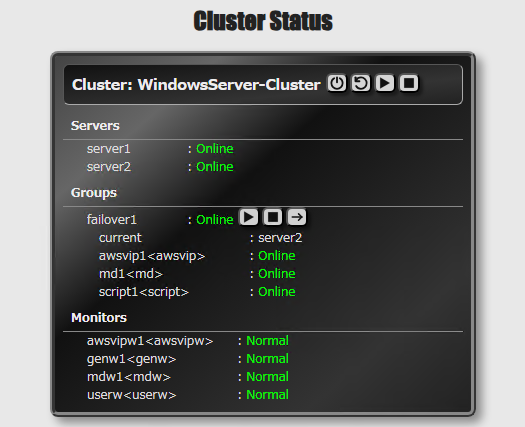
In this setup, StatPanel will operate as a web server listening on port number 3000. Therefore, launch a web browser and access https://localhost:3000 (for HTTP connection, http://localhost:3000). If there are no issues with the configuration, a screen like the following image will be displayed.
2. Checking the Operation
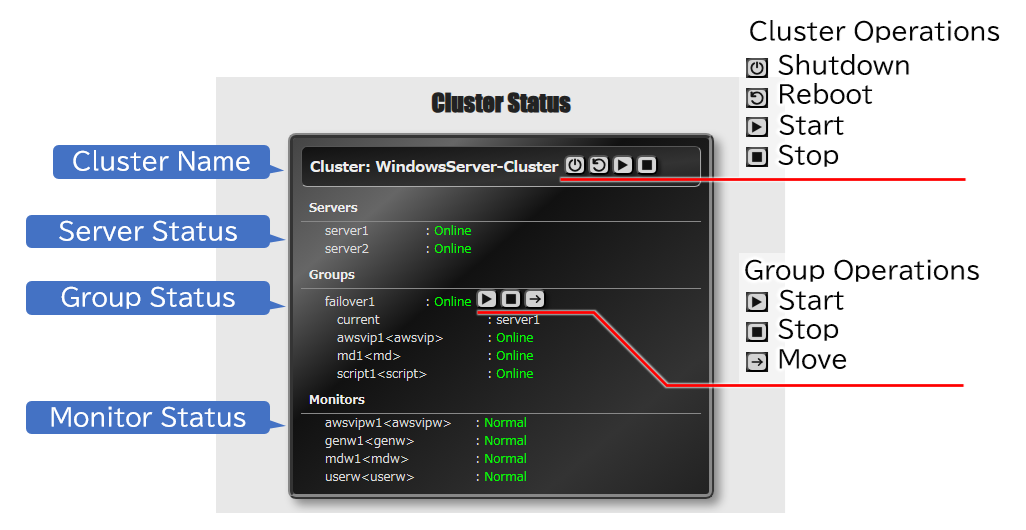
You can try managing clusters and groups on the StatPanel screen. The possible operations from this screen are as follows.
As an example of checking the operation, we will perform a group move of failover1.
- 1.Check that the cluster is in a normal state and the failover1 group is running on server1 (server1 is displayed as current) and is "Online".
- 2.Click on the "Move" icon in the "Group Operations" section.
- 3.The status of the failover1 group and the group resources within it transition from "Offline Pending" blinking status to "Online Pending" blinking status, and finally to "Online".
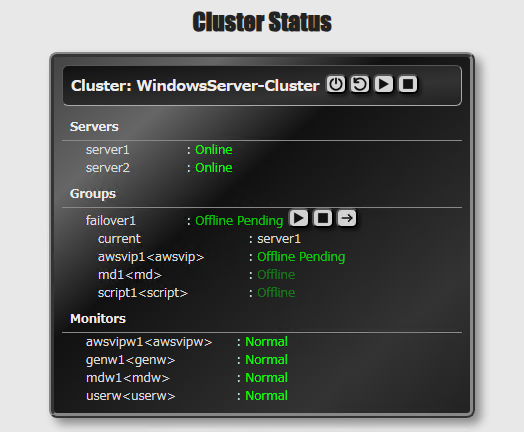
- 4.Check that the failover1 group is running on server2 (server2 is displayed as current) and is "Online" (the group movement has been completed).
Conclusion
This time, we introduced StatPanel as a sample application utilizing the RESTful API of EXPRESSCLUSTER. By using the RESTful API in your preferred language, it is possible to monitor and control the cluster status in ways other than the Cluster WebUI or EXPRESSCLUSTER commands. This can be useful in scenarios such as the following.
- Filter and arrange the information according to the operation management target for better visibility
- Displaying and monitoring multiple target clusters on a single screen
- Operator-specific screen that permits only specific operations for clusters and groups
- Application specialized in operation on smartphone screens
- Integration with other processes and services using EXPRESSCLUSTER
- Displaying the status of each server as one of the operational information items within the provided services
Various other use cases are also expected beyond the above examples. Please make use of it if you find it useful.
If you consider introducing the configuration described in this article, you can perform a validation with the trial module of EXPRESSCLUSTER. Please do not hesitate to contact us if you have any questions.