
Global Site
Displaying present location in the site.
March 15th, 2024
Machine translation is used partially for this article. See the Japanese version for the original article.
Introduction
In EXPRESSCLUSTER X, you can select HTTPS connection as communication method of Cluster WebUI which is the management GUI.
OpenSSL, which is required when using an HTTPS communication, has versions 1.1.1, 3.0, 3.1, etc., but version 1.1.1 is no longer supported on September 11, 2023.
Currently, EXPRESSCLUSTER X supports OpenSSL 3.0/3.1 in the following EXPRESSCLUSTER X versions by applying the update.
The update module can be obtained by logging in to the  NEC Support Portal.
* User ID and password are required.
- ・Standard update of EXPRESSCLUSTER X 5.1(Internal Ver. 5.1.2-1/13.12)
- ・Additional update for EXPRESSCLUSTER X 4.3(Internal Ver. 4.3.0-1 to 4.3.4-1/12.30 to 12.34)
- ・Additional update for EXPRESSCLUSTER X 3.3(Internal Ver. 3.3.5-1/11.35)
In OpenSSL 3.0/3.1, the file names of libraries are different from OpenSSL 1.1.1 and earlier, so some of the settings are different from previous articles for
Windows and Linux.This time, we will introduce how to set up an HTTPS communication to the Cluster WebUI using OpenSSL 3.0/3.1 in the EXPRESSCLUSTER X 5.1(Internal Ver. 5.1.2-1/13.12) environment.
Contents
- 1. Installing OpenSSL
- 1.1 Installing OpenSSL(Windows)
- 1.2 Installing OpenSSL(Linux)
- 2. Create and Placement of a Private Key and a Server Certificate
- 2.1 Create a Location to Store a Private Key and a Server Certificate
- 2.2 Create a Private Key
- 2.3 Create a Certificate Signing Request(CSR)
- 2.4 Create a Server Certificate(CRT)
- 2.5 Distribute a Private Key and a Server Certificate to Cluster Configuration Servers
- 3. EXPRESSCLUSTER Settings
- 4. Checking the Operation
1. Installing OpenSSL
Install OpenSSL to use HTTPS communication in the Cluster WebUI.
1.1 Installing OpenSSL(Windows)
We need to download and install OpenSSL separately in the Windows environment. The procedure introduced this time is for installing OpenSSL 3.1, but OpenSSL 3.0 can also be installed by following the same procedure.
Install OpenSSL on all servers constituting an HA cluster.
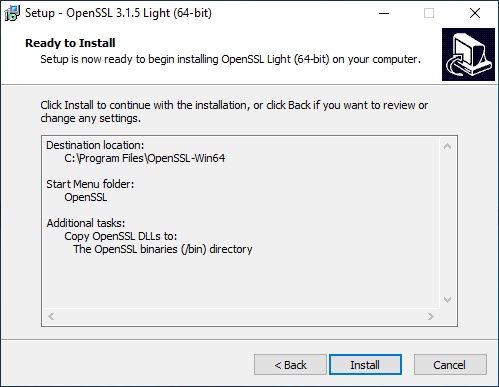
This time, we will download the file "Win64 OpenSSL v3.1.X Light"(X is a number) from the following site, place it on the server, and install it. "Microsoft Visual C++ 2019 Redistributable(64-bit)" is required to install Win64 OpenSSL, so if you are asked to install it, please follow the procedure provided to install it.
After running the OpenSSL installer, follow the installation wizard. In this procedure, the "Destination location" is not changed to the default setting, and the DLL is placed under "bin".
In addition to the sites introduced above, OpenSSL binaries for Windows are published on the following OpenSSLWiki. The operation from the EXPRESSCLUSTER perspective when using each site's OpenSSL binaries has not been confirmed, but we will introduce them as reference information.
[Reference]
Binaries - OpenSSLWiki
Binaries - OpenSSLWiki 1.2 Installing OpenSSL(Linux)
We can use OpenSSL provided by the distribution in the Linux environment. The procedure introduced this time use Red Hat Enterprise Linux 9.2 as the OS. Red Hat Enterprise Linux 9.2 includes OpenSSL 3.0 during minimal installation.
2. Create and Placement of a Private Key and a Server Certificate
Create and place a private key and a server certificate to be used for HTTPS communication.
This time, the server certificate is created as a self-signed certificate.
- * The options specified in the command in this procedure are reference values, and when actually creating various files, please change the options according to your requirements.
2.1 Create a Location to Store a Private Key and a Server Certificate
Create a private key and a server certificate on the server where OpenSSL is installed, and create a location to store them.
For Windows
This time, we will create "C:\ssl". Create a folder from a command prompt, etc., and move to the folder.
Also, for future preparations, temporarily set the OpenSSL installation folder in the path environment variable.
> mkdir C:\ssl
> cd C:\ssl
> set Path=%Path%;C:\Program Files\OpenSSL-Win64\bin
For Linux
This time, create "/tmp/ssl" as a temporary directory for creating files, and move to the directory.
# mkdir /tmp/ssl
# cd /tmp/ssl
2.2 Create a Private Key
Use OpenSSL command to create a private key.
This time, create a file with the name "clp_server.key".
For Windows
> openssl.exe genrsa -out clp_server.key 2048
For Linux
# openssl genrsa -out clp_server.key 2048
2.3 Create a Certificate Signing Request(CSR)
Use OpenSSL command to create a certificate signing request(CRS).
This time, create the file name as "clp_server.csr". When run the command bellow, we will enter information such as "Country Name" interactively, so please set it according to your environment.
For Windows
> openssl.exe req -new -key clp_server.key -out clp_server.csr
For Linux
# openssl req -new -key clp_server.key -out clp_server.csr
2.4 Create a Server Certificate(CRT)
Use OpenSSL command to create a server certificate(CRT).
This time, create the file name as "clp_server.crt". Also, create a certificate validity period of 3650 days.
For Windows
> openssl.exe x509 -req -in clp_server.csr -signkey clp_server.key -out clp_server.crt -days 3650
For Linux
# openssl x509 -req -in clp_server.csr -signkey clp_server.key -out clp_server.crt -days 3650
2.5 Distribute a Private Key and a Server Certificate to Cluster Configuration Servers
Distribute the private key and the server certificate(CRT) that we created to all servers constituting an HA cluster.
At this time, store the private key and the server certificate so that they are the same path on all servers. This time, the private key and the server certificate are stored under the following directory.
For Windows
- Private key: C:\ssl\clp_server.key
- Server Certificate: C:\ssl\clp_server.crt
For Linux
- Private key: /etc/pki/tls/private/clp_server.key
- Server Certificate: /etc/pki/tls/certs/clp_server.crt
3. EXPRESSCLUSTER Settings
Configure settings to use HTTPS communication from Cluster WebUI.
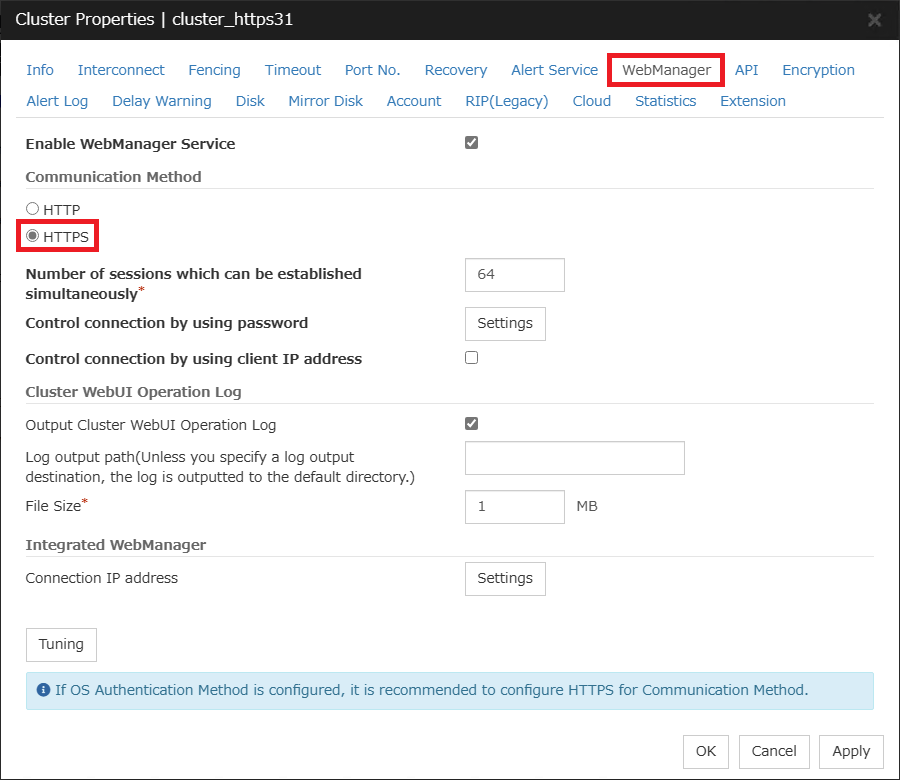
Select "Cluster Properties" in the "Config mode" of Cluster WebUI.

Select the "WebManager" tab of "Cluster Properties" and select "HTTPS" as the communication method.
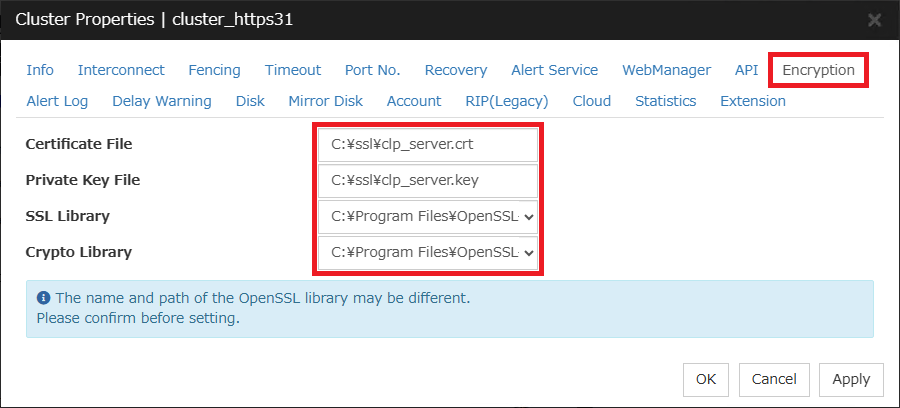
Select the "Encryption" tab of "Cluster Properties" and set the path such as a certificate file.
For Windows
- Certificate File: C:\ssl\clp_server.crt
- Private Key File: C:\ssl\clp_server.key
- SSL Library: C:\Program Files\OpenSSL-Win64\libssl-3-x64.dll
- Crypto Library: C:\Program Files\OpenSSL-Win64\libcrypto-3-x64.dll
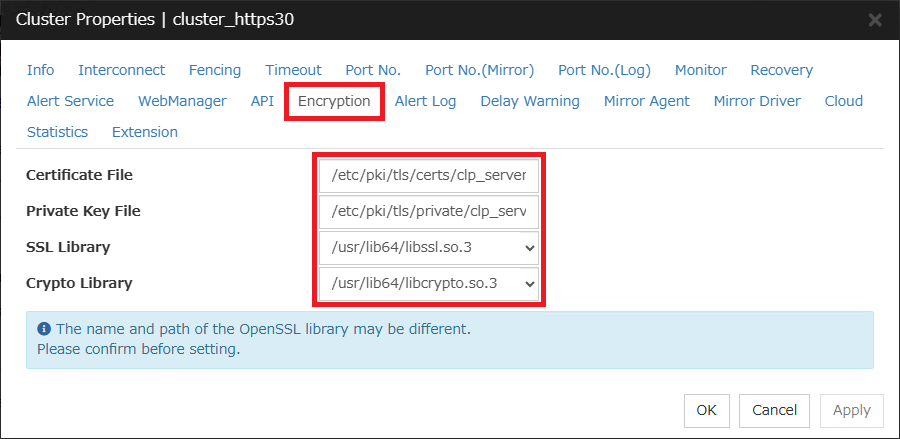
For Linux
- Certificate File: /etc/pki/tls/certs/clp_server.crt
- Private Key File: /etc/pki/tls/private/clp_server.key
- SSL Library: /usr/lib64/libssl.so.3
- Crypto Library: /usr/lib64/libcrypto.so.3
After the setting is completed, apply the configuration file to the HA cluster.
The communication protocol to Cluster WebUI will be changed from HTTP to HTTPS in this setting change, you will be asked to perform actions such as "Restart WebManager service" when the settings are reflected, so select OK.
4. Checking the Operation
After "Restart WebManager service" is completed, we will need to connect with HTTPS because we cannot connect with HTTP. An error will be displayed when the display is updated, so please change the connection URL to "https://<server IP address>:29003" and connecting again. If we can display the Cluster WebUI, the setting change is completed.
- * This setting uses a self-signed certificate is used as the server certificate, a warning about the certificate will be displayed when connecting. This is intended, so please proceed with the connection.
If HTTPS communication is not available due to a flaw in file placement or settings, the WebManager service will start with HTTP connection enabled. In this case, restart the WebManager service after replacing the files, or modify the Cluster WebUI settings and reflect the new settings.
Conclusion
This time, we introduced how to set up an HTTPS communication to the Cluster WebUI using OpenSSL 3.0/3.1. If you want to encrypt the connection to Cluster WebUI, please refer to this article and enable HTTPS settings.
If you consider introducing the configuration described in this article, you can perform a validation with the trial module of EXPRESSCLUSTER. Please do not hesitate to contact us if you have any questions.