Global Site
Displaying present location in the site.
January 13th, 2026
Machine translation is used partially for this article. See the Japanese version for the original article.
Introduction
We tried building an HA cluster on Proxmox Virtual Environment (hereinafter called "Proxmox VE"). Proxmox VE is an open-source, free-to-use server virtualization platform that, like VMware ESXi and Hyper-V, allows you to easily create virtual machines, disks, and NICs via the GUI.
We created two virtual machines on Proxmox VE, installed EXPRESSCLUSTER X, and built a mirror disk type HA cluster. In this article, we introduce the procedure to build this HA cluster.
Contents
1. What is Proxmox Virtual Environment
Proxmox VE is an open-source server virtualization platform that supports KVM (full virtualization) and LXC (containers). It is basically free-to-use, and paid commercial support is available.
Like VMware ESXi and Hyper-V, you can create, run, and manage virtual machines (hereinafter called "VM") on physical servers. Operations are provided via the GUI accessible from a web browser, making VM creation and deletion easy. It supports various storage systems such as ZFS, Ceph, NFS, iSCSI, and LVM, and includes features such as VM backup/restore and snapshots. You can also operate Proxmox VE via the CLI and REST API to retrieve VM status and to stop VMs.
[Reference] Features - Proxmox Virtual Environment
2. HA Cluster Configuration
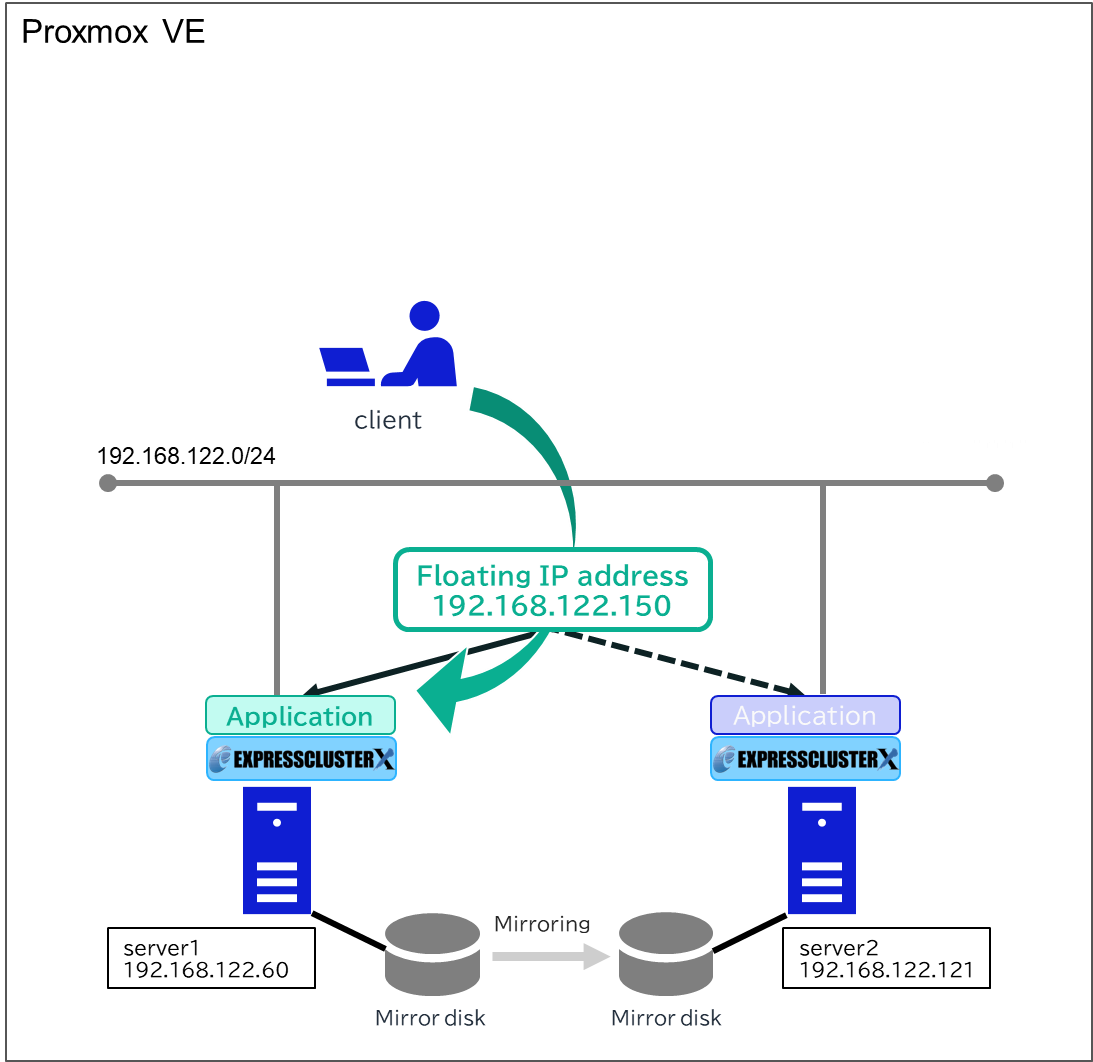
We will build a mirror disk type HA cluster using a floating IP resource on Proxmox VE. The configuration diagram for the HA cluster to be built is as follows.
3. HA Cluster Building Procedure
3.1 Creating VMs
Create VMs for the client, server1, and server2 on Proxmox VE. The OS was installed using ISO images saved in Proxmox VE’s local storage. When actually setting up the HA cluster, please use an OS version supported by EXPRESSCLUSTER X. For the Linux version, system requirements also depend on the kernel module version, so please check not only the OS version but also the kernel module version.
In this article, as an example, we created VMs with the following settings. If you install Windows using VirtIO drivers, please also refer to the "Windows VirtIO Drivers" link below.
■OS
-
Windows Server 2022
-
Red Hat Enterprise Linux 9.4
[Reference]System Requirements - EXPRESSCLUSTER X for WindowsSystem Requirements - EXPRESSCLUSTER X for Linux
[Reference]
Windows VirtIO Drivershttps://pve.proxmox.com/wiki/Windows_VirtIO_Drivers
■Network and Hardware
-
client
- IP address: 192.168.122.105 -
server1
- IP address: 192.168.122.60
- Mirror disk hard drive: 5 GB -
server2
- IP address: 192.168.122.121
- Mirror disk hard drive: 5 GB
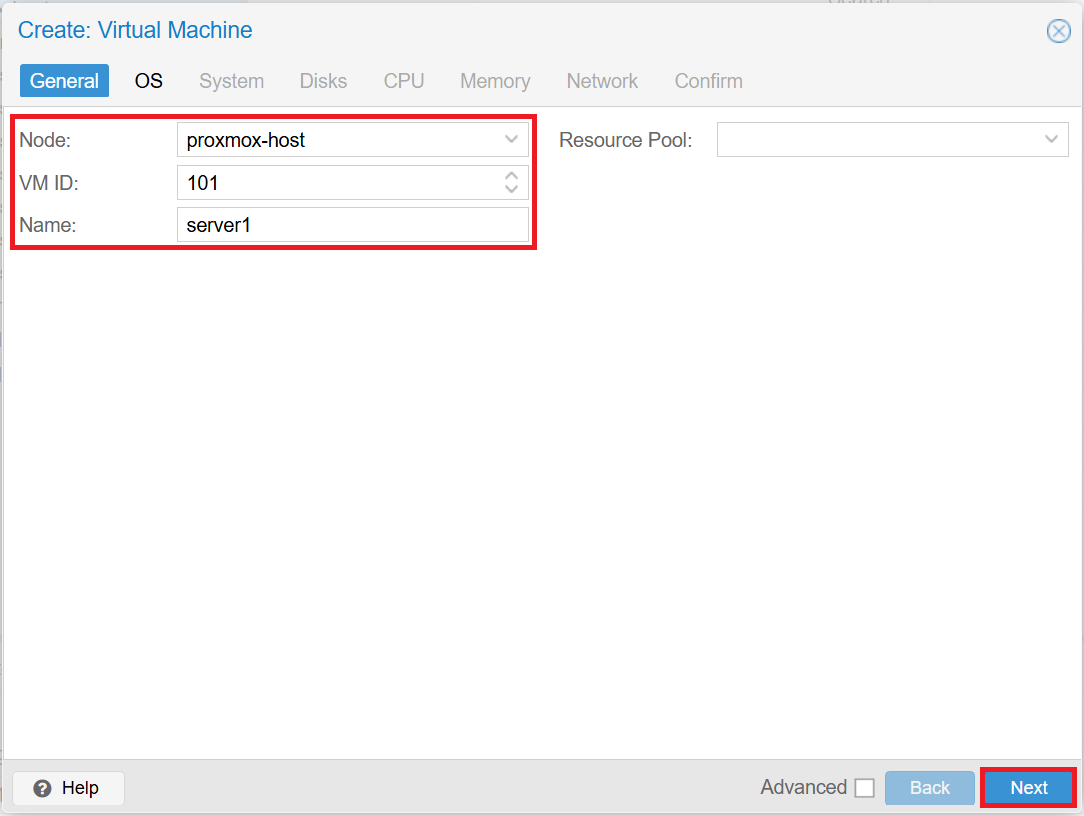
To create VMs, access the Proxmox web interface via a web browser (https://<the IP address configured during Proxmox installation>:8006) and click [Create VM].

■General tab
VM IDs are assigned automatically. After entering the fields, click [Next].
-
Node: proxmox-host
-
VM ID: 101 / 102 / 103
-
Name: server1 / server2 / client
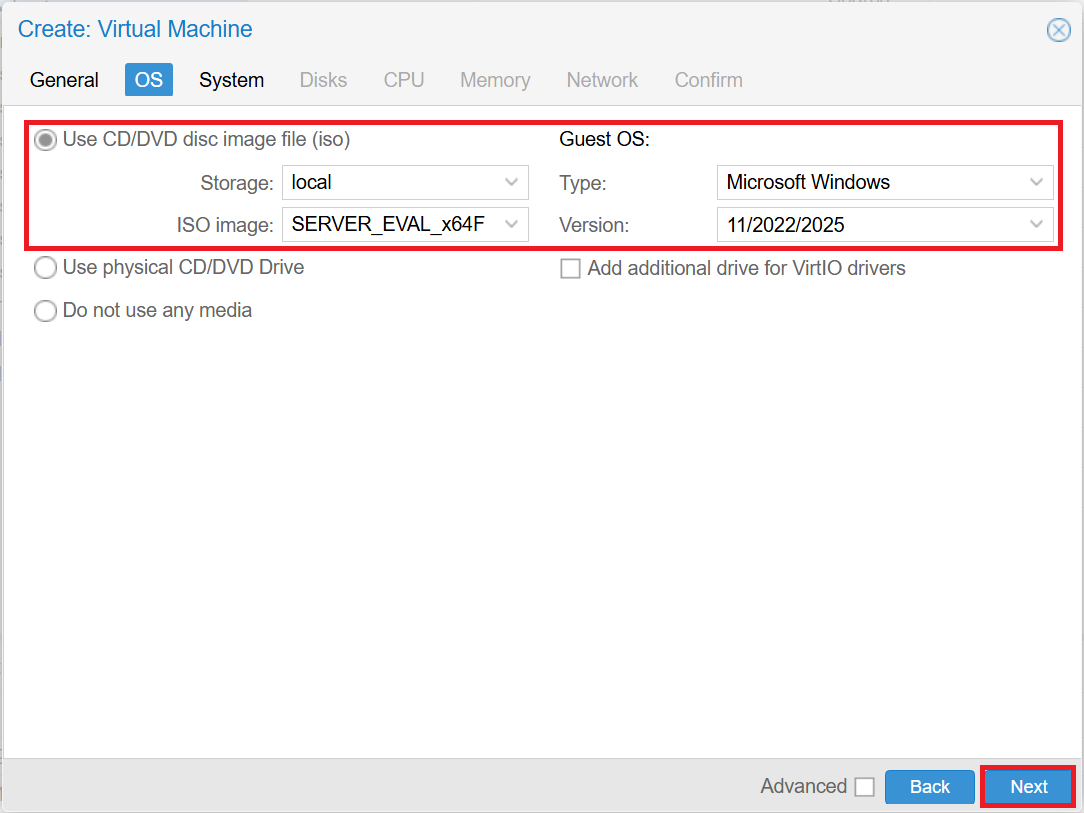
■OS tab
After entering the fields, click [Next].
- *If you install Windows using VirtIO drivers, click [Add additional drive for VirtIO drivers] and select the ISO image obtained from "Windows VirtIO Drivers".
-
Use CD/DVD disc image file (iso)
- Storage: local
- ISO image: Specify the ISO image -
Guest OS
- For Windows
■Type: Microsoft Windows
■Version: 11/2022/2025
- For Linux
■Type: Linux
■Version: 6.x - 2.6 kernel
Windows
Linux

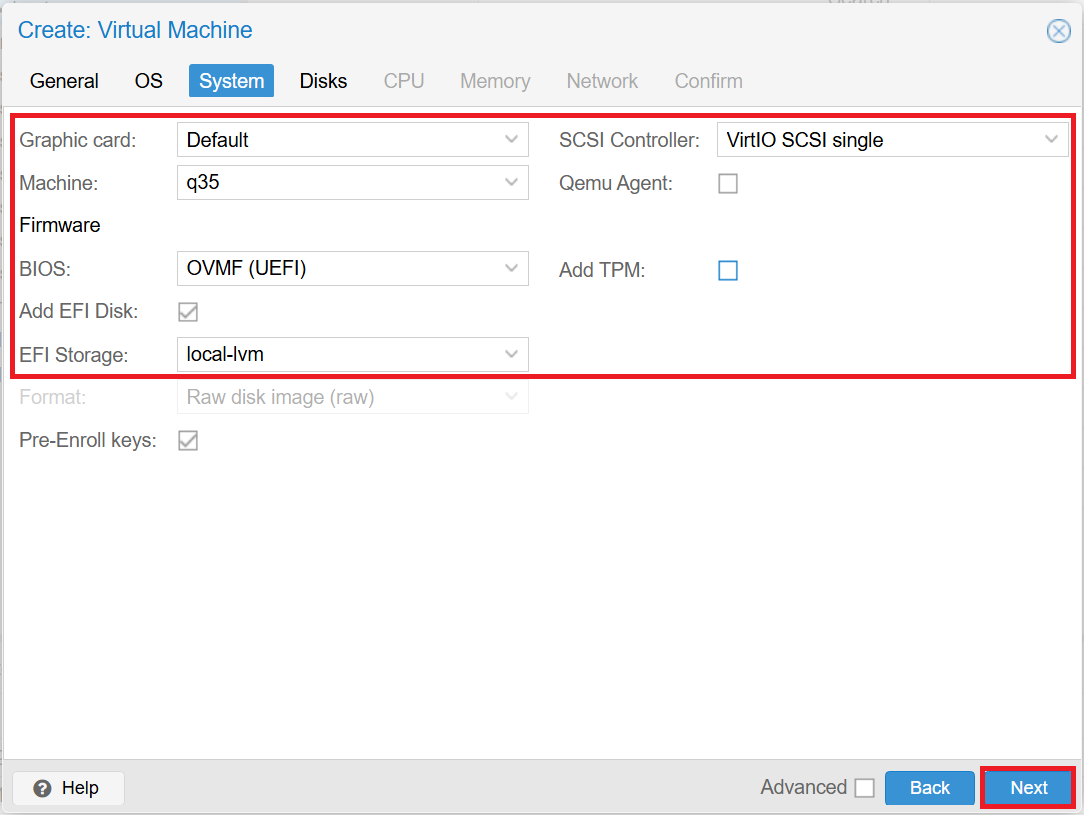
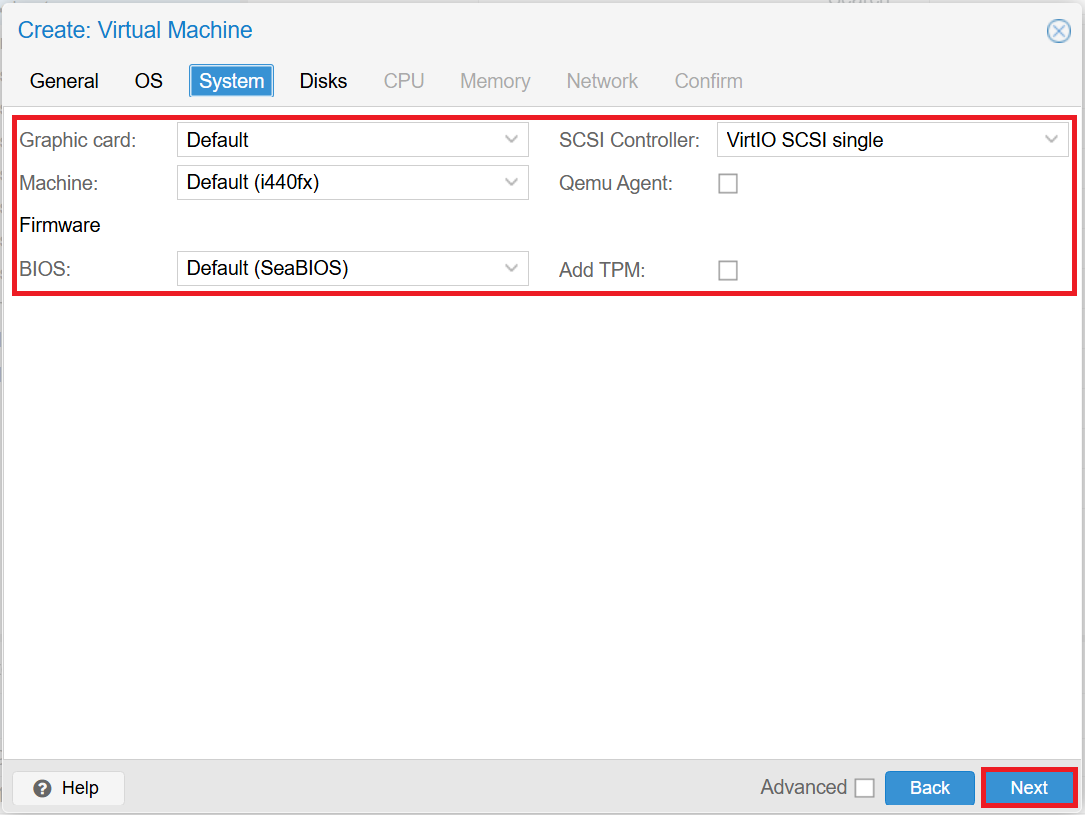
■System tab
After entering the fields, click [Next].
-
For Windows
- Graphic card: Default
- Machine: q35
- BIOS: OVMF (UEFI)
- EFI Storage: local-lvm
- SCSI Controller: VirtIO SCSI single
- Add TPM: unchecked -
For Linux
- Graphic card: Default
- Machine: Default (i440fx)
- BIOS: Default (SeaBIOS)
- SCSI Controller: VirtIO SCSI single
- Add TPM: unchecked
Windows
Linux
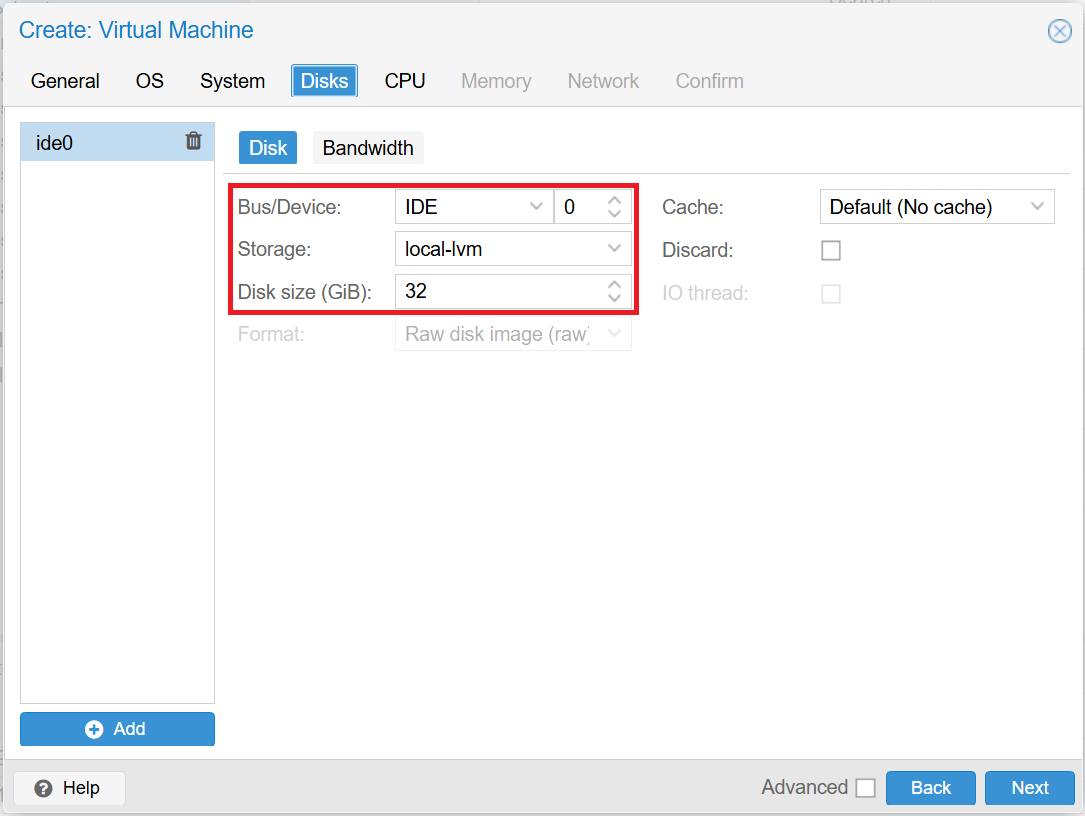
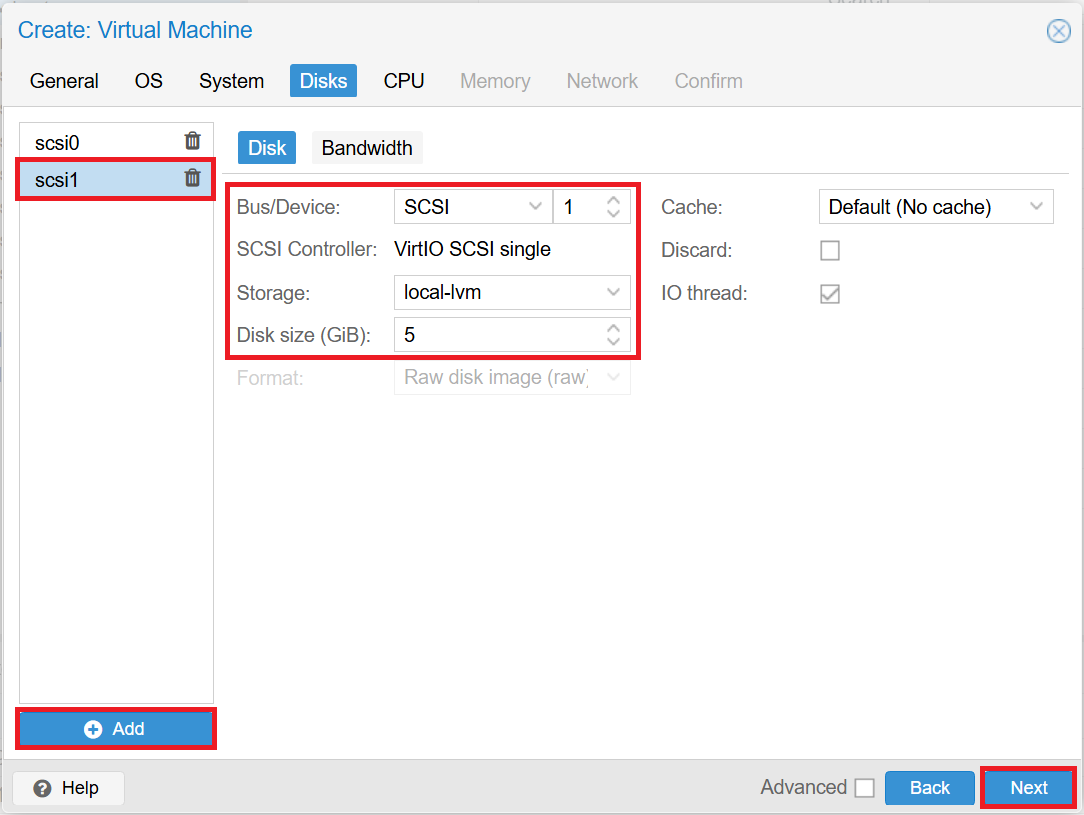
■Disks tab
Click [Add] to add a disk for the mirror disk. After entering the fields, click [Next].
- *The client does not need a disk for a mirror disk.
- *If VirtIO drivers are selected for Windows, "SCSI" will be selected under [Bus/Device].
-
For Windows
- ide0
■Storage: local-lvm
■Disk size (GiB): 32 (system drive)
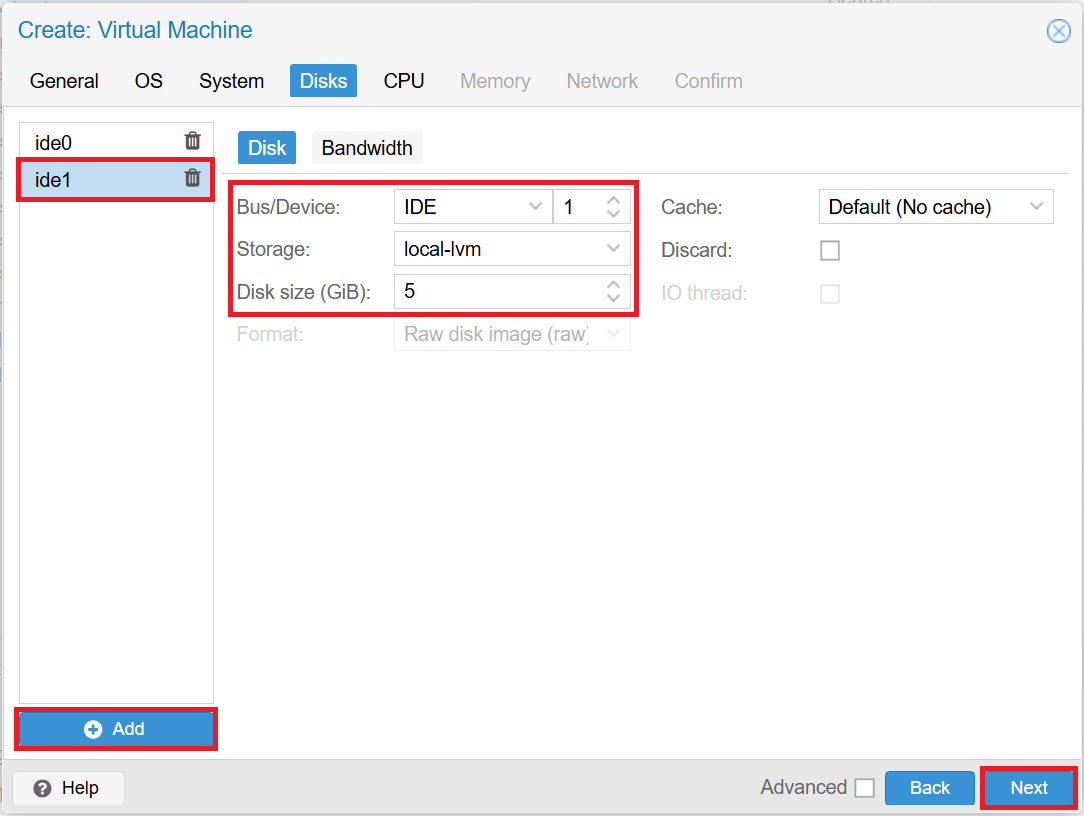
- ide1
■Storage: local-lvm
■Disk size (GiB): 5 (mirror disk) -
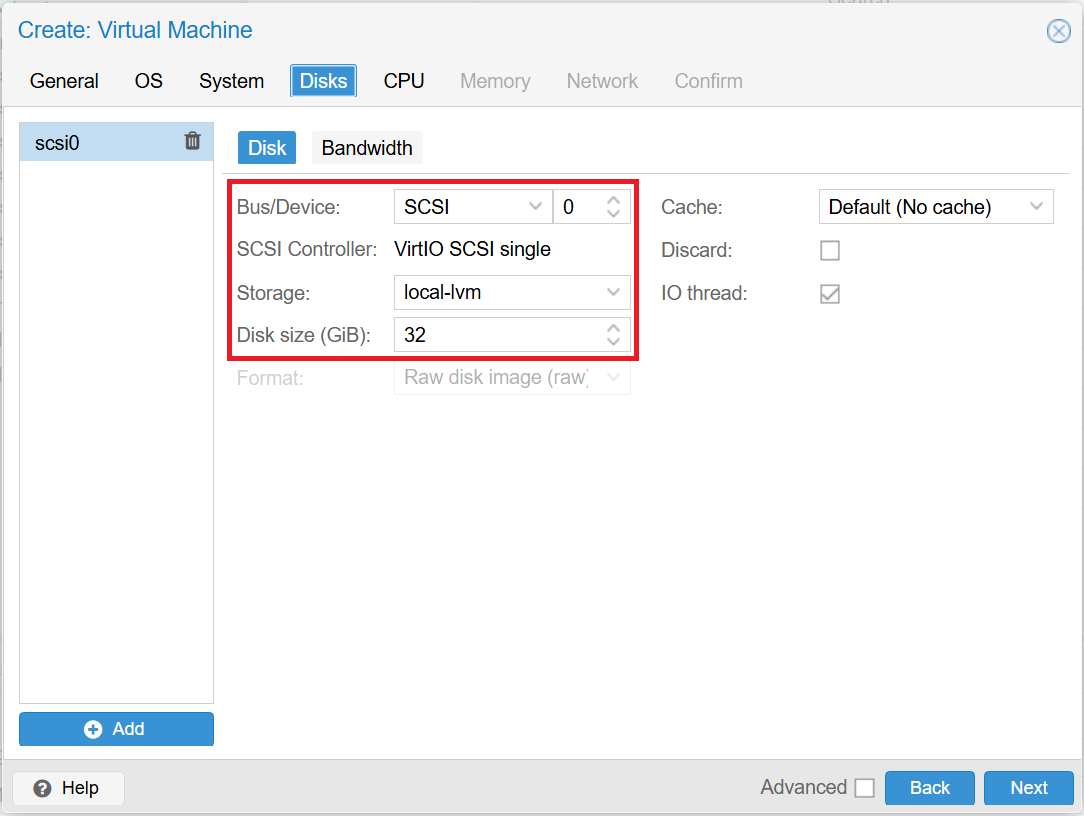
For Linux
- scsi0
■Storage: local-lvm
■Disk size (GiB): 32 (system drive)
- scsi1
■Storage: local-lvm
■Disk size (GiB): 5 (mirror disk)
Windows
Linux
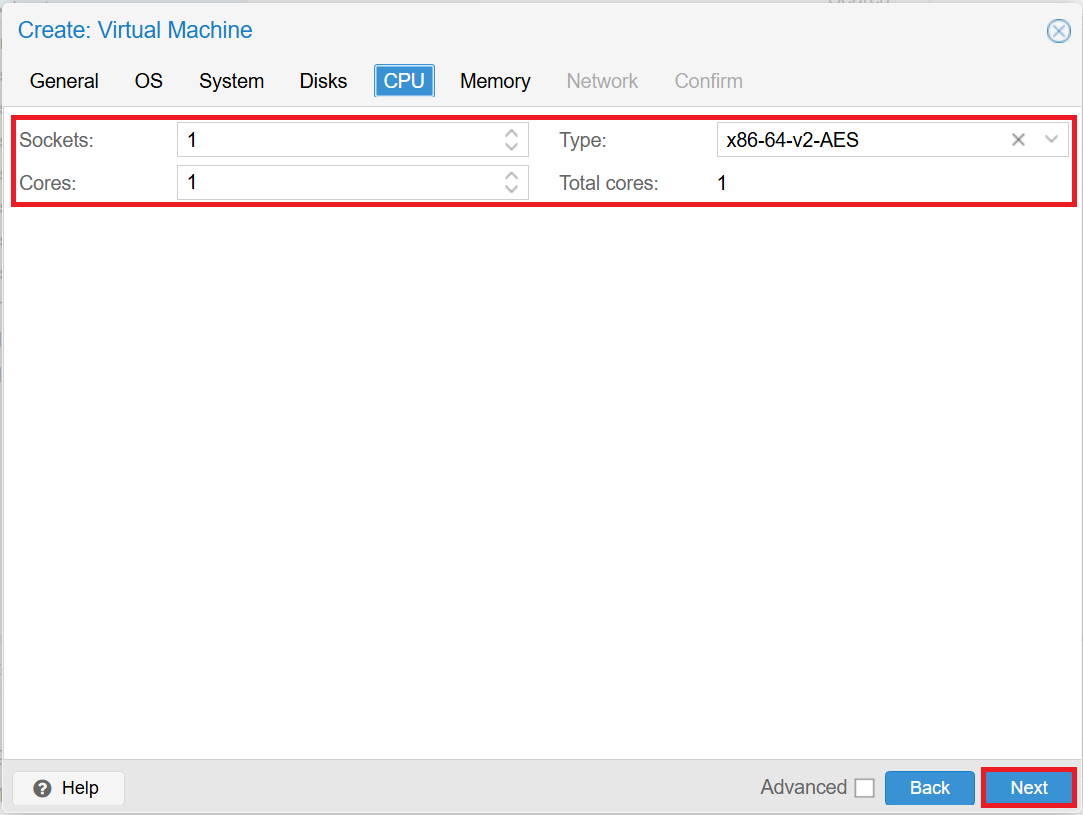
■CPU tab
After entering the fields, click [Next].
-
Sockets: 1
-
Cores: 1
-
Type: x86-64-v2-AES
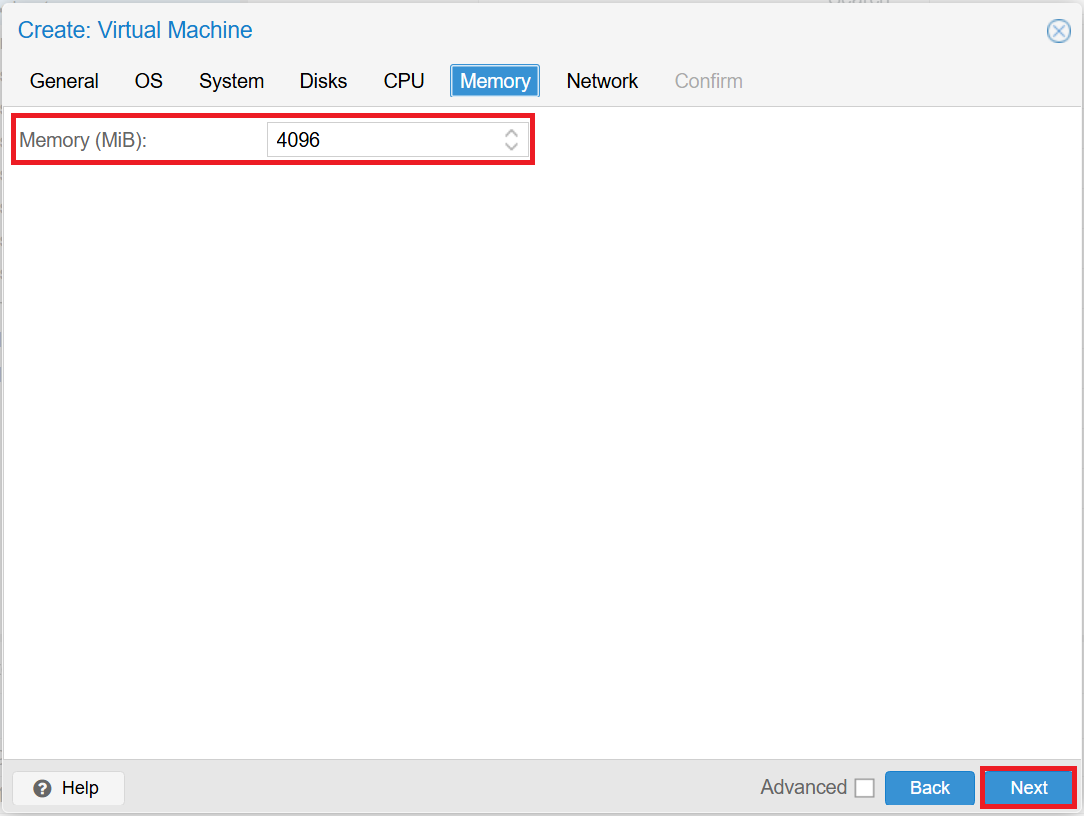
■Memory tab
After entering the field, click [Next].
-
Memory (MiB): specify any size
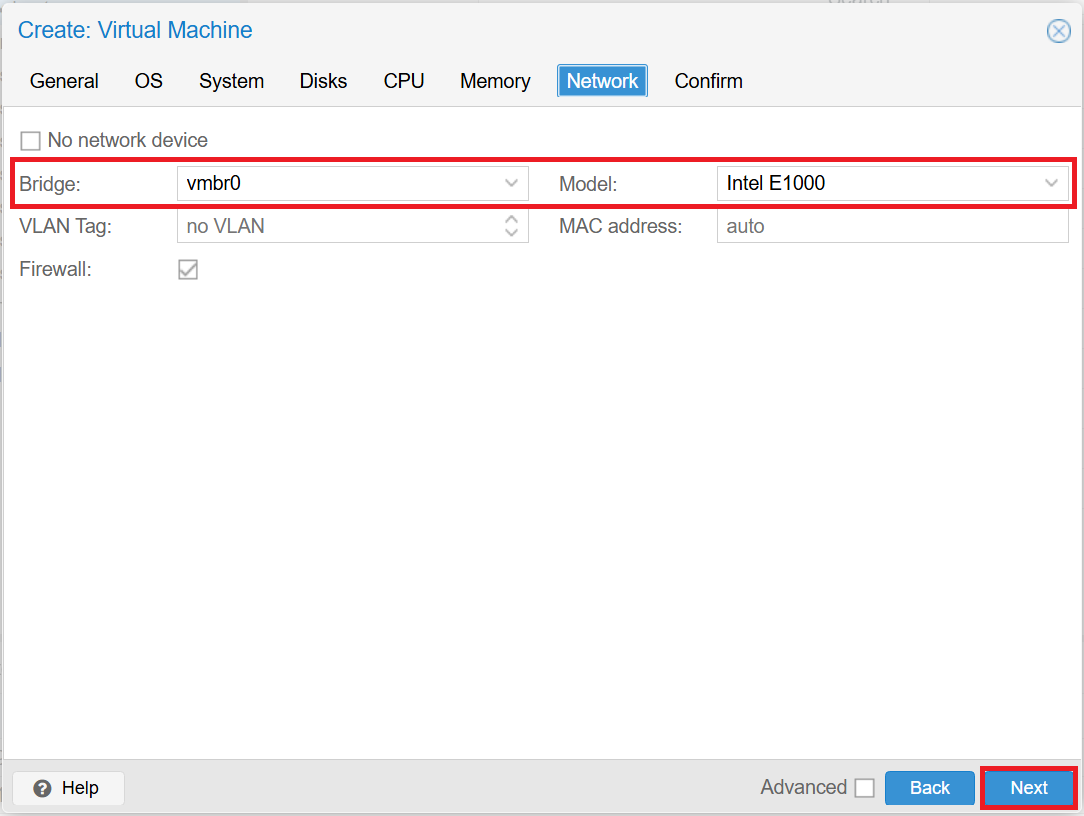
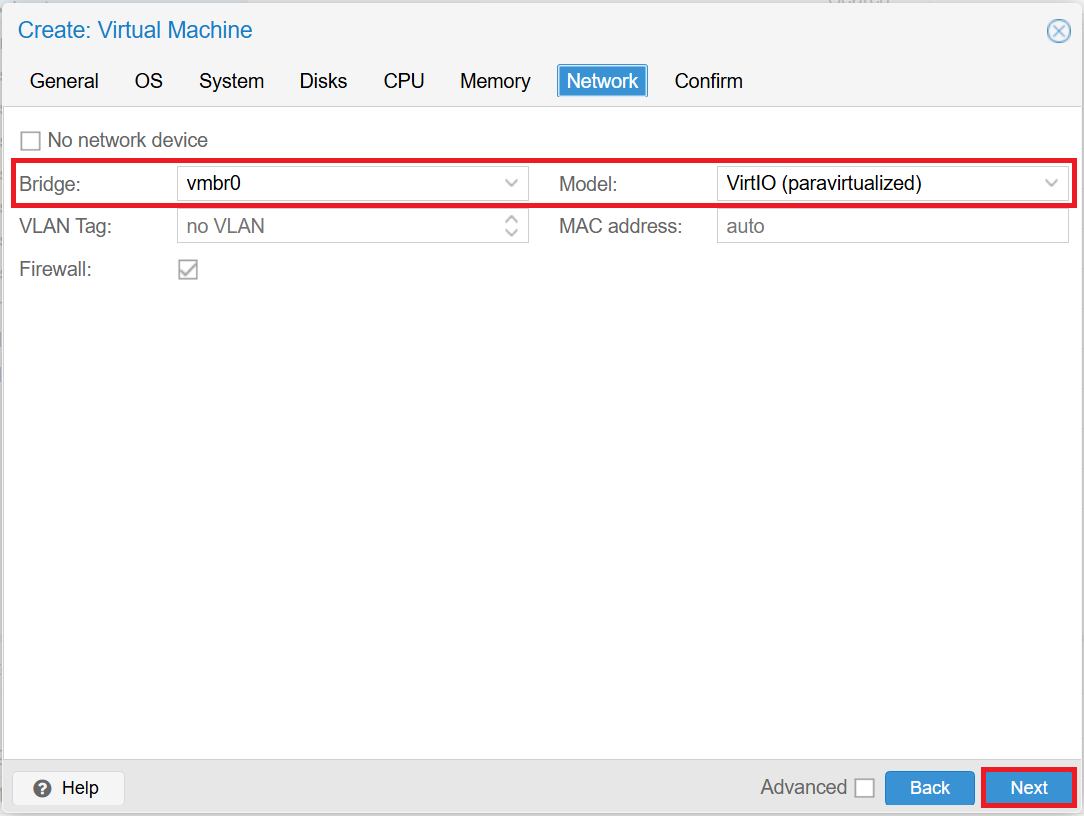
■Network tab
After entering the fields, click [Next].
- *If VirtIO drivers are selected for Windows, "VirtIO (paravirtualized)" will be selected under [Model].
-
For Windows
- Bridge: vmbr0
- Model: Intel E1000 -
For Linux
- Bridge: vmbr0
- Model: VirtIO (paravirtualized)
Windows
Linux
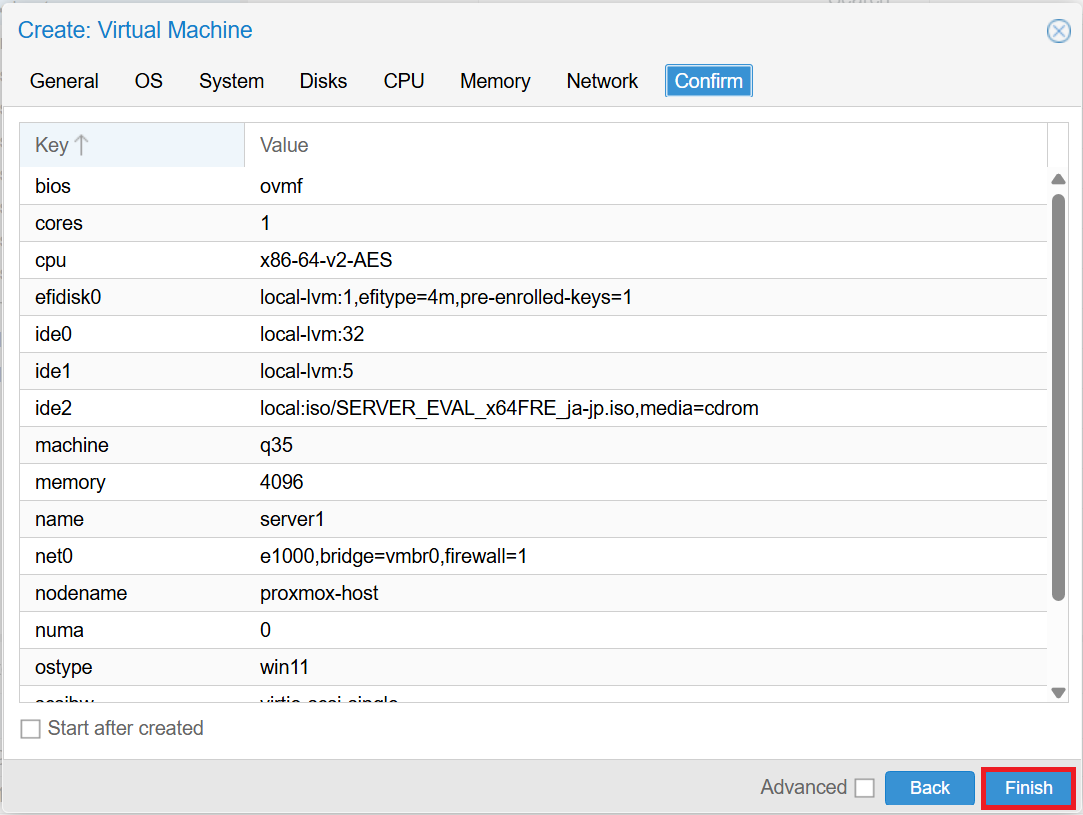
Finally, click [Finish] to create the VM. After creation, start the VM and install the OS.
- *If VirtIO drivers are selected for Windows, the disk will not be displayed during OS installation, so you will need to load the VirtIO drivers.
3.2 Creating a Mirror Disk Type HA Cluster
The HA cluster to be built is configured as follows. IIS (Windows) or Apache (Linux) is used for applications controlled by service resources or EXEC resources. Installation procedures and public directory configurations for IIS and Apache are omitted.
Windows version
■EXPRESSCLUSTER X version
-
EXPRESSCLUSTER X 5.3 for Windows (internal version: 13.31)
■Failover group (failover)
-
Floating IP resource (fip)
- IP address: 192.168.122.150 -
Mirror disk resource (md)
- Cluster partition: E:
- Data partition: F: -
Service resource (service)
■Monitor resources
-
Floating IP monitor resource (fipw1)
-
Mirror disk monitor resource (mdw1)
-
Service monitor resource (servicew1)
-
User mode monitor resource (userw)
Linux version
■EXPRESSCLUSTER X version
-
EXPRESSCLUSTER X 5.3 for Linux (internal version: 5.3.1-1)
■Failover group (failover)
-
Floating IP resource (fip)
- IP address: 192.168.122.150 -
Mirror disk resource (md)
- Cluster partition: /dev/sdb1
- Data partition: /dev/sdb2 -
EXEC resource (exec)
■Monitor resources
-
Floating IP monitor resource (fipw1)
-
Custom monitor resource (genw)
-
Mirror disk connect monitor resource (mdnw1)
-
Mirror disk monitor resource (mdw1)
-
User mode monitor resource (userw)
For details on installing EXPRESSCLUSTER X and building a mirror disk type HA cluster, please refer to the EXPRESSCLUSTER X Installation and Configuration Guide.
[Reference]
Documentation - Manuals
Documentation - Manuals-
EXPRESSCLUSTER X 5.3 > EXPRESSCLUSTER X 5.3 for Windows > Installation and Configuration Guide
-
EXPRESSCLUSTER X 5.3 > EXPRESSCLUSTER X 5.3 for Linux > Installation and Configuration Guide
3.3 Configuring Forced Stop Resource
To prevent both-system activation, add a ping NP resolution resource and configure a forced stop resource. For details on both-system activation and forced stop resources, refer to the following:
[Reference][2022 Edition] How to Prevent Both-System Activation on AWS (Windows/Linux)Introducing the Function of EXPRESSCLUSTER: Forced Stop Resource
For the target of the ping NP resolution resource, specify a device, other than the cluster servers, that can always respond to ping via the interconnect LAN registered in the configuration information. In this example, we specified the gateway of the Proxmox host as the ping responder. When setting up an NP resolution resource in practice, choose the appropriate NP resolution method and target that fit your HA cluster environment.
On Proxmox environment, there is no corresponding forced stop resource, so use a custom forced stop resource. Proxmox provides a REST API for operations such as controlling VMs. By calling this API to stop or reboot VMs, you can implement a forced stop. Sample scripts can be downloaded from the links below. If you use the samples, change “_” in the file name to “.”.
 Forced stop script sample (Windows)Forced stop script sample (Linux)
- *Please note that the samples do not guarantee operation.
For details on how to configure a custom forced stop resource, please refer to the following.
[Reference]Introducing the Function of EXPRESSCLUSTER: Forced Stop Resource
→ 2.3 Configuration Procedure for Using a Script
→ 3. Specifying the Service Startup Delay Time
4. Checking the Operation
We will check whether the HA cluster is properly built by following these steps:
- 1.Launch a web browser on the client and access the following URL to display the Cluster WebUI.
http://<IP address of server1>:29003
Windows version

Linux version
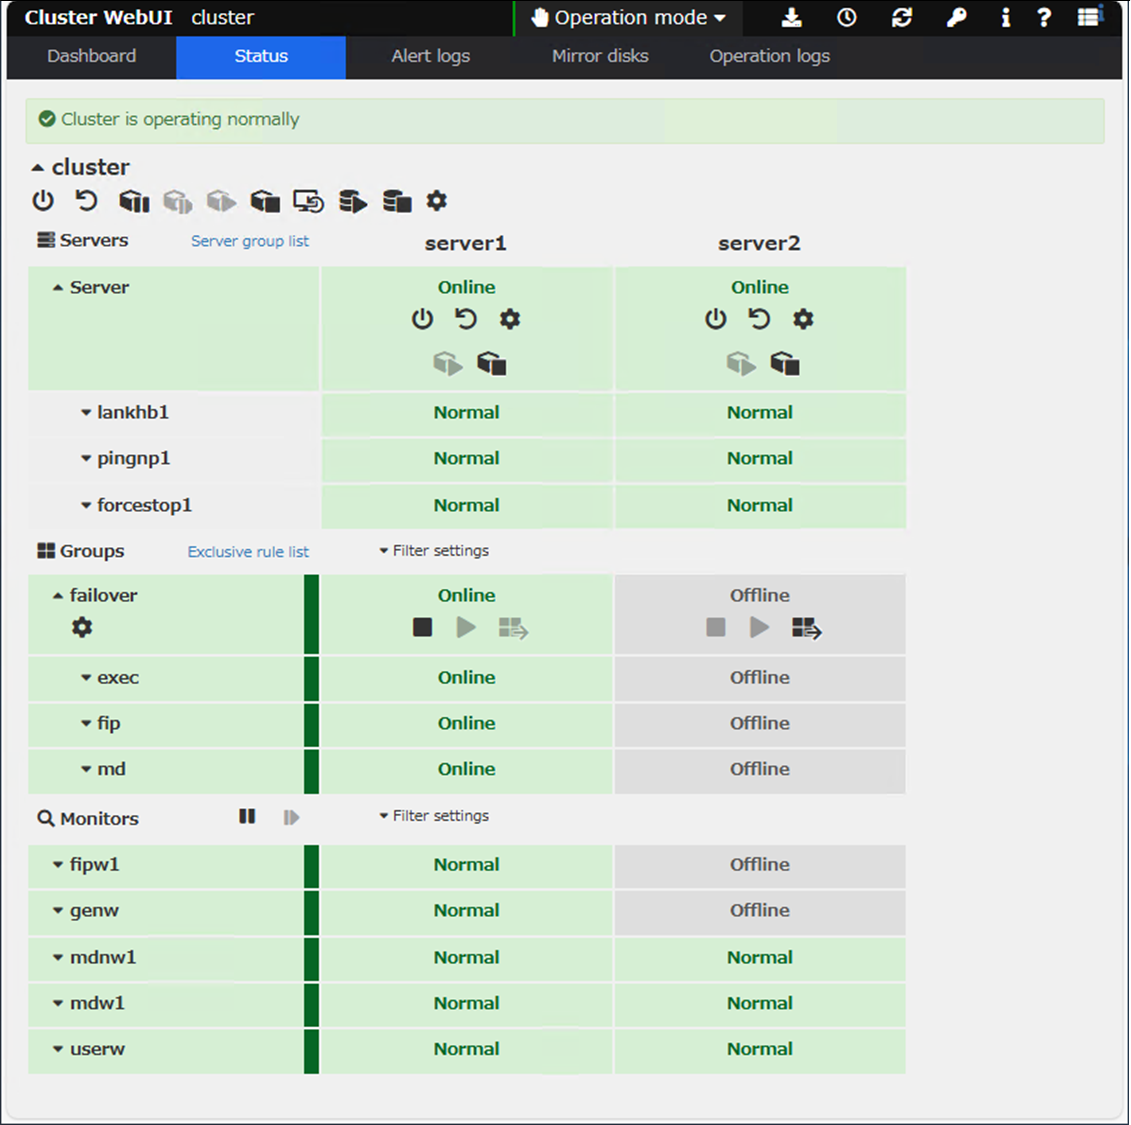
- 2.From the status screen of the Cluster WebUI, check that the failover group (failover) is running on server1 and that [Server], [Group], and [Monitor] are all operating normally.
- 3.Log in to server1 and put an HTML file directly under the data partition.
- 4.From the web browser on the client, access the IP address of the floating IP resource (fip) and check that the HTML file from server1 is displayed as a web page.
http://<IP address of floating IP resource (fip)> - 5.From the Cluster WebUI, manually move the failover group (failover) from server1 to server2.
- 6.From the Cluster WebUI, check that the failover group (failover) has been moved to server2, and that [Server], [Group], and [Monitor] are operating normally.
- 7.Log in to server2, check the HTML file is stored directly under the data partition, and modify the contents of the HTML file.
- 8.From the web browser on the client, access the IP address of the floating IP resource (fip) and check that the HTML file from server2 is displayed as a web page.
http://<IP address of floating IP resource (fip)>
These steps check that it can be checked that it is possible to connect to the HA cluster via the floating IP address before and after failover, and that the disk is mirrored.
Also, we will cause a network partition and check the behavior of the forced stop resource. In order to cause a network partition, we configure a firewall to block all communication between the servers in the HA cluster. This causes the heartbeats between the servers to disconnect, but ping communication to the gateway of the Proxmox host from the servers is still possible, so each server decides that there is a problem on the other server and tries to start the failover group. However, on the standby server, it will perform the forced stop before trying to start the failover group, check that the active server has stopped, and then start the failover group. This prevents both-system activation.
Below is an example from the Linux version. After the standby server detects the active server’s down state, the syslog output is as follows. You can see that the forced stop script executed before the failover group started.
Nov 13 06:04:55 server2 expresscls[1221]: [E] <type: nm><event: 102> Server server1 has been stopped.
Nov 13 06:04:58 server2 expresscls[1221]: [I] <type: forcestop><event: 1> Forced stop of server server1 has been requested.(custom, none)
Nov 13 06:06:56 server2 expresscls[1221]: [I] <type: rc><event: 60> Failover group failover has started.
Nov 13 06:06:56 server2 expresscls[1221]: [I] <type: rc><event: 10> Activating group failover has started.
Nov 13 06:06:56 server2 expresscls[1221]: [I] <type: rc><event: 30> Activating fip resource has started.
Nov 13 06:07:06 server2 expresscls[1221]: [I] <type: rc><event: 30> Activating md resource has started.
Nov 13 06:07:06 server2 expresscls[1221]: [I] <type: rm><event: 1> Monitoring fipw1 has started.
Nov 13 06:07:06 server2 expresscls[1221]: [I] <type: rc><event: 31> Activating fip resource has completed.
Nov 13 06:07:24 server2 expresscls[1221]: [I] <type: rc><event: 31> Activating md resource has completed.
Nov 13 06:07:24 server2 expresscls[1221]: [I] <type: rc><event: 30> Activating exec resource has started.
Nov 13 06:07:24 server2 expresscls[1221]: [I] <type: rm><event: 1> Monitoring genw has started.
Nov 13 06:07:24 server2 expresscls[1221]: [I] <type: rc><event: 31> Activating exec resource has completed.
Nov 13 06:07:24 server2 expresscls[1221]: [I] <type: rc><event: 11> Activating group failover has completed.
Nov 13 06:07:24 server2 expresscls[1221]: [I] <type: rc><event: 61> Failover group failover has completed.
Conclusion
In this article, we installed EXPRESSCLUSTER X on VMs created on Proxmox VE and tried to build a mirror disk type HA cluster. EXPRESSCLUSTER X is designed to be independent of any virtualization platform, so it can be used as long as the guest OS is included in the EXPRESSCLUSTER X system requirements for the OS. Only the forced stop resource needs to leverage the virtualization platform’s functions, and we implemented it using a custom forced stop script.
If you consider introducing the configuration described in this article, you can perform a validation with the trial module of EXPRESSCLUSTER X. Please do not hesitate to contact us if you have any questions.