Global Site
Displaying present location in the site.
November 13th, 2025
Machine translation is used partially for this article. See the Japanese version for the original article.
Introduction
We tried using Azure VM Backup for backup and restore on a mirror disk type HA cluster built on Microsoft Azure (hereinafter called Azure).
Azure Backup allows you to back up various types of data. One of these, Azure VM Backup, can back up entire Azure Virtual Machines (hereinafter called VM). This time, we will introduce the procedure for backing up and restoring the system disk and mirror disk using Azure VM Backup for a mirror disk type HA cluster built on Azure.
Contents
- 1. What is the Azure Backup?
- 2. HA Cluster Configuration for Backup and Restore Targets
- 3. Setting Up Azure VM Backup
- 3.1 Creating a Recovery Services Vault
- 3.2 Creating a Backup Policy
- 3.3 Configuring Backup
- 4. Backup Procedures for Azure VM
- 4.1 Stopping the Failover Group and the Synchronization of the Mirror Disk
- 4.2 Executing the Pre-backup Command on the Standby Server
- 4.3 Backup of Azure VM for the Standby Server
- 4.4 Executing the Post-backup Command on the Standby Server
- 4.5 Resuming Monitoring of the Mirror Disk on the Active Server
- 4.6 Switching Backup Targets and Performing Backup
- 5. Azure VM Restore Procedure
- 5.1 Azure VM Restore
- 5.2 Checking the Mirror Disk settings
- 5.3 Executing Post-restore Command (Active/Standby)
- 5.4 Mirror Recovery of the Mirror Disk
1. What is the Azure Backup?
Azure Backup is a service that can back up and restore various data related to Azure.
It can back up and restore not only data in the Azure environment, such as Azure VMs, Azure Managed Disks, and SQL Servers within Azure VMs, but also various data on on-premises environments, like VMs and files.
[Reference] What is the Azure Backup service?
This time, we tried backing up and restoring a mirror disk-type HA cluster built on Azure using Azure VM Backup, which backs up Azure VM.
2. HA Cluster Configuration for Backup and Restore Targets
Build a "mirror disk type HA cluster using an internal load balancer" in the East US region environment. Perform backup and restore on the constructed mirror disk type cluster.
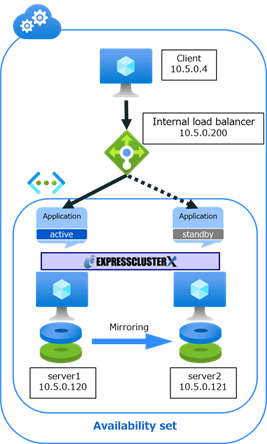
Please refer to the HA Cluster Configuration Guide for the procedure to build an HA cluster. This time, in addition to the construction procedure configuration, another mirror disk resource has been added.
[Reference]Documentation - Setup Guides
-
Linux > Cloud > Microsoft Azure > HA Cluster Configuration Guide
→ 6 Cluster Creation Procedure (for an HA Cluster Using an Internal Load Balancer)
Additionally, the configuration of EXPRESSCLUSTER is as follows. Please adjust according to your specific environment as necessary.
-
EXPRESSCLUSTER
- Hostname
・ server1 (usually active system): server1
・ server2 (usually active system): server2
- Failover group: failover
・ Azure probe port resource: azurepp
・ Mirror disk resource: md
・ Mirror disk resource 2: md2
- Monitor resource
・ Azure load balance monitor resource: azurelbw1
・ Azure probe port monitor resource: azureppw1
・ Mirror disk connect monitor resource: mdnw1
・ Mirror disk monitor resource: mdw1
・ Mirror disk connect monitor resource 2: mdnw2
・ Mirror disk monitor resource 2: mdw2
When building a mirror disk type cluster on Linux, you need to specify the device file name. However, on Azure, the device file name may change at VM startup and other times. Therefore, it is recommended to set a logical volume or specify a symbolic link to the device name.
When setting up a logical volume, please refer to "Building Mirror Disk Type Clusters Using Logical Volumes" from the link below, and specify the created logical volume as a mirror disk resource.
If you specify a symbolic link for the device name, please refer to the following and specify the symbolic link of the cluster partition and data partition in the mirror disk resource.
[Reference]Troubleshoot Linux VM device name changes
3. Setting Up Azure VM Backup
In Azure VM Backup, the backup data and recovery points are stored in the Recovery Services vault. You can use these recovery points to restore the data to a specific point in time. Backup integrity can be selected as application consistent/File-system consistent or crash-consistent. Application-consistent/File system consistent backup requires an agent on the VM to work with snapshots.
While Chapter 4 will explain the details, this backup will follow the EXPRESSCLUSTER Maintenance Guide and will be taken with the VM shut down, thus ensuring crash-consistent backup.
This chapter explains the preliminary setup for performing Azure VM Backup, including the Recovery Services vault, backup policy, and backup settings.
3.1 Creating a Recovery Services Vault
First, create a Recovery Services vault. We referred to the following procedure.
[Reference]Back up Azure VMs in a Recovery Services vault
-
Create a Recovery Services vault
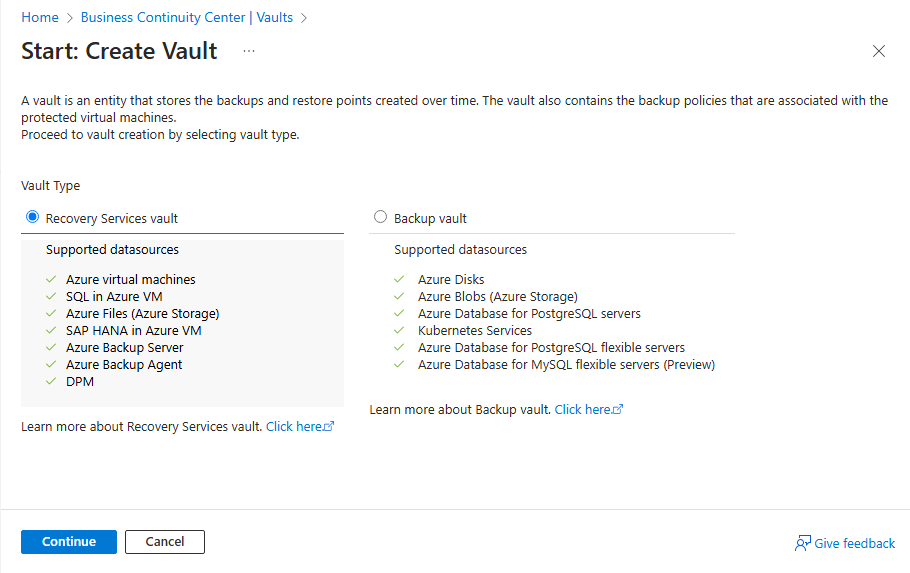
- ・Expand the [Manage] menu in the Business Continuity Center to display the [Vaults] pane, then click [+ Vault].
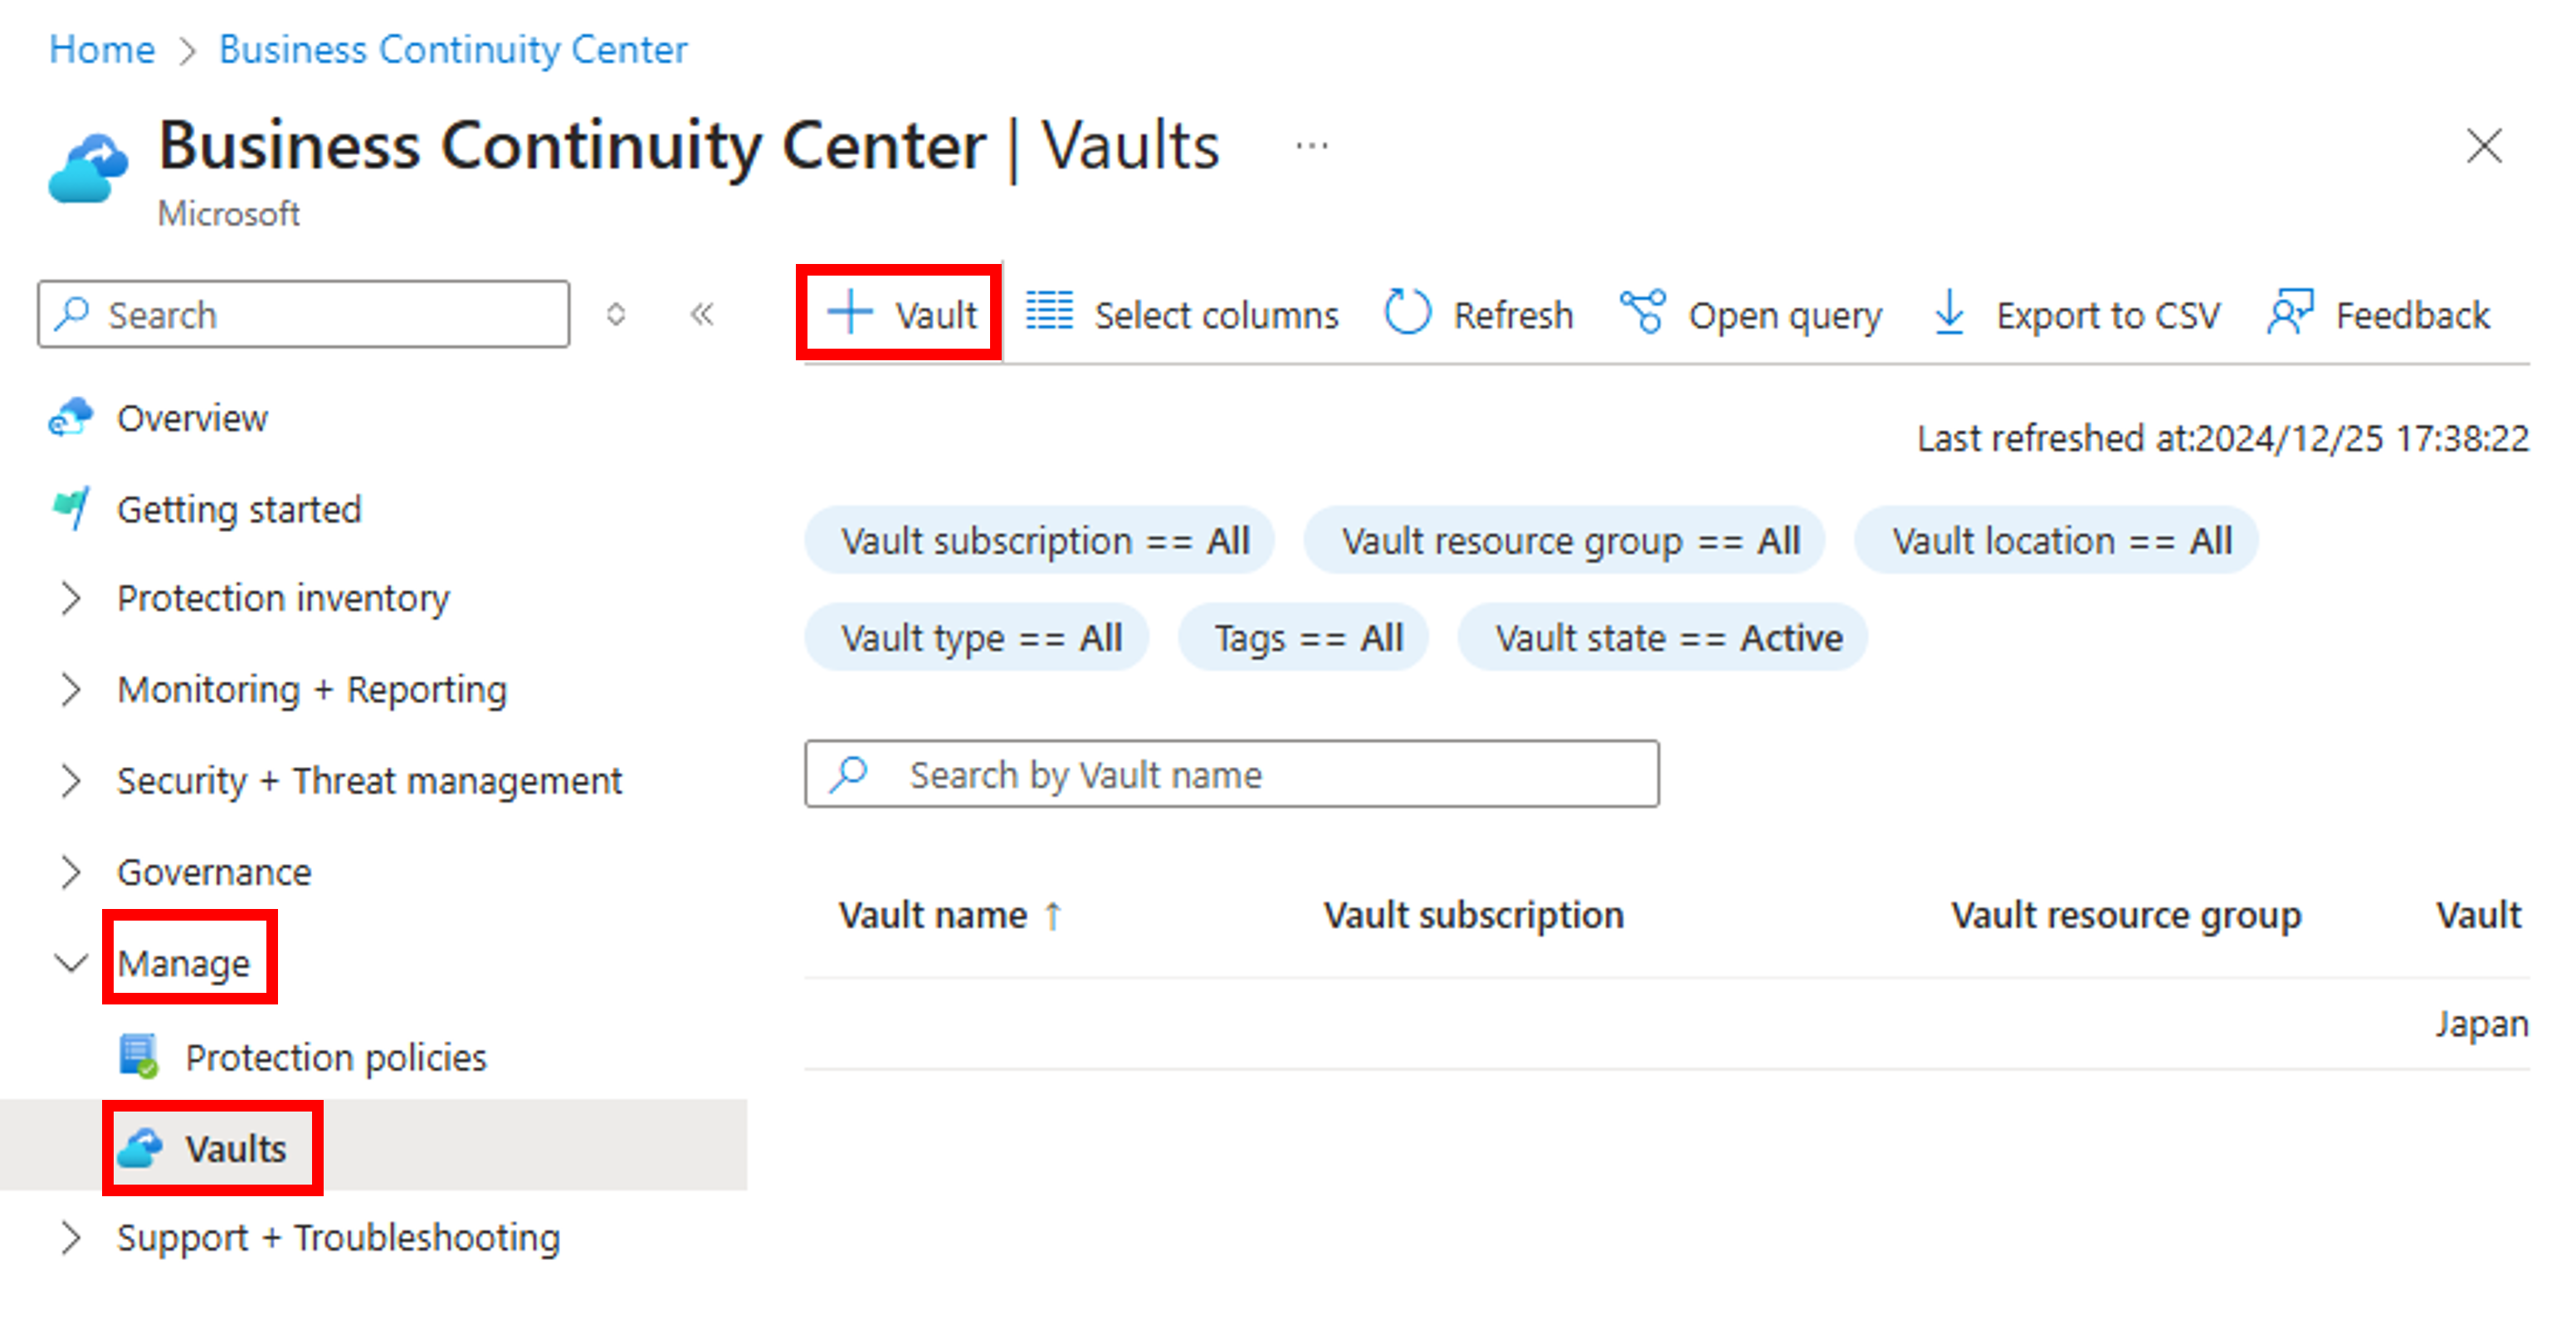
- ・Select [Recovery Services vault] and click [Continue].
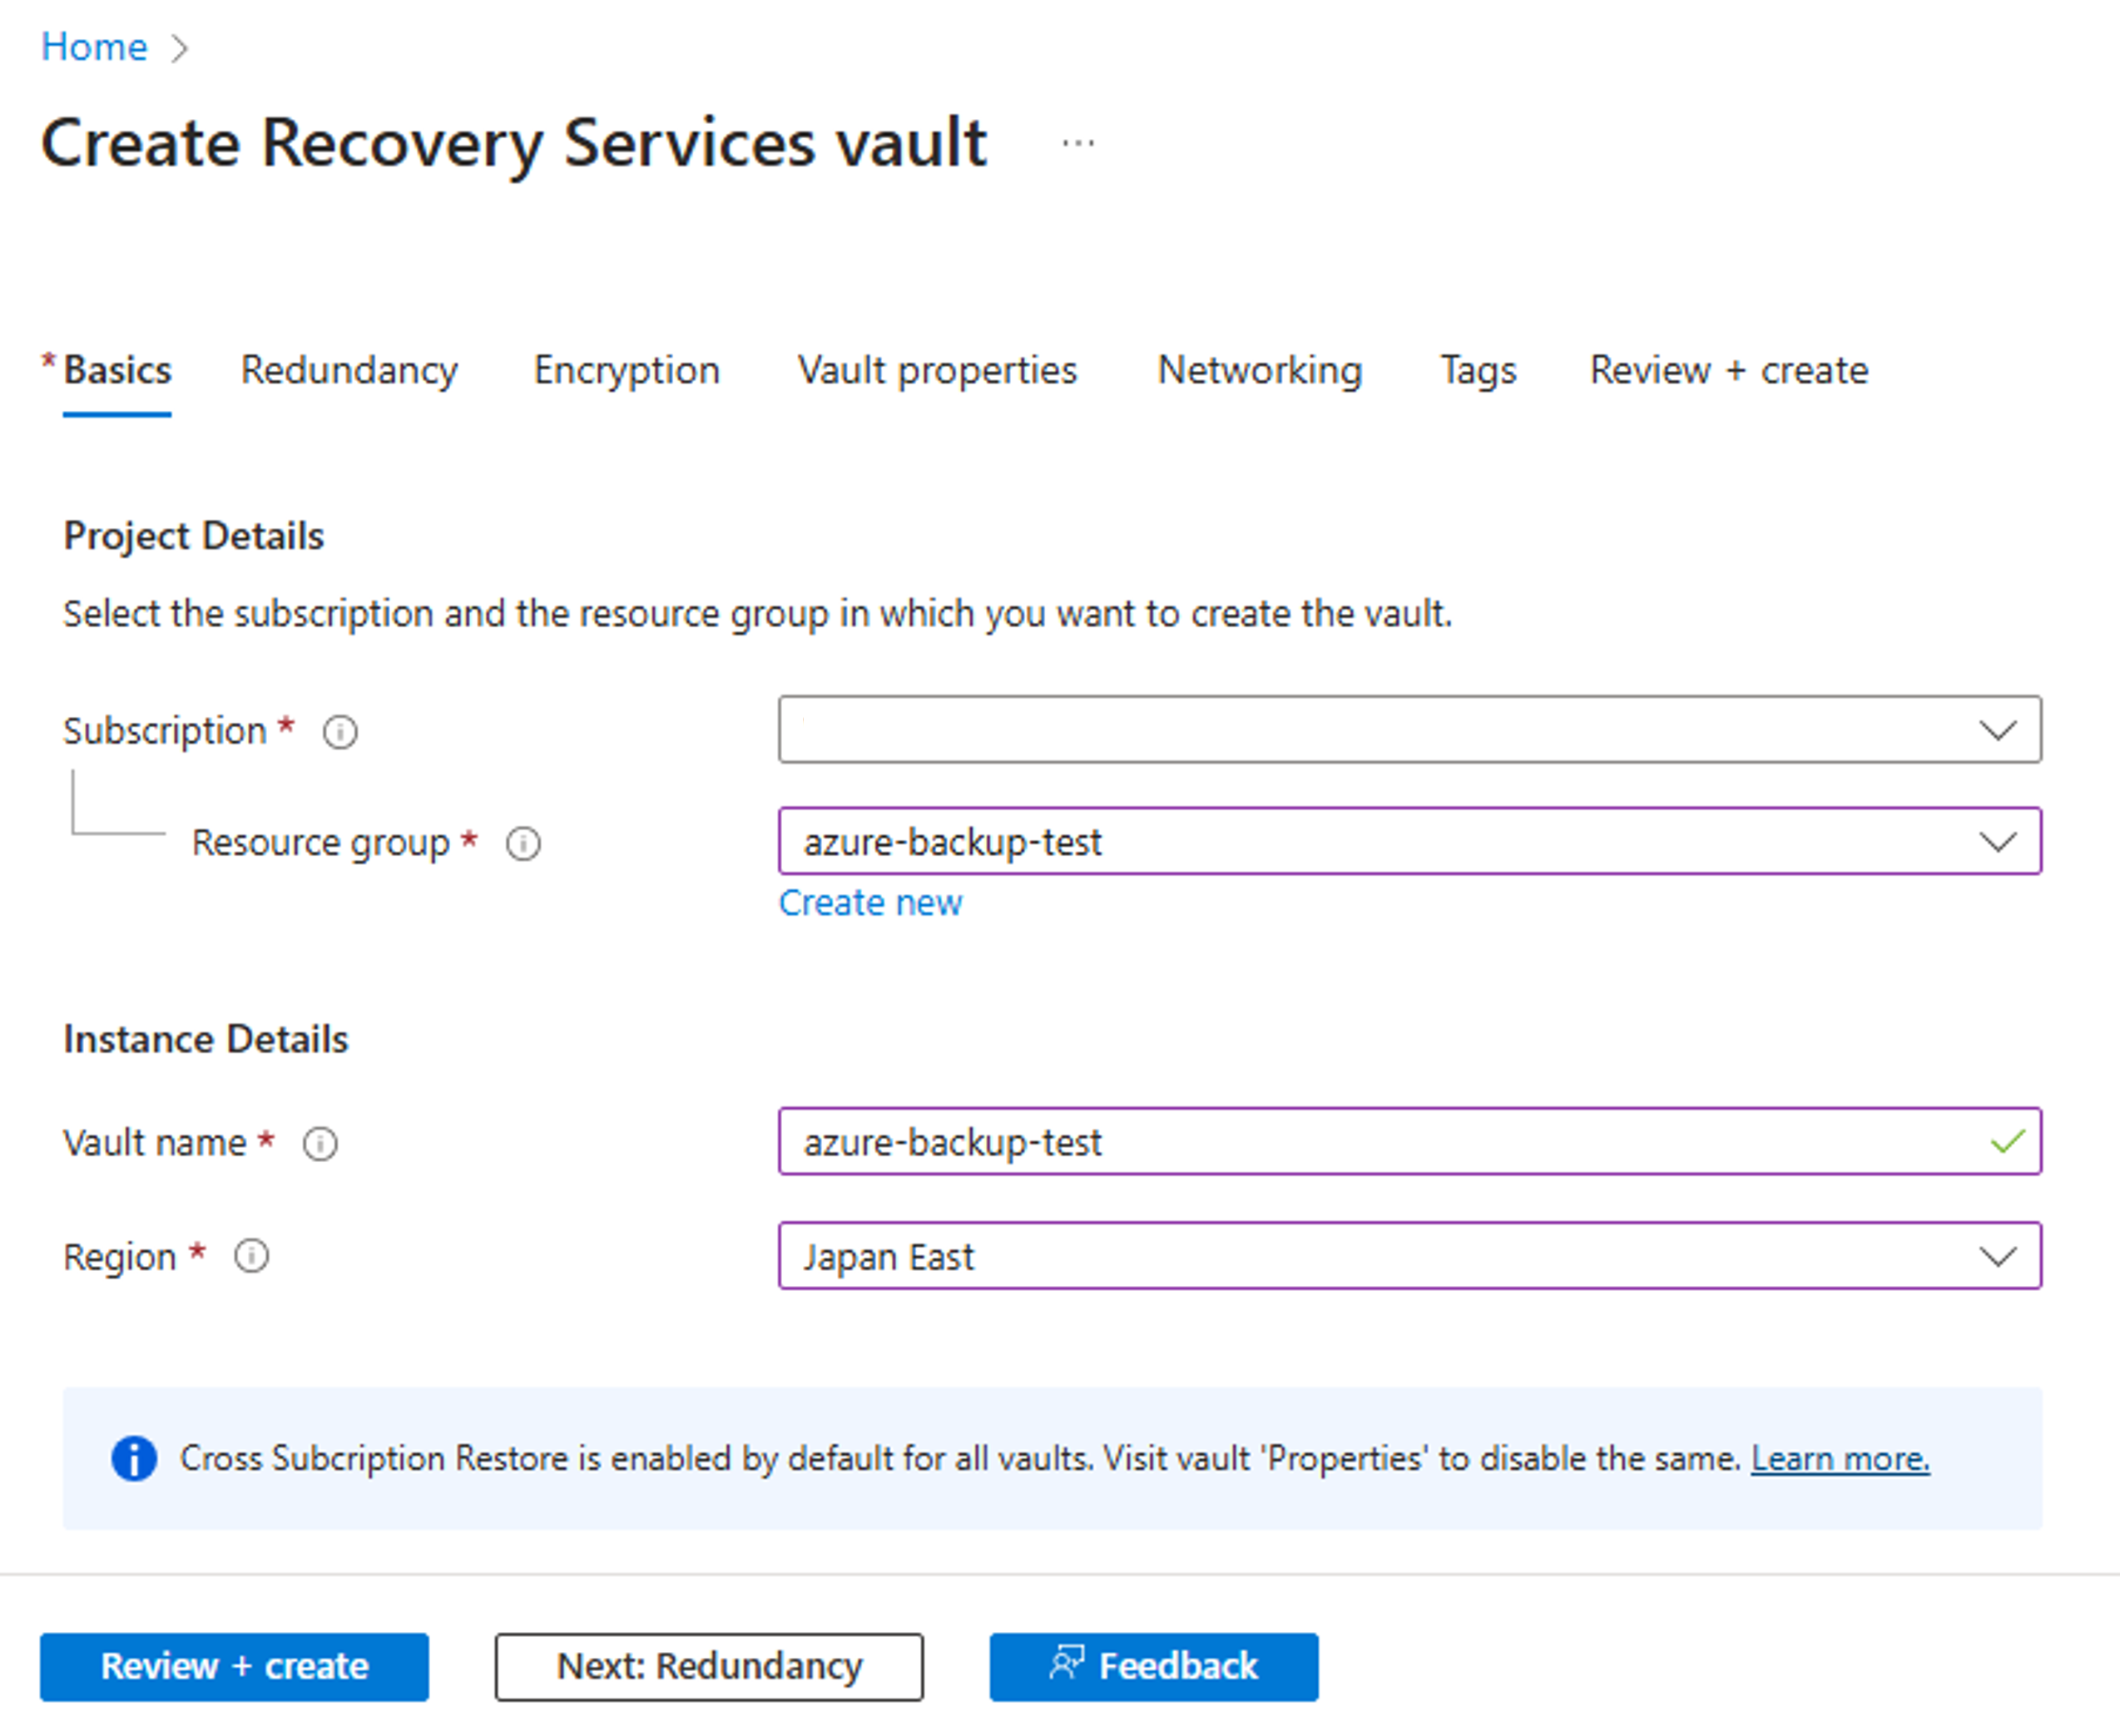
- ・Enter values in the properties of Basics, Redundancy, Encryption, Vault properties, Networking, and Tags items to create a Recovery Services vault. This time, create a vault in a resource group where a VM exists in the East US region. The items other than Basics were left at default settings.
By default, the redundancy option for Recovery Services vault uses geo-redundant storage (GRS), but it is also possible to select locally redundant storage (LRS) or zone-redundant storage (ZRS). Please choose the redundancy of Azure Storage appropriately according to your operational policy.
The redundancy option can be changed from the storage replication settings.
However, please note that it cannot be changed after the vault is set up and contains backup items, and it is necessary to recreate the Recovery Services vault to make changes.
[Reference]Back up Azure VMs in a Recovery Services vault
-
Modify storage replication
3.2 Creating a Backup Policy
Next, create a backup policy. The backup policy sets the timing and retention period of backups. A backup policy is provided by default, but this time we will create a new one. We referred to the following procedure.
[Reference]Back up Azure VMs in a Recovery Services vault
-
Create a custom policy
- ・Expand the [Manage] in the Business Continuity Center menu to display the [Protection policies] pane, and click [+ Create policy], and select [Create backup policy].
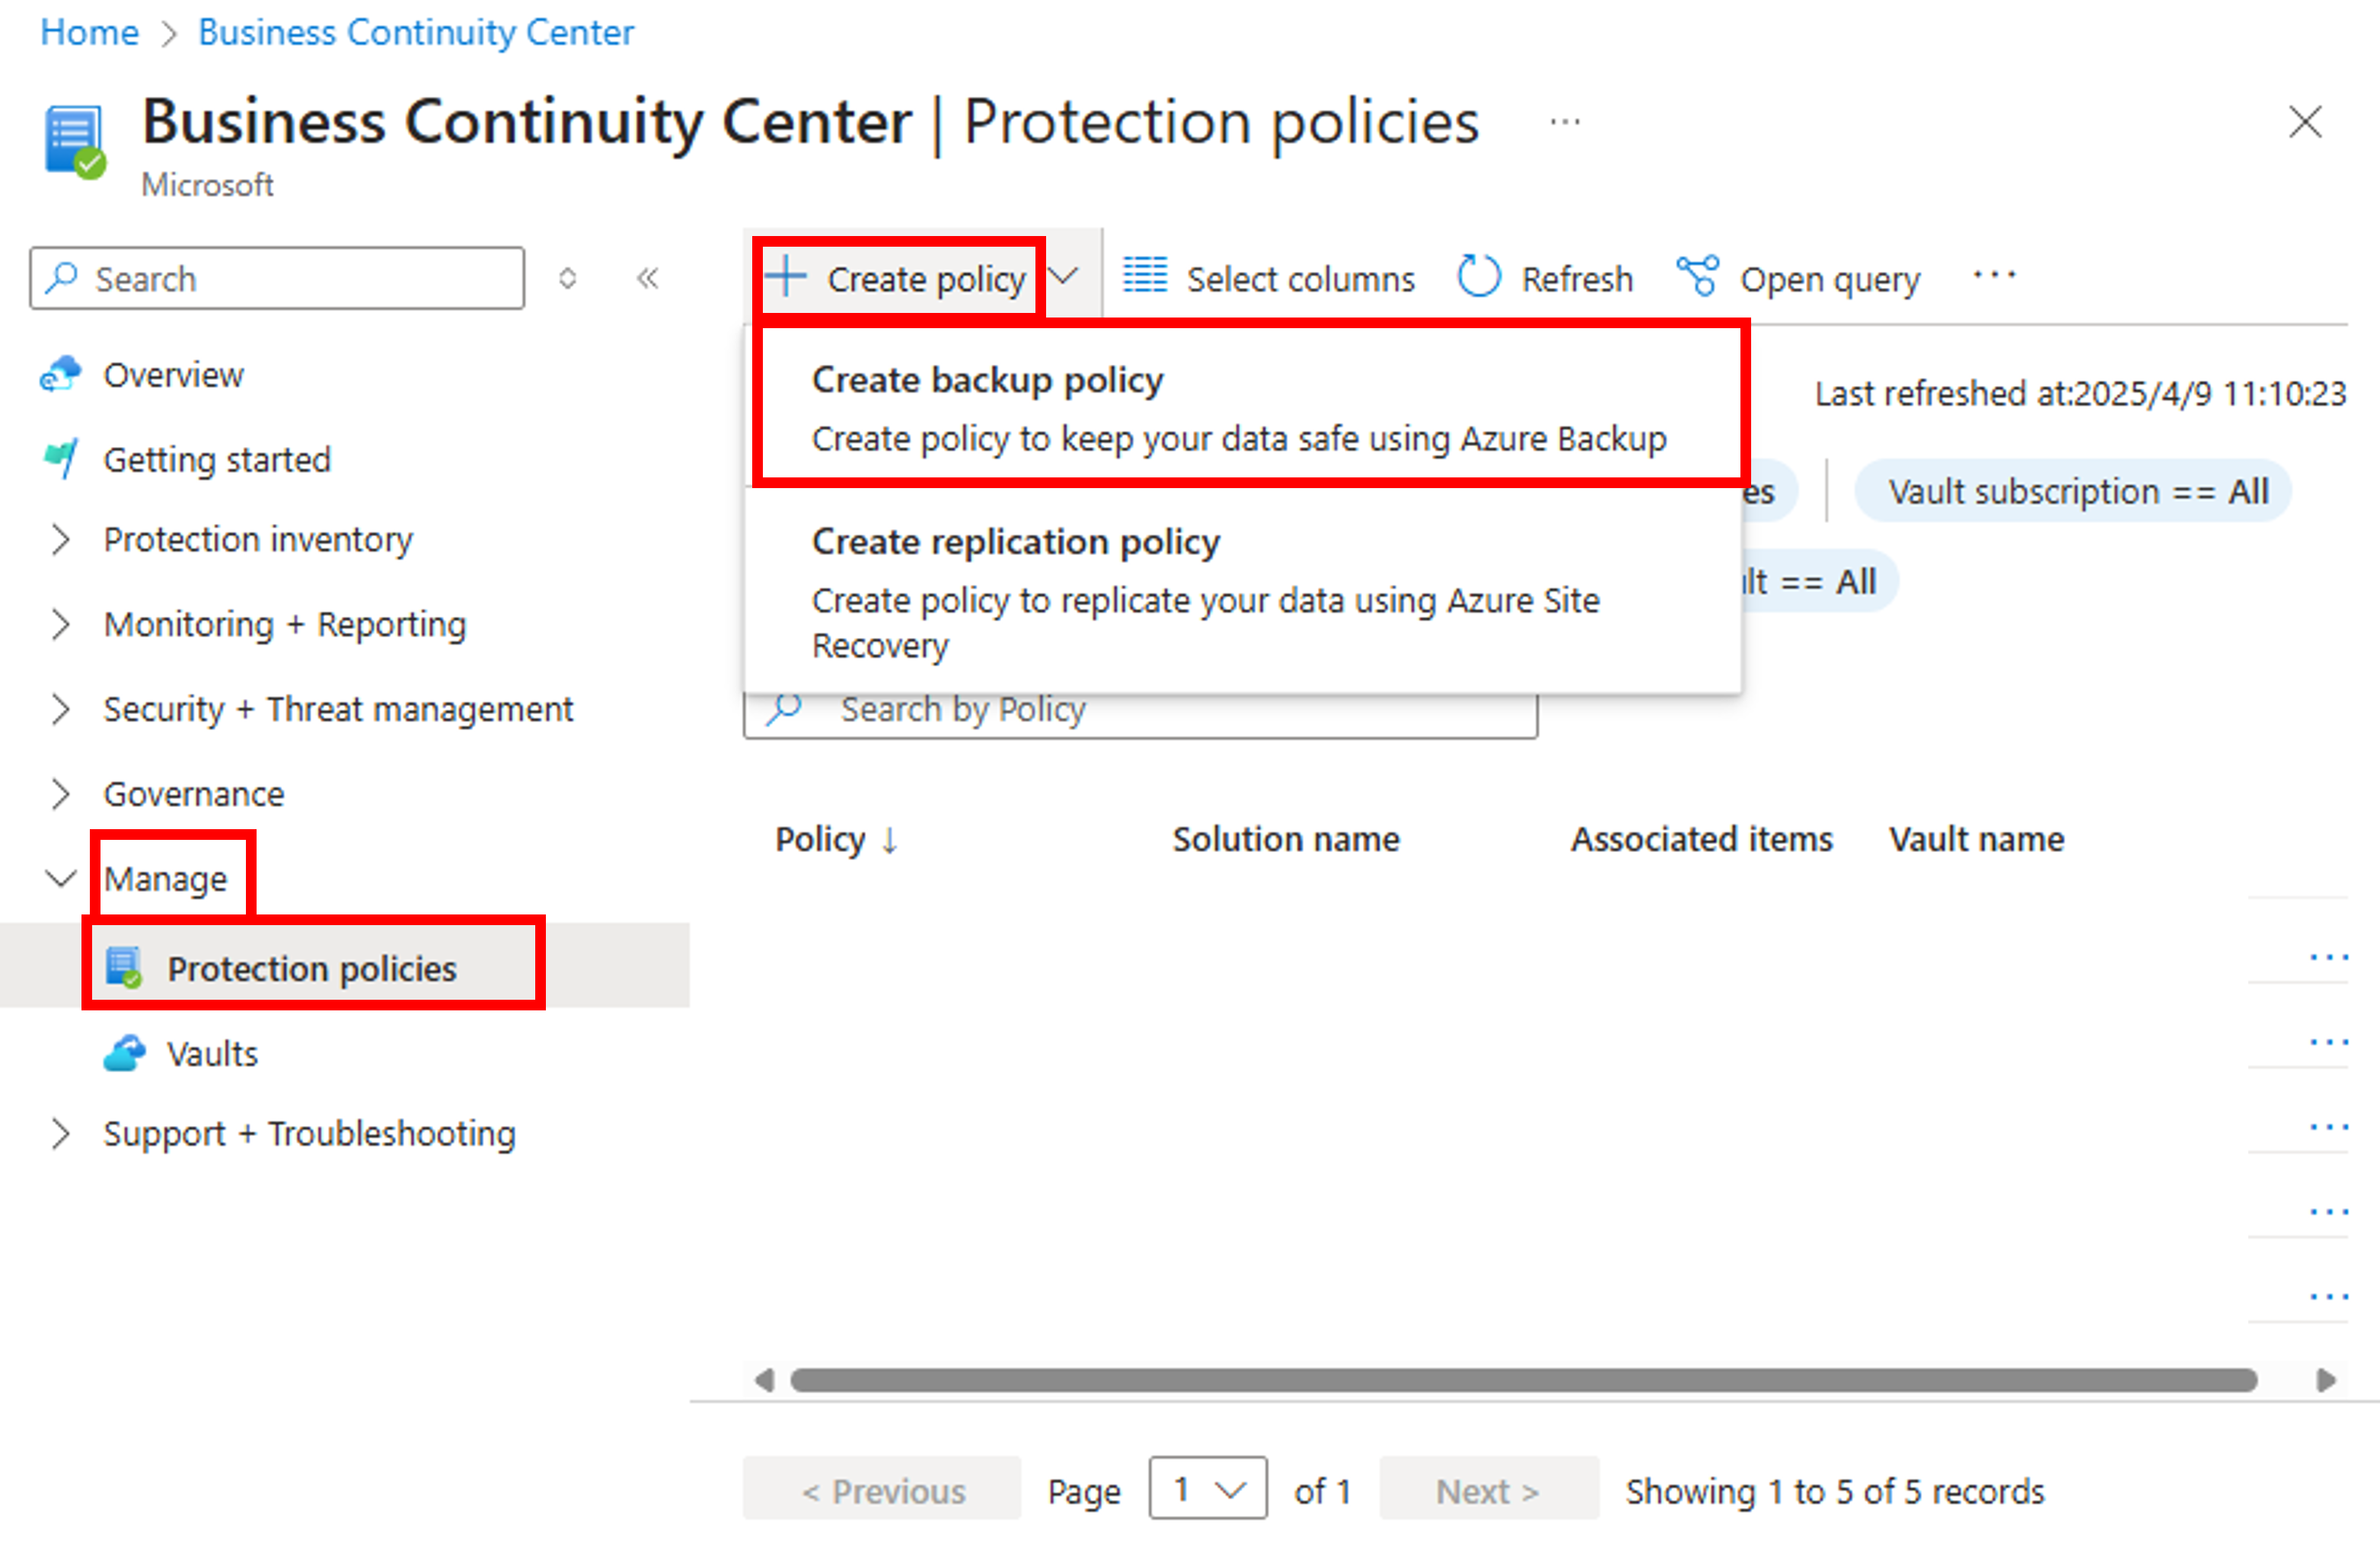
- ・Select "Azure Virtual Machine" in [Datasource type], choose the Recovery Services vault created in "3.1 Creating a Recovery Services Vault" in [Vault], and click [Continue].
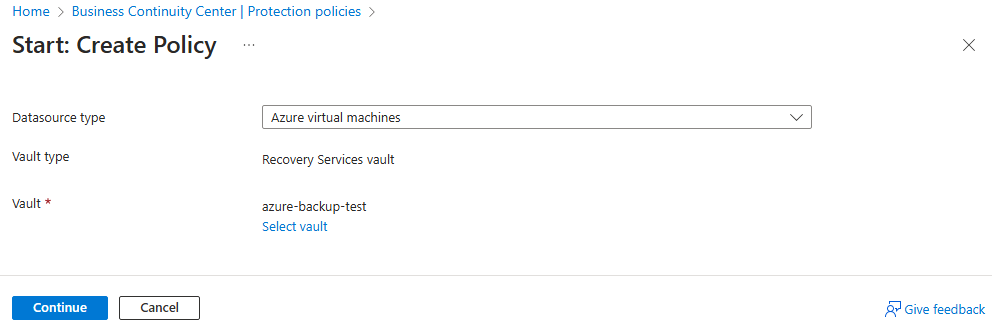
- ・The settings for [Create Policy] will be displayed, so enter the values accordingly.
In this case, for testing purposes, set [Policy sub type] to "Standard," [Backup schedule] to "Daily," and [Retention of daily backup point] to the shortest "7 days."

- *Using the Enhanced Policy, multiple daily backups and retention in the snapshot tier for up to 30 days are possible, but additional costs may apply.
[Reference]Back up Azure VMs with Enhanced policy
- *Azure VM Backup requires a scheduled periodic execution setting. As mentioned above, the VM will be in a shutdown state during the procedure described in this article. Therefore, in actual operation, please note that the following operational designs are necessary before the periodic execution of Azure VM Backup:
- Conduct the preparatory work for backup explained in Chapter 4 as a job.
- Execute Azure VM Backup via command and incorporate it into a series of jobs.
3.3 Configuring Backup
Finally, we will configure the backup. We referred to the following procedure.
[Reference]Back up Azure VMs in a Recovery Services vault
-
Apply a backup policy
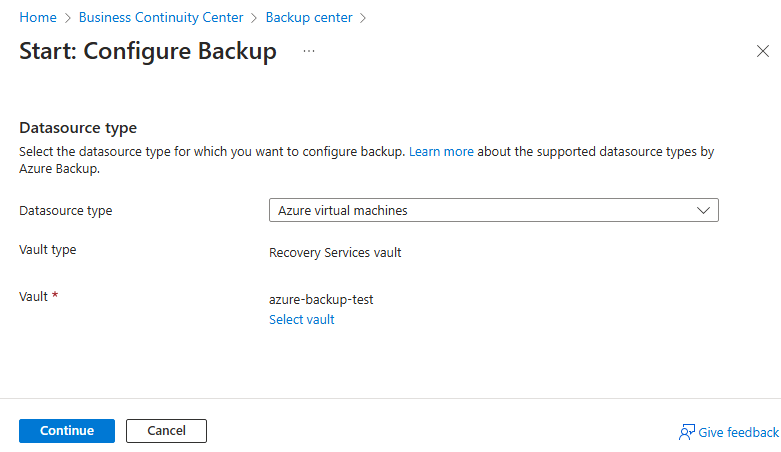
Clicking [+ Backup] in the Overview pane of the backup center menu displays the setting items for [Start: Configure Backup].
Select "Azure virtual machines" for the [Datasource type] and the Vault created in "3.1 Creating a Recovery Services Vault" for [Vault], and click [Continue].
Next, select "Standard" for [Policy sub type], the backup policy created in "3.2 Creating a Backup Policy" for [Backup Policy], and the servers for the HA cluster for [Virtual Machines]. At this time, check that [Disks] includes all the disks set as mirror disk resources for the cluster partition and data partition. Finally, click [Enable backup] to activate the backup.
- *Azure VM Backup can take a backup of the entire VM, including the system disk and additional disks. While you can exclude the additional disks, you cannot exclude the system disk, so you cannot back up only the additional disks.

4. Backup Procedures for Azure VM
For each active and standby server, we will perform a backup of the entire Azure VM.
To prevent the influence on backup data due to the operation status of the HA cluster, it is recommended to perform the system disk backup with the OS stopped.
The backup procedures for the standby server are as follows.
When backing up the active server, perform a failover of the failover group to the standby server and then follow the same procedure.
- ①Stop the failover group and the synchronization of the mirror disk
- ②Execute the pre-backup command on the standby server
clpbackup --pre - ③Execute an Azure VM Backup of the standby server.
- ④Execute the post-backup command on the standby server
clpbackup --post - ⑤Resume mirror disk monitoring on the active server.
Please refer to the following for the backup procedure.
[Reference]Documentation - Manuals
-
EXPRESSCLUSTER X 5.3 > EXPRESSCLUSTER X 5.3 for Linux > Maintenance Guide
→ 2.20 How to back up a mirror/hybrid disk to its disk image
→ 2.20.2 Backing up active/standby mirror disks in each server
4.1 Stopping the Failover Group and the Synchronization of the Mirror Disk
First, check that the mirror disk is synchronizing correctly. After confirming the synchronization status, stop the failover group to ensure a quiescent point.
- ・Check that the mirror disk is successfully synchronized.
Execute the following command on the active server.
Confirm that the Mirror Status in the output is "Normal" and that the Mirror Color on both the active/standby servers is "Green".
It is also possible to determine the status of the mirror disk by the return value of the command.
When both the active/standby servers are normal (Green), 17 is returned.- *If there are multiple mirror disk resources, check all of them.
# clpmdstat --mirror md
Mirror Status: Normal
md server1 server2
------------------------------------------------------------------
Mirror Color GREEN GREEN
# echo $?
17
# clpmdstat --mirror md2
Mirror Status: Normal
md2 server1 server2
------------------------------------------------------------------
Mirror Color GREEN GREEN
# echo $?
17 - *
- ・Stop the failover group.
Execute the following command on the active server.
# clpgrp -t failover
Command succeeded.
- ・Suspend the mirror disk monitor resources on both the active and standby servers to prevent automatic mirror recovery from operating.
Execute the following command on the active server.- *If there are multiple mirror disk monitor resources, suspend all mirror disk monitor resources.
# clpmonctrl -s -h server1 -m mdw1
Command succeeded.
# clpmonctrl -s -h server2 -m mdw1
Command succeeded.
# clpmonctrl -s -h server1 -m mdw2
Command succeeded.
# clpmonctrl -s -h server2 -m mdw2
Command succeeded. - *
- ・Stop the synchronization of the mirror disk.
Execute the following command on the standby server.- *If there are multiple mirror disk resources, stop the synchronization for all mirror disk resources.
- *
# clpmdctrl --break md
md: Isolated completed successfully
# clpmdctrl --break md2
md2: Isolated completed successfully
- ・Start the failover group on the active server.
You can resume business from the point when the failover group is activated. This minimizes business downtime and allows you to take a backup of the standby server.
Execute the following command on the active server.
# clpgrp -s failover
Command succeeded.
4.2 Executing the Pre-backup Command on the Standby Server
By executing the pre-backup command, change the mirror disk to backup mode, set the automatic startup of various EXPRESSCLUSTER services to off, and shut down the server.
- ・Execute the following command on the standby server.
# clpbackup.sh --pre
clpbackup.sh : Beginning backup-mode.
All backup flags have set to <ON>.
clpbackup.sh : Changing the setting of cluster services to Manual Startup.
clpbackup.sh : Shutting down...
Command succeeded.
clpbackup.sh : Command succeeded.
4.3 Backup of Azure VM for the Standby Server
Basically, backups are performed according to the backup policy settings, but this time, for testing purposes, we will perform a manual backup.
We referred to the following procedure.
[Reference]Back up Azure VMs in a Recovery Services vault
-
Trigger the initial backup
In addition to operations from the Azure Portal, it is also possible to use the Azure CLI.
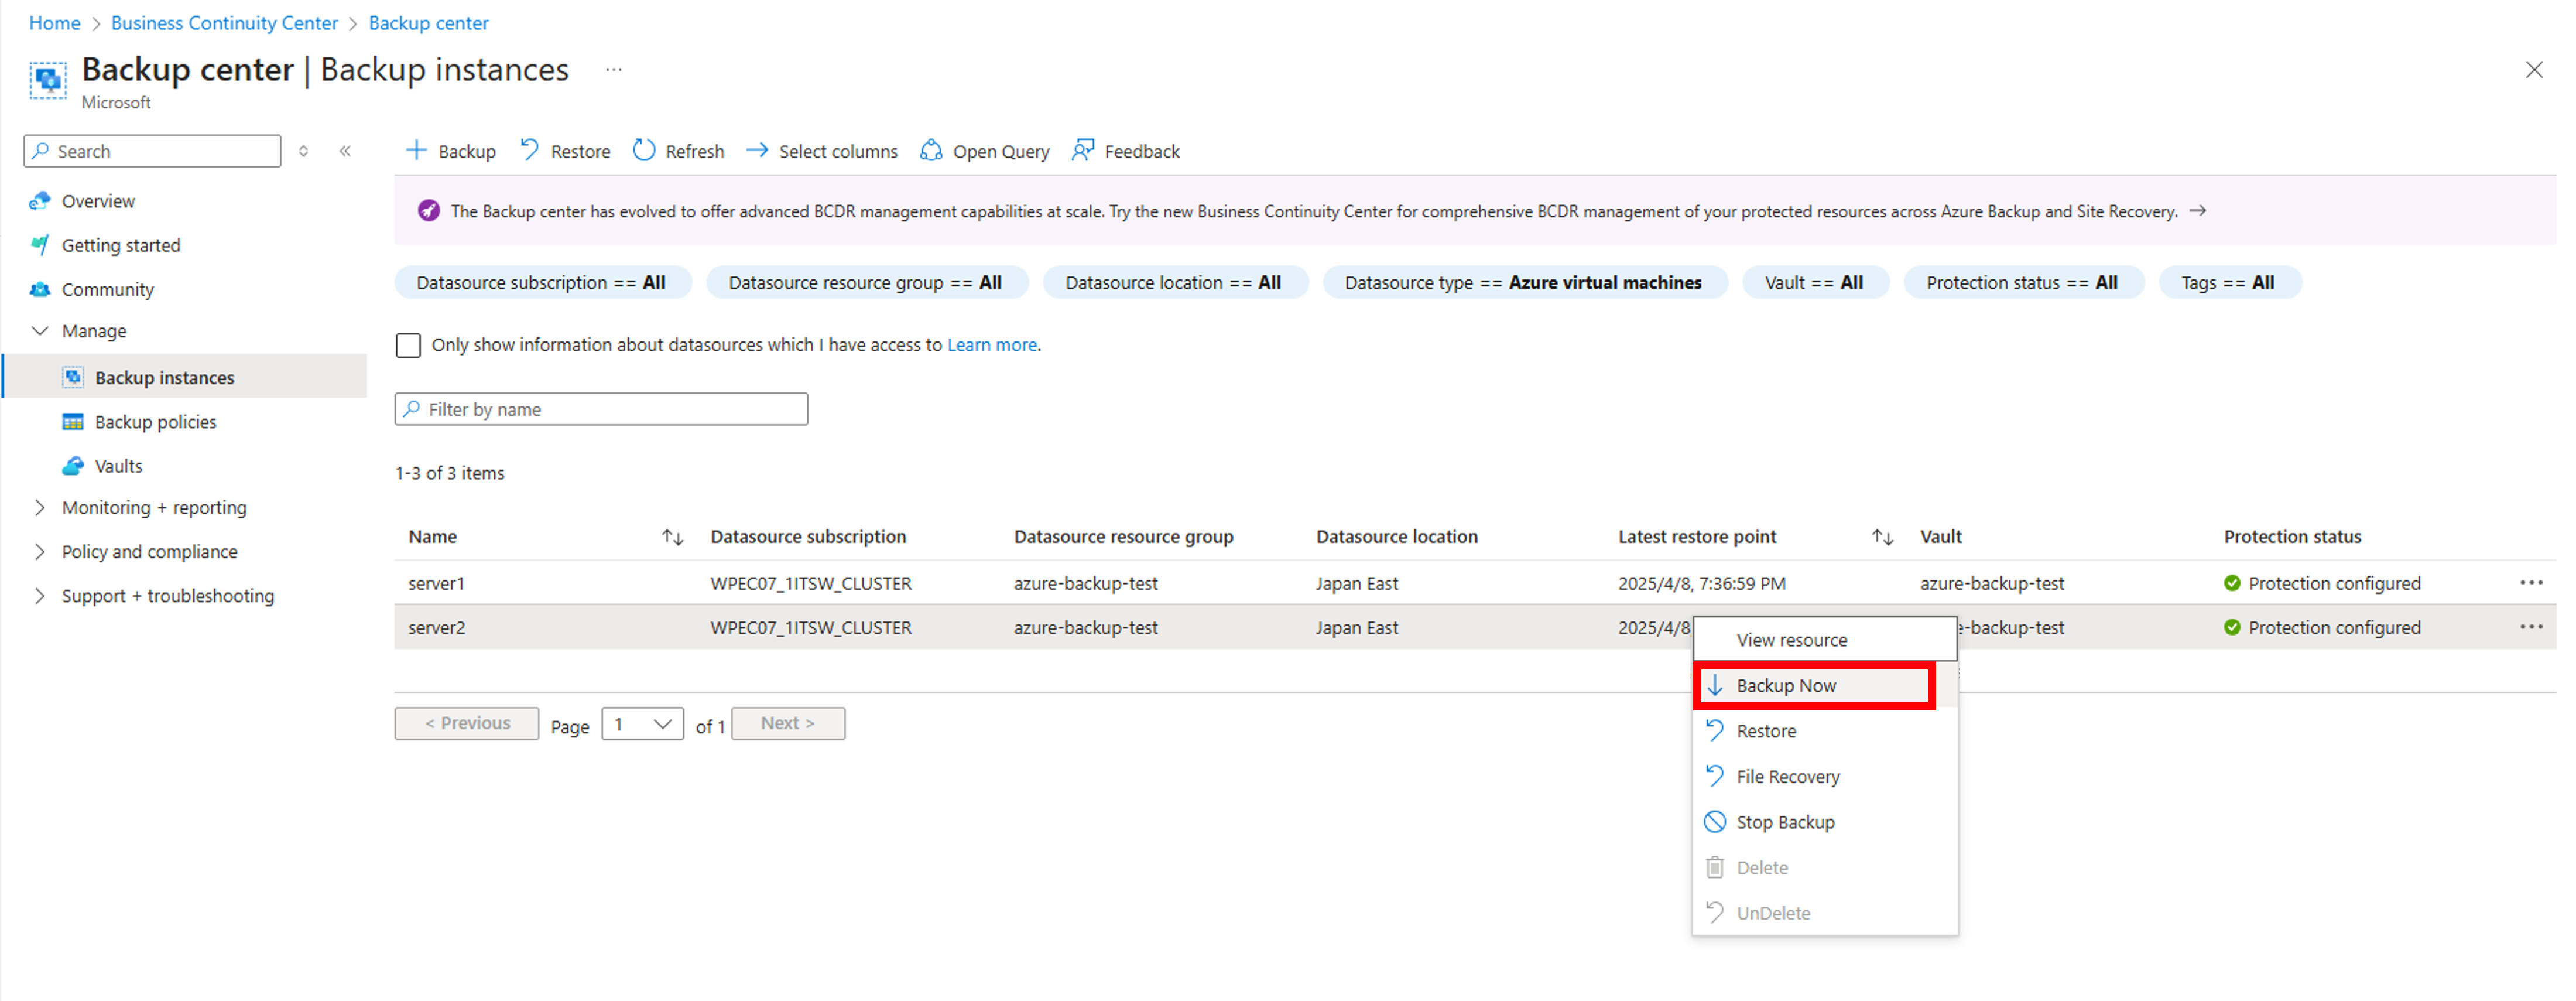
- ・Expand the [Manage] in the backup center menu to display the [Backup instances] pane.
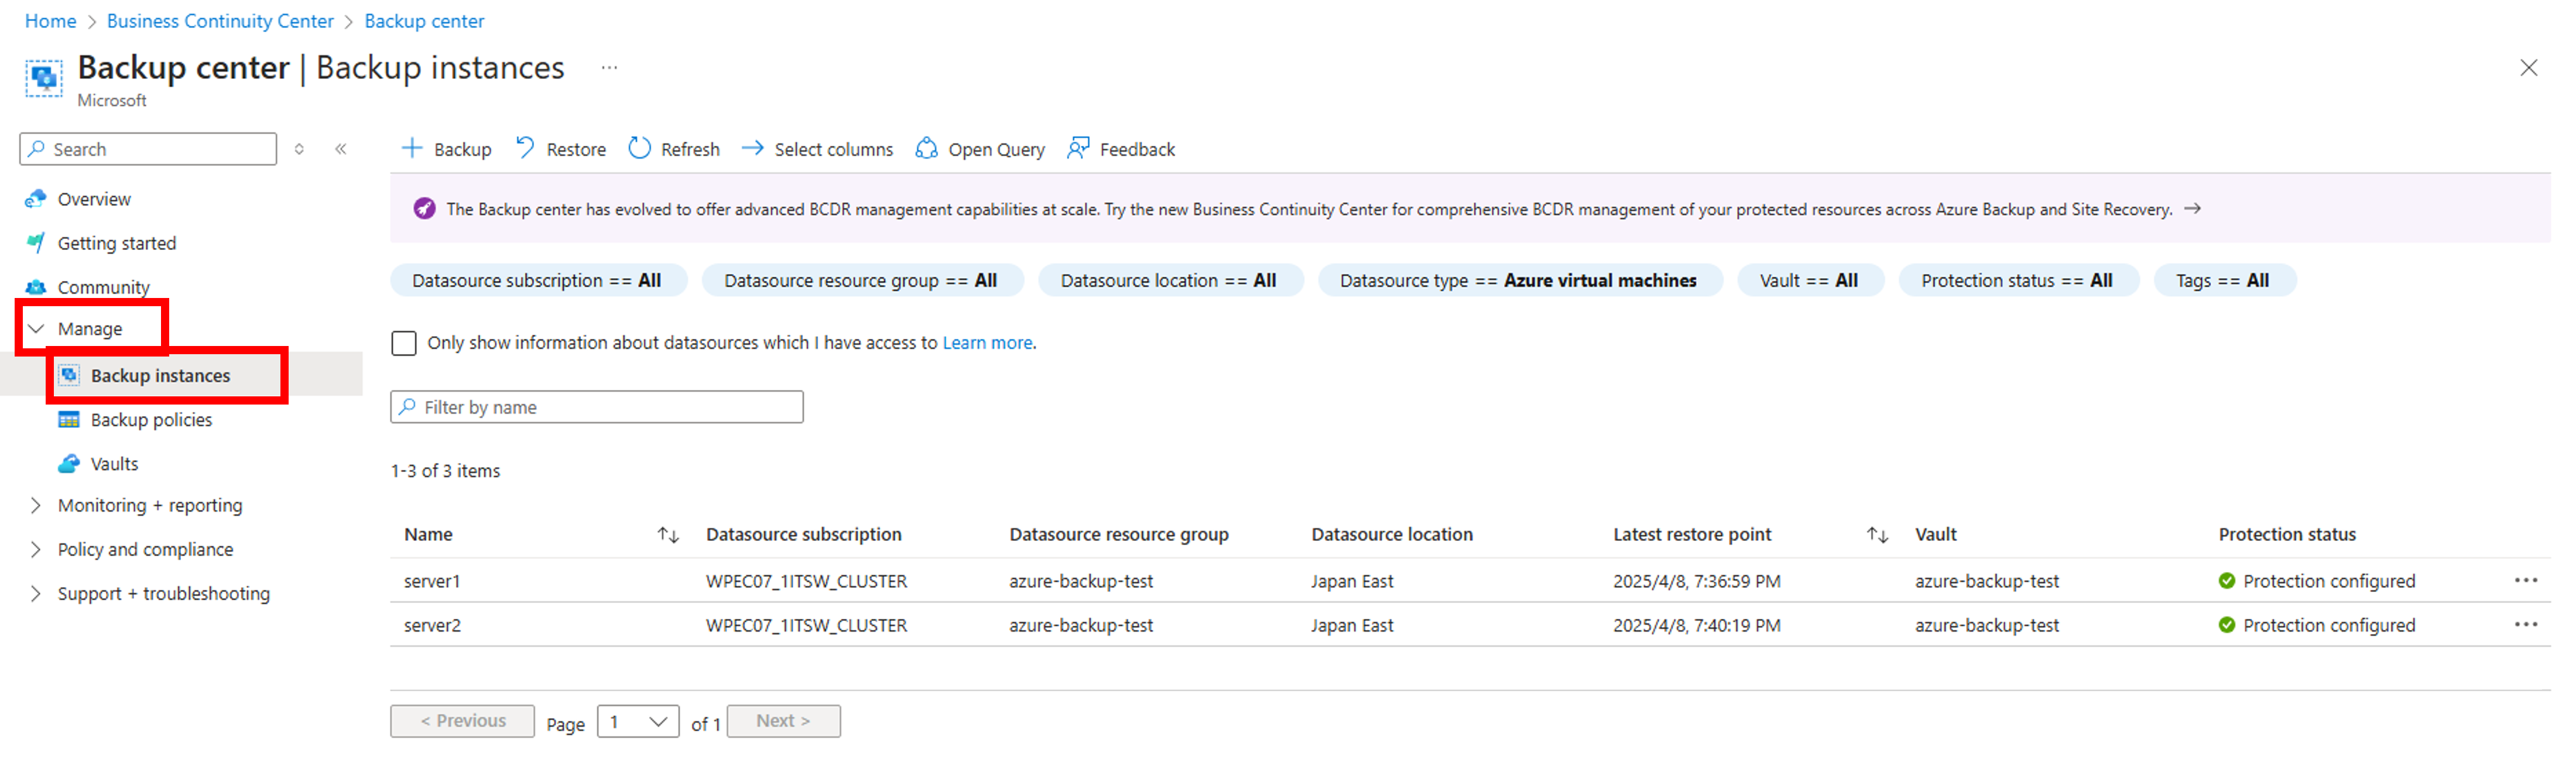
- ・Right-click the row of VM to be backed up or click the […] icon on the far right, then click [Backup now].
For this test, set the backup retention period to the shortest, which is 2 days.
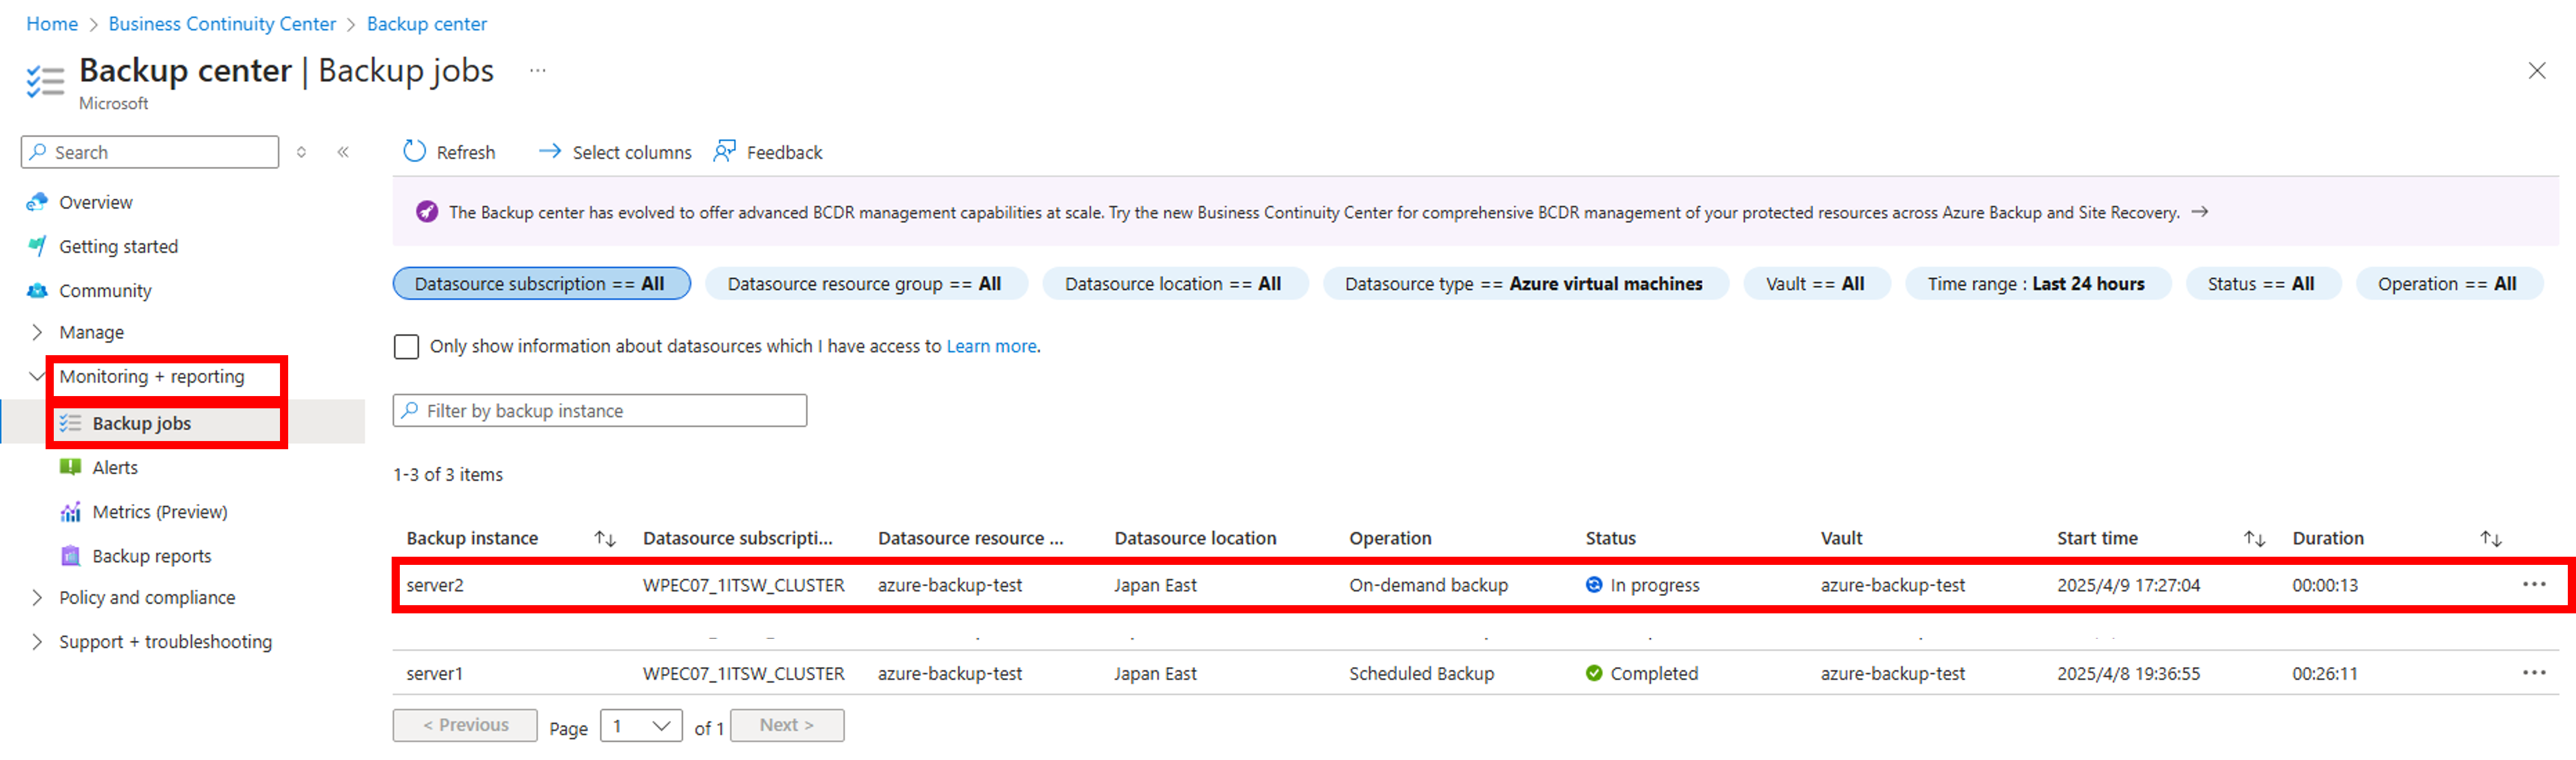
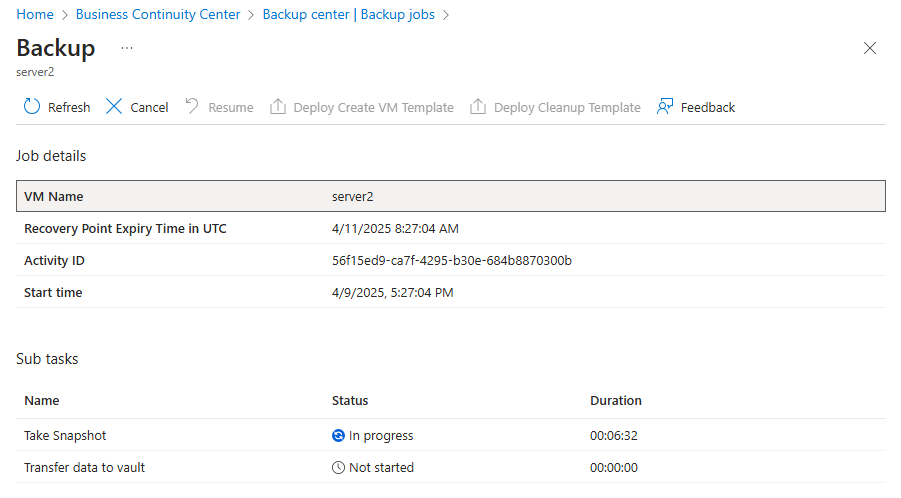
- ・To check the backup status, expand the [Monitoring + reporting] in the Backup center to display the [Backup Jobs] pane, and click on the relevant job.
4.4 Executing the Post-backup Command on the Standby Server
By executing the post-backup command, change the mirror disk to normal mode, set automatic startup for various EXPRESSCLUSTER services, and restart the server.
Once the backup of the standby server is complete, proceed with the following actions:
- ・Start the standby server from the Microsoft Azure portal.
- ・Execute the following command on the standby server.
# clpbackup.sh --post
clpbackup.sh : Starting Mirror Agent.
Command succeeded.
clpbackup.sh : Ending backup-mode.
All backup flags have set to <OFF>.
clpbackup.sh : Changing the setting of cluster services to Auto Startup.
clpbackup.sh : Stopping Mirror Agent.
Command succeeded.
clpbackup.sh : Rebooting...
4.5 Resuming Monitoring of the Mirror Disk on the Active Server
Resume the mirror disk monitoring on the active server.
- ・Execute the following command on the active server.
- *If there are multiple mirror disk monitor resources, resume all mirror disk monitor resources.
- *After the standby server reboots, it automatically returns to the cluster, and the mirror disk monitoring on the standby server automatically resumes.
# clpmonctrl -r -h server1 -m mdw1
Command succeeded.
# clpmonctrl -r -h server1 -m mdw2
Command succeeded.
- *
4.6 Switching Backup Targets and Performing Backup
After failing over the failover group and switching the backup target, back up the other server as well.
- ・Failover the failover group to the standby server.
Execute the following command on the active server.
# clpgrp -m failover
Command succeeded.
- ・After the failover is completed, perform steps 4.1 to 4.5 to back up the other server as well.
5. Azure VM Restore Procedure
Restore Azure VM data from recovery points stored in the Recovery Services vault. This time, the system disk of both the active and standby servers and the two mirrored disks are assumed to have failed and will be replaced, so we'll restore the system disk and the two mirrored disks together.
The flow of the restore procedure is as follows:
- ①Azure VM Restore
- ②Checking the Mirror Disk settings
- ③Executing Post-restore Command
clprestore --post - ④Mirror Recovery of the Mirror Disk
Please refer to the following for details on the restore procedure.
[Reference]How to restore Azure VM data in Azure portal
-
Replace existing disks
[Reference]Documentation - Manuals
-
EXPRESSCLUSTER X 5.3 > EXPRESSCLUSTER X 5.3 for Linux > Maintenance Guide
2.19 How to restore a virtual machine ~For a mirror disk~
→ 2.21 How to restore the mirror/hybrid disk from the disk image
→ 2.21.2 Simultaneously restoring the mirror disks on both the active and standby servers from their respective disk images
In the procedures introduced this time, since the method of replacing existing VMs is adopted, no additional license is required. However, if restoring (duplicating) by creating a new VM from a backup, you need to prepare an additional license for the destination environment.
For more details, please refer to the Japanese FAQ below.
5.1 Azure VM Restore
Restore both active and standby servers.
First, shut down the servers, then start the restoration.
After shutting down the servers, perform the following steps on both active and standby servers.
- ・Shut down the cluster.
Execute the following command on the active server.
# clpstdn
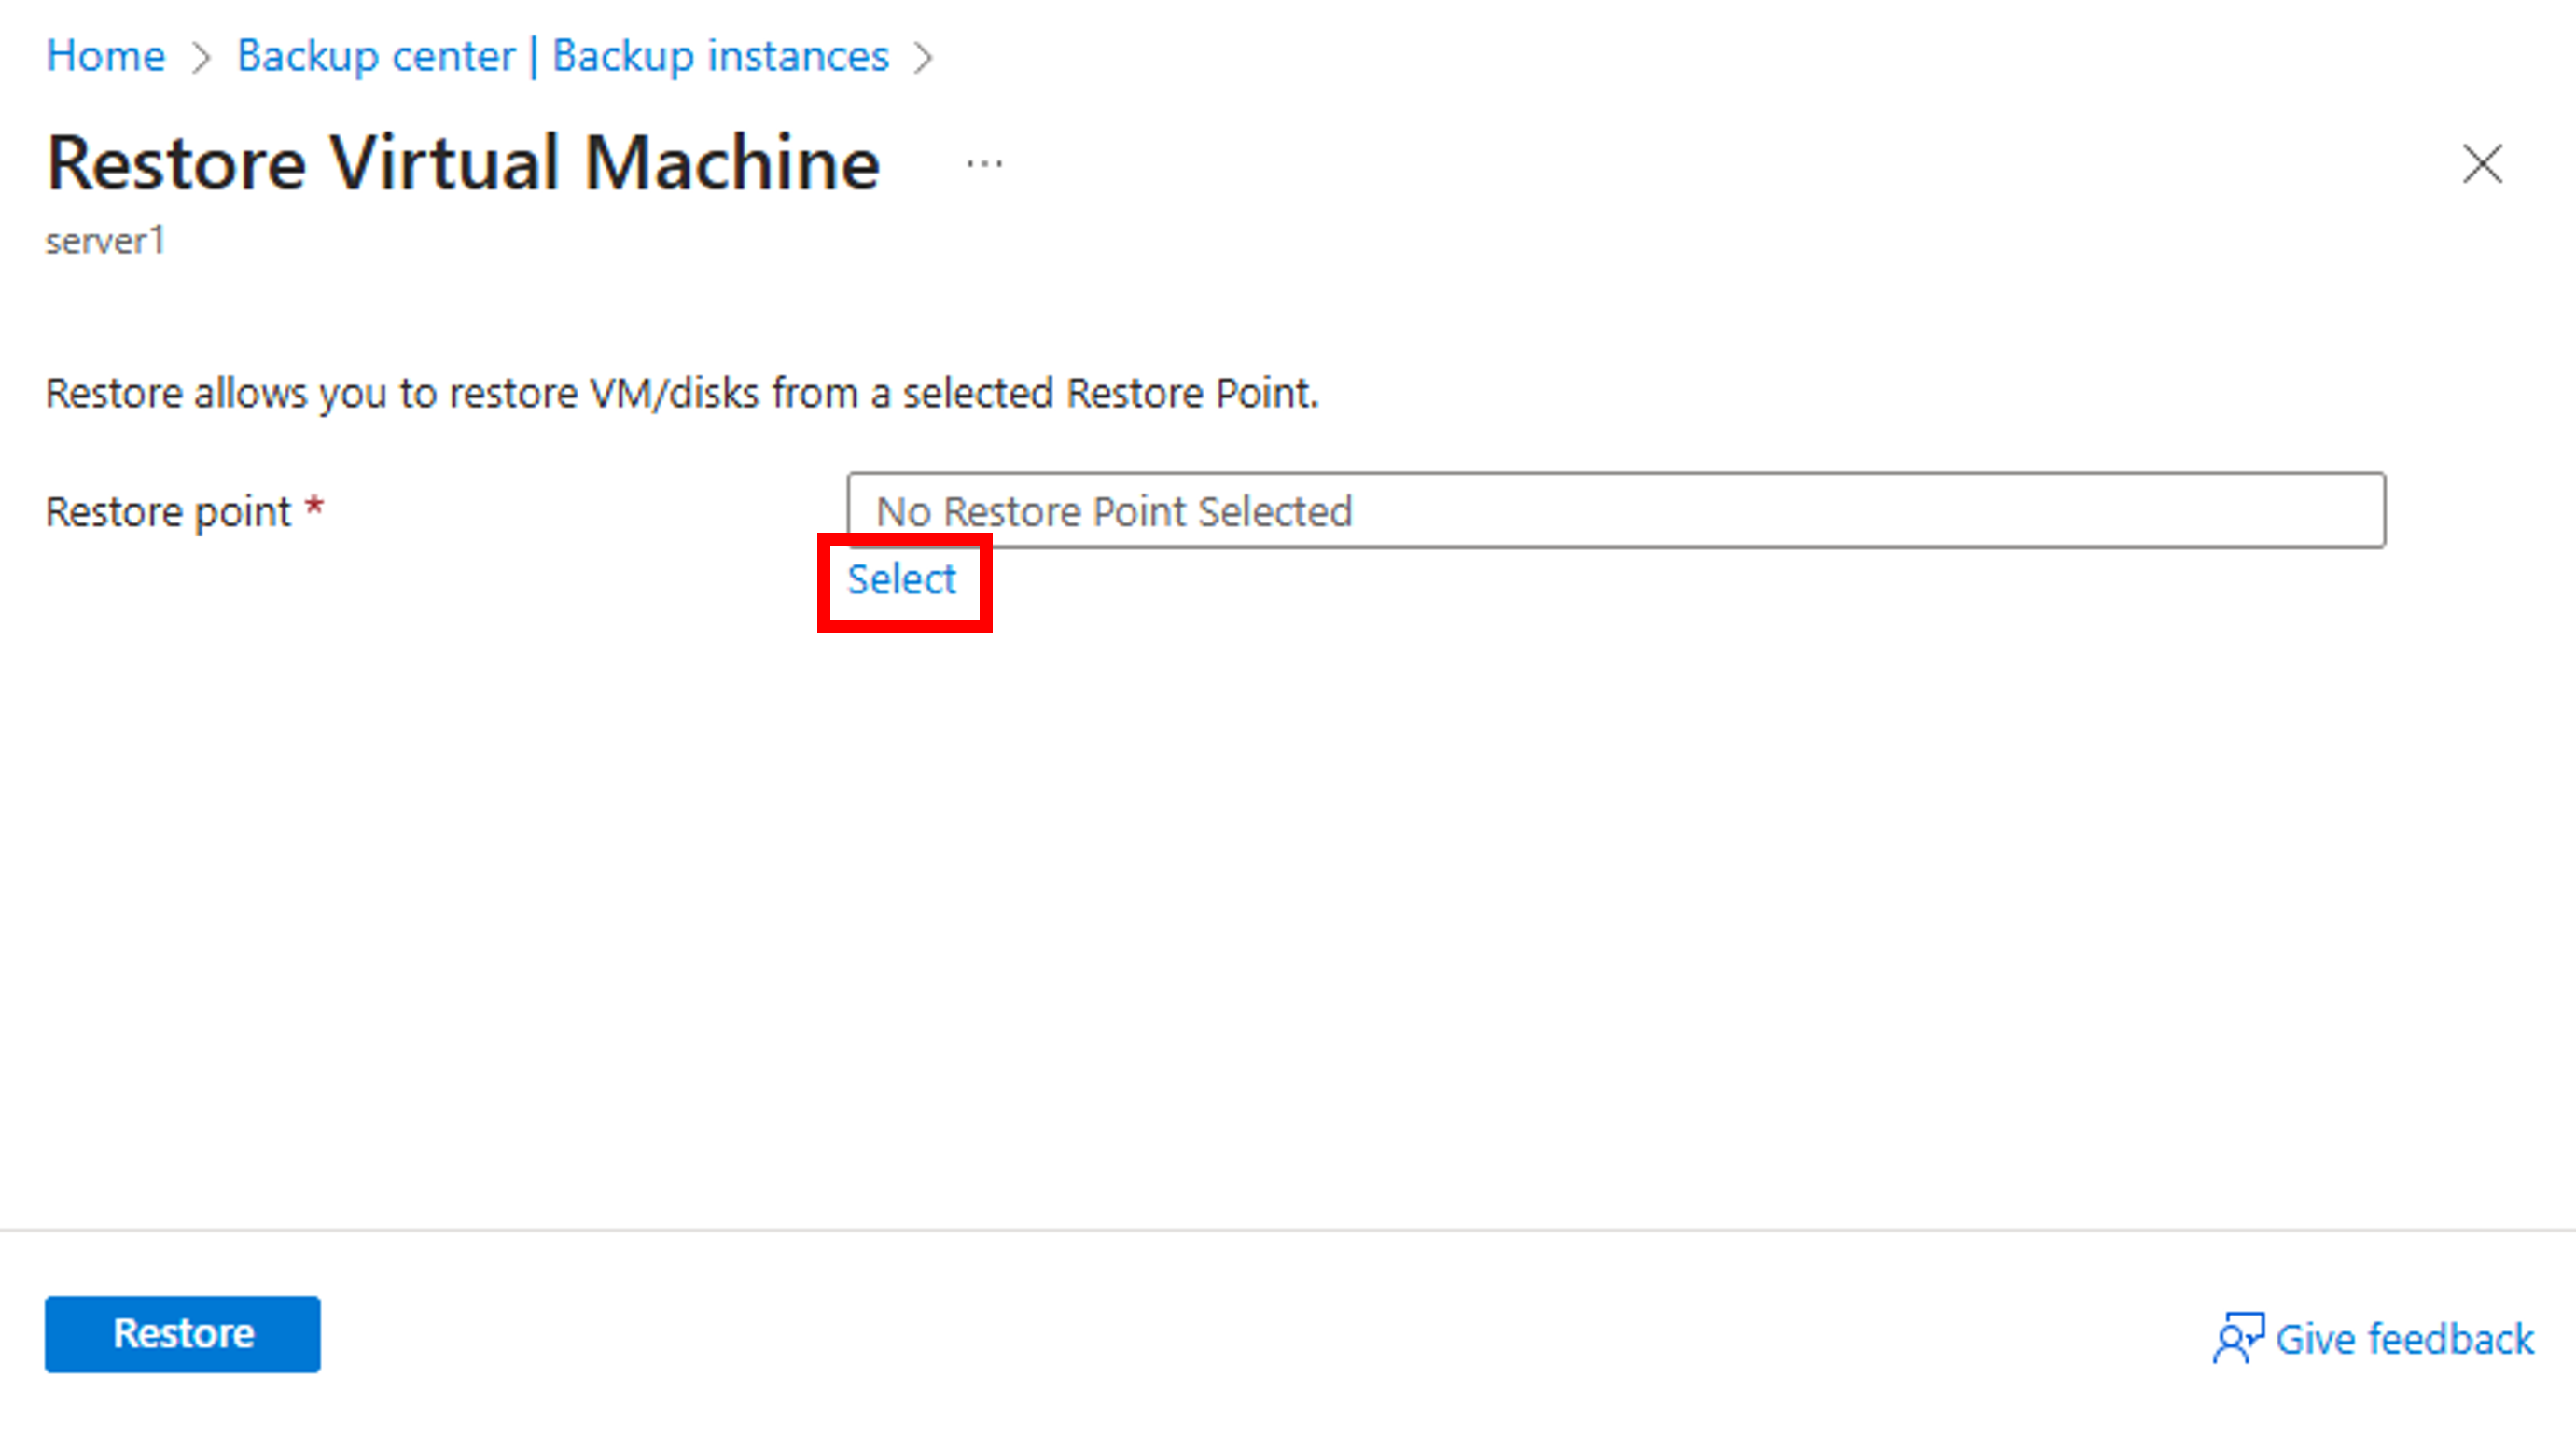
Command succeeded. - ・Expand the [Manage] menu on the backup center to display the [Backup Instances] pane.
Right-click the row of VM to be restored or click the […] icon on the far right, then click [Restore].
Next, click Select to choose a restore point.
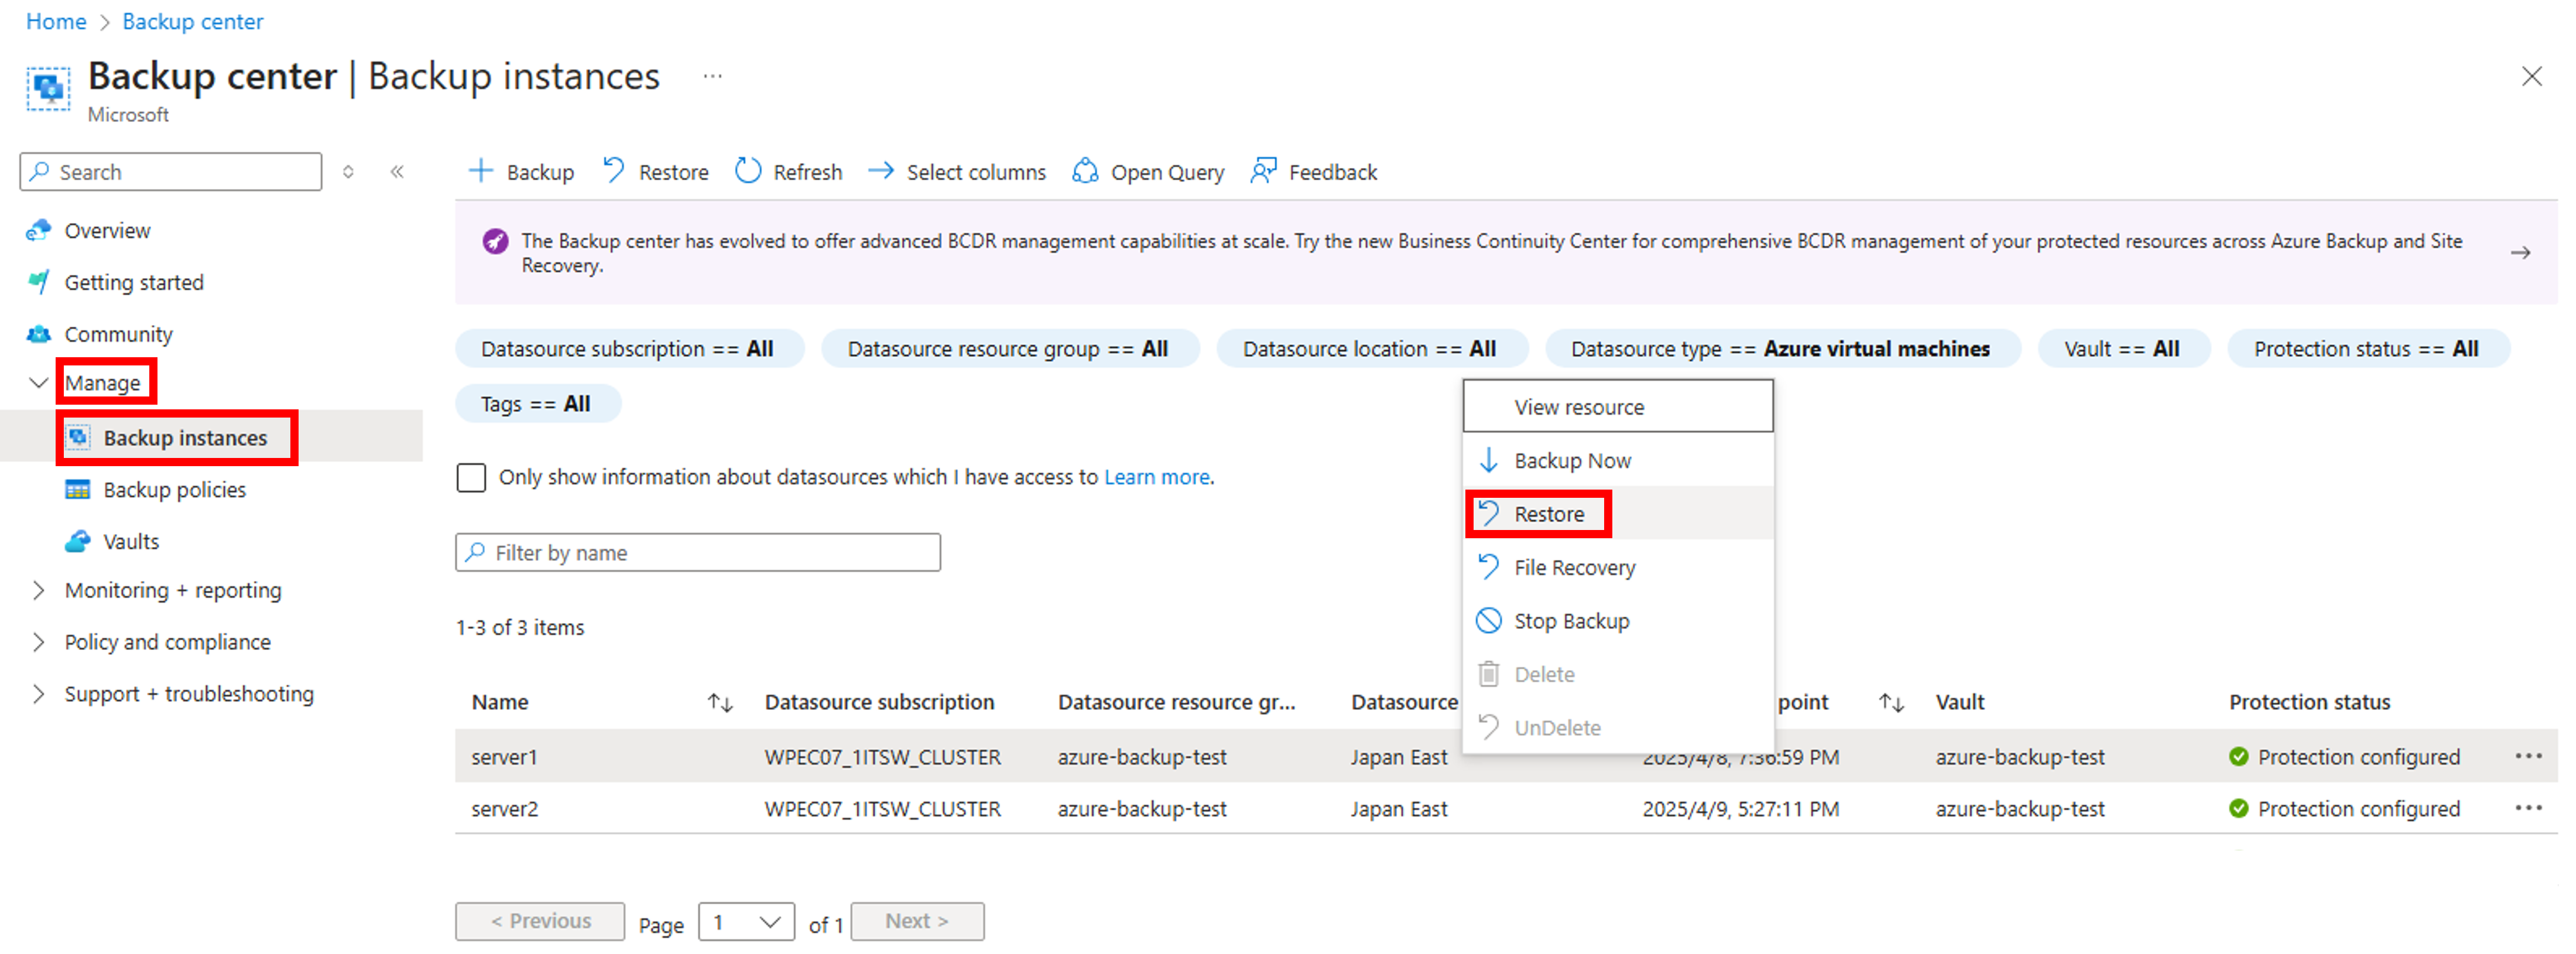
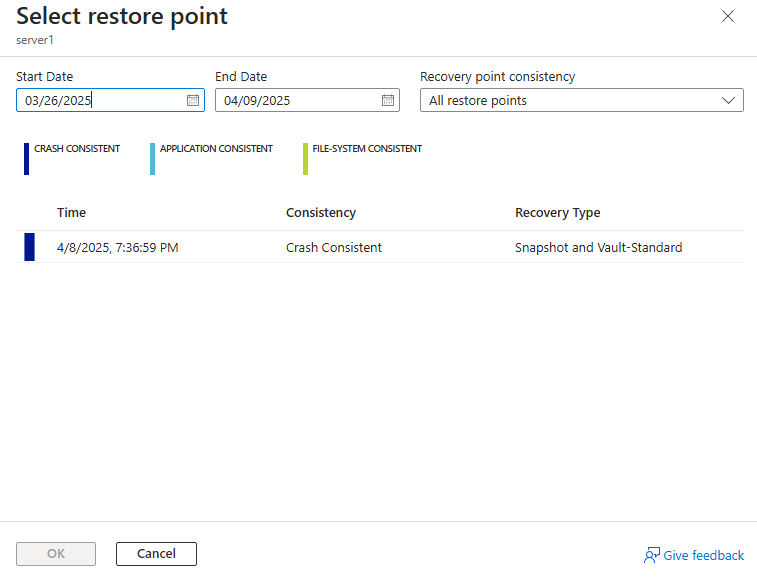
- ・Select a restore point from the displayed list.
- ・Select “Replace existing” under [Restore Configuration].
Choose the staging location and start the restore.
To check the status of the restore, just like during backup, expand [Monitoring + reporting] in the Backup Center, display the [Backup Jobs] pane, and click the relevant job.
- *By selecting “Create New” in [Restore Configuration], you can create a new VM.
However, when creating a new VM, please note that you will need to purchase an additional EXPRESSCLUSTER license for the newly created VM, as mentioned above.
5.2 Checking the Mirror Disk settings
After completing the restore, check the disk configuration.
As explained in Chapter 2, if the device file name of the mirror disk resource specifies the device name of the logical volume or specifies a symbolic link, this procedure is not necessary.
Please proceed to the next step 5.3.
- ・Activate both the active and standby servers from the Microsoft Azure portal.
- ・Check the path of the restored cluster partition and data partition.
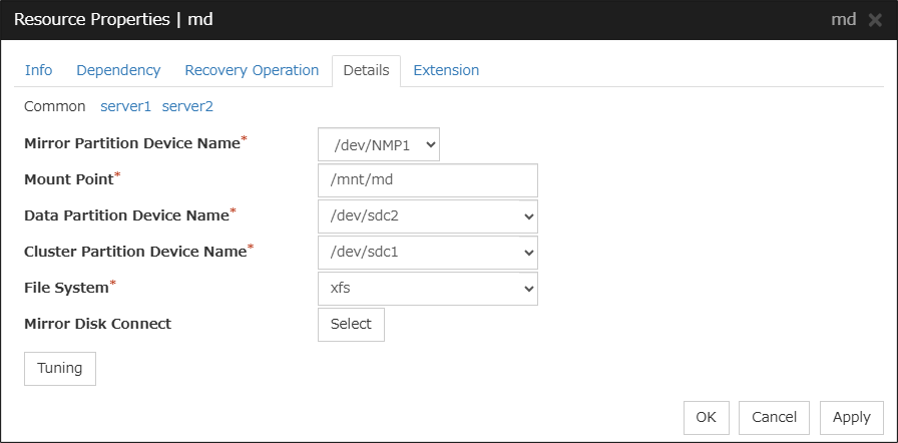
If the path has changed, start the Cluster WebUI and, from "Config mode," enter the correct path in the data partition device name and cluster partition device name on the [Details] tab of the resource properties of the mirror disk resource.
After checking, apply the update.- *Particular attention is required to check that there is no swapping of disk device names when there are multiple mirror disk resources.
It is recommended to set up a logical volume as described in "2. HA Cluster Configuration for Backup and Restore Targets" to prevent the swapping of disk device names, or to specify a symbolic link to the device name.
- *
5.3 Executing Post-restore Command (Active/Standby)
After completing the restore, by executing the post-processing command, set the automatic startup of various EXPRESSCLUSTER services to on, and the server will be restarted.
- ・Start both the active and standby servers from the Microsoft Azure portal. (If they are already started in step 5.2, proceed to the next step.)
- ・Since the entire OS was restored, in actual operation, due to differences in backup timing, the EXPRESSCLUSTER settings may differ between the active server and the standby server. In such cases, please correct to the proper settings and update those changes.
- ・Execute the following command on both active and standby servers.
# clpbackup.sh --post
clprestore.sh : Changing the setting of cluster services to Auto Startup.
clprestore.sh : Rebooting...
5.4 Mirror Recovery of the Mirror Disk
After restarting the server, the status of the mirror disk resource will be error, so you need to return the mirror disk resource to a normal state and start the mirror recovery.
- ・Check the server where the failover group is running.
Execute the following command on either server1 or server2.
The server displayed as “current” in the output is the server where the failover group is running.- *If there are multiple mirror disk resources, make a full copy for each mirror disk resource.
- *
# clpstat
======================== CLUSTER STATUS ========================
Cluster : cluster
<server>
* server1 ...: Online
server2 ...: Online
lankhb1 : Normal Kernel Mode LAN Heartbeat
lankhb1 : Normal Kernel Mode LAN Heartbeat
<group>
failover ........: Error
current : server1
azurepp : Online
md : Online Failure
md2 : Online Failure
<monitor>
azurelbw1 : Normal
azureppw1 : Normal
mdnw1 : Normal
mdnw2 : Norml
mdw1 : Error
mdw2 : Error
userw : Normal
============================================================
- ・First, stop the failover group.
Execute the following command on the server where the failover group is running.
# clpgrp -t failover
Command succeeded.
- ・Then, set the state of the mirror disk to "normal" on the server whose data you want to be up to date. In this case, we will make server1 the server with the most recent data and resume operations as the active server.
Execute the following command on the active server.- *If there are multiple mirror disk resources, make all mirror disk resources normal.
# clpmdctrl --force md
md: Forced recovery has completed successfully.
# clpmdctrl --force md2
md2: Forced recovery has completed successfully. - *
- ・Start the failover group on the active server.
Execute the following command on the active server.
# clpgrp -s failover
Command succeeded.
- ・Check that the restore from the backup point is complete. Business operations can resume from this point.
- ・Finally, make a full copy of the data from the mirror disk on the active server to the standby server.
Execute the following command on the active server.- *If there are multiple mirror disk resources, make a full copy for each mirror disk resource.
- *
# clpmdctrl --recovery md
<md>: recovery started
# cclpmdctrl --recovery md2
<md2>: recovery started
- ・After the full copy is completed, move the failover group to the server where the data was copied, and check that you can access the data correctly.
Conclusion
This time, I tried using Azure VM Backup to backup and restore the system disk and additional disk (mirror disk) of an Azure VM. The feature of Azure Backup that allows for easy backup and restoration of data is attractive.
If you consider introducing the configuration described in this article, you can perform a validation with the trial module of EXPRESSCLUSTER. Please do not hesitate to contact us if you have any questions.