Global Site
Displaying present location in the site.
August 28th, 2025
Machine translation is used partially for this article. See the Japanese version for the original article.
Introduction
We tried backing up and restoring a mirror disk using Block Volume Backups for a mirror disk type HA cluster built on Oracle Cloud Infrastructure (hereinafter called "OCI").
OCI provides an easy way to obtain data backups using the Block Volume Backups feature. The obtained backups can be restored at any time by generating a new block volume.
In this article, we will introduce the procedure for backing up and restoring the block volume used for the mirror disk.
Contents
1. What is Block Volume Backups?
Using the Block Volume Backups feature, you can create point-in-time snapshots of the data on a block volume. These backups are stored in Object Storage. As a best practice for creating a block volume backup, it is recommended to establish a quiescent point to maintain data integrity when creating a backup.
When restoring, you create a new block volume using the backup stored in Object Storage. Restoring a block volume from a backup recreates all data exactly as it was at the specified point in time. It is possible to restore the block volume to its state at the time of backup by replacing the block volume attached to the compute instance with the restored block volume.
[Reference] Overview of Block Volume Backups
2. HA Cluster Configuration
We will build a "mirror disk type HA cluster using Oracle Cloud DNS resources" on OCI.
The configuration is as follows.

OCI Configuration(Ashburn region:us-ashburn-1)
-
VCN (CIDR: 10.0.0.0/16)
- Subnets
- Public Subnet:10.0.10.0/24
- Private Subnet:10.0.110.0/24
- Internet Gateway
- NAT Gateway
-
Compute Instances
- Server1 (Active Instance):server1
- OS
- Oracle Linux 9.2
- IP Configuration
- Primary IP:10.0.110.101
- Server2 (Standby Instance):server2
- OS
- Oracle Linux 9.2
- IP Configuration
- Primary IP:10.0.110.102
EXPRESSCLUSTER Configuration
-
EXPRESSCLUSTER X 5.2 for Linux (Internal Ver. 5.2.0-1)
-
Failover group (failover)
- Oracle Cloud DNS resource (ocdns)
- Mirror disk resource (md)
- Mount point:/mnt/mirror
- Data partition:/dev/oracleoci/oraclevdb2
- Cluster partition:/dev/oracleoci/oraclevdb1 -
Monitor resource
- Oracle Cloud DNS monitor resource (ocdnsw1)
- Mirror disk connect monitor resource (mdnw1)
- Mirror disk monitor resource (mdw1)
Disk Configuration
-
Block volume(Mirror disk)
-
Attachment type:paravirtualized
-
Device path:/dev/oracleoci/oraclevdb
-
Access:Read/Write
- *Create cluster partition and data partition on the same block volume.
# lsblk
NAME MAJ:MIN RM SIZE RO TYPE MOUNTPOINTS
sda 8:0 0 46.6G 0 disk
├─sda1 8:1 0 100M 0 part /boot/efi
├─sda2 8:2 0 2G 0 part /boot
└─sda3 8:3 0 44.5G 0 part
├─ocivolume-root 253:0 0 29.5G 0 lvm /
└─ocivolume-oled 253:1 0 15G 0 lvm /var/oled
sdb 8:16 0 50G 0 disk
├─sdb1 8:17 0 1G 0 part ← Cluster partition
└─sdb2 8:18 0 4G 0 part ← Data partition
# ls -l /dev/oracleoci/oraclevd*
lrwxrwxrwx 1 root root 6 Jul 22 04:30 /dev/oracleoci/oraclevda -> ../sda
lrwxrwxrwx 1 root root 7 Jul 22 04:30 /dev/oracleoci/oraclevda1 -> ../sda1
lrwxrwxrwx 1 root root 7 Jul 22 04:30 /dev/oracleoci/oraclevda2 -> ../sda2
lrwxrwxrwx 1 root root 7 Jul 22 04:30 /dev/oracleoci/oraclevda3 -> ../sda3
lrwxrwxrwx 1 root root 6 Jul 22 04:32 /dev/oracleoci/oraclevdb -> ../sdb
lrwxrwxrwx 1 root root 7 Jul 22 04:32 /dev/oracleoci/oraclevdb1 -> ../sdb1 ← Cluster partition
lrwxrwxrwx 1 root root 7 Jul 22 04:32 /dev/oracleoci/oraclevdb2 -> ../sdb2 ← Data partition
OCI supports consistent device paths for block volumes attached to instances. When you attach a block volume to an instance, you can select a device path that remains consistent between instance reboots.
In this procedure, you need to configure policies in advance to execute OCI CLI when performing operations such as starting a compute instance, creating a block volume backup, restoring a block volume from a backup, and detaching/attaching a block volume. The required policies for this article are as follows. Since the above operations are executed from the client, you will also install OCI CLI in the client.
| Policy syntax | Description |
|---|---|
| Allow <subject> to use dns in <location> | Required to create, update, or delete an A record of Oracle Cloud DNS, or to retrieve information on it. * It is not required if you do not use Oracle Cloud DNS resource. |
| Allow <subject> to manage volume-family in <location> | Required to performing all operations related to block volumes and backups. |
| Allow <subject> to use instance-family in <location> | Required to stop or restart an instance, or to retrieve information on it. |
Please refer to the following for details on how to set up OCI CLI and policy syntax.
[Reference]QuickstartPolicy Syntax
3. Overview of Backup and Restore
In this article, we will perform backup and restoration of the mirror disk, assuming a case where data on the mirror disk has been accidentally deleted due to an operational error. If data on the active instance is deleted due to an operational error, it will also be mirrored to the standby instance, resulting in data loss on both instances.
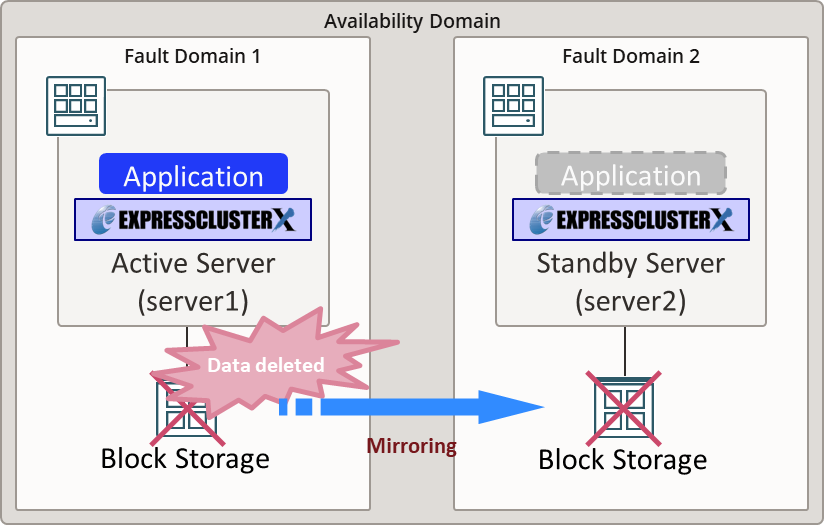
Therefore, you back up the "mirror disk of the standby instance" and, in the event of an emergency, replace the mirror disks of the active and the standby instances with the block volume created from the backup. Because the contents of the active and the standby mirror disks are the same and there are no differences, recovery can be performed without executing a full copy.
- *If you restore the mirror disk only to the active instance, a full copy from the active to the standby instance will be required to complete the recovery.
For more detailed procedures and information on other backup and restore methods, please refer to the following:
[Reference]Documentation - Manuals
-
EXPRESSCLUSTER X 5.2 > EXPRESSCLUSTER X 5.2 for Linux > Maintenance Guide
→ 2. The system maintenance information
→ 2.19 How to back up a mirror/hybrid disk to its disk image
→ 2.20 How to restore the mirror/hybrid disk from the disk image
4. Backup Procedure
We will introduce the procedure to obtain a backup from a block volume attached to the standby instance.
4.1 Stopping a Failover Group
Verify that the mirror disk is synchronized successfully.
Execute the following command on either the active or standby instance to ensure that the mirror disk status is normal (GREEN). The state of the mirror disks can also be determined by the return value of the command. If both the active and standby instances are normal (GREEN), the command will return a value of 17.
Execution example
# clpmdstat --mirror md
Mirror Status: Normal
md server1 server2
------------------------------------------------------------
Mirror Color GREEN GREEN
# echo $?
17
For more details on return values, please refer to the following:
[Reference]Documentation - Manuals
-
EXPRESSCLUSTER X 5.2 > EXPRESSCLUSTER X 5.2 for Linux > Reference Guide
→ 9. EXPRESSCLUSTER command reference
→ 9.14 Mirror-disk-related commands
→ 9.14.1 Displaying the mirror status (clpmdstat command)
→ Return value(--mirror, -m)
After verifying the synchronization status, stop the failover group to ensure the quiescent point.
Execute the following command on the active instance.
Execution example
# clpgrp -t failover
Command succeeded.
4.2 Stopping a Mirror Disk Synchronization
Suspend the mirror disk monitor resource to prevent the auto-mirror recovery from being triggered.
Execute the following command on either the active or standby instance
- *Suspend the mirror disk monitor resource on both the active and the standby instances.
Execution example
# clpmonctrl -s -h server1 -m mdw1
Command succeeded.
# clpmonctrl -s -h server2 -m mdw1
Command succeeded.
4.3 Executing Pre-processing Command for Backup
Execute the following command on the standby instance.
Execution example
# clpbackup.sh --pre --no-shutdown
clpbackup.sh : Beginning backup-mode.
All backup flags have set to <ON>.
clpbackup.sh : Changing the setting of cluster services to Manual Startup.
clpbackup.sh : Stopping Cluster Service.
Command succeeded.
clpbackup.sh : Stopping Mirror Agent.
Command succeeded.
clpbackup.sh : Command succeeded.
After executing the above command, the mirror disk of the standby instance enters backup mode, EXPRESSCLUSTER services are set not automatically started. As a result, the cluster service stops on the standby instance.
If you want to resume your business operation immediately, start the failover group on the active instance at this stage.
Execute the following command on the active instance.
Execution example
# clpgrp -s failover
Command succeeded.
4.4 Obtaining the Block Volume Backup
Obtain a backup of the block volume used for the mirror disk on the standby instance.
Execute the following command on the client.
Execution example
> oci bv backup create --volume-id ocid1.volume.oc1.ap-tokyo-1.xxxxxxxxxx --display-name Mirror-Disk-Backup --type FULL
| Parameters | Description |
|---|---|
| --volume-id | The OCID of the block volume attached to the standby instance. |
| --display-name | Name of the new block volume backup to be created. |
| --type | Full backup/Incremental backup |
Confirm in the OCI Console etc, that the block volume backup has been successfully created. Note the OCID of the created block volume since it will be used later. The OCID of the block volume can be obtained from the [id] value included in the command execution results.
Additionally, once the backup state changes from REQUEST_RECEIVED to CREATING after the backup has started, you can resume writing data to the volume. Proceed to the next section "4.5 Executing Post-processing Command for Backup".
4.5 Executing Post-processing Command for Backup
Execute the following command on the standby instance.
Execution example
# clpbackup.sh --post --no-reboot
clpbackup.sh : Starting Mirror Agent.
Command succeeded.
clpbackup.sh : Ending backup-mode.
All backup flags have set to <OFF>.
clpbackup.sh : Changing the setting of cluster services to Auto Startup.
clpbackup.sh : Starting Cluster Service.
Command succeeded.
clpbackup.sh : Command succeeded.
After executing the above command, the mirror disk of the standby instance enters normal mode, and EXPRESSCLUSTER services are set to start automatically. As a result, the cluster service starts on the standby instance.
4.6 Resume a Mirror Disk Synchronization
Resume monitoring the mirror disk on the active instance.
Execute the following command on the active instance.
Execution example
# clpmonctrl -r -h server1 -m mdw1
Command succeeded.
- *After executing the command, the standby instance automatically returns to the cluster and the mirror disk monitor resource also resumes automatically.
If the failover group was not started on the active instance in "4.2 Stopping a Mirror Disk Synchronization", start it and restart mirror synchronization.
Execute the following command on the active instance.
Execution example
# clpgrp -s failover
Command succeeded.
If the auto-mirror recovery is enabled, the differences between the active and the standby instance mirror disks made during the backup operation are automatically synchronized, and they are restored to normal status. If the auto-mirror recovery is not executed and the mirror disk does not go back to normal, execute the following command on either the active or standby instance.
Execution example
# clpmdctrl --recovery md
Verify the status of the mirror disk resource and the failover group to ensure that the cluster is normal. If the status of the mirror disk resource is abnormal, wait a while until synchronization is complete and then check again.
Execute the following command on the active or the standby instance.
Execution example
# clpmdstat --mirror md
Mirror Status: Normal
md server1 server2
------------------------------------------------------------
Mirror Color GREEN GREEN
# clpstat -s
======================== CLUSTER STATUS ===========================
Cluster : cluster
<server>
*server1 .........: Online
lankhb1 : Normal Kernel Mode LAN Heartbeat
server2 .........: Online
lankhb1 : Normal Kernel Mode LAN Heartbeat
<group>
failover ........: Online
current : server1
md : Online
ocdns : Online
<monitor>
mdnw1 : Normal
mdw1 : Normal
ocdnsw1 : Normal
userw : Normal
=====================================================================
5. Restore Procedure
We will introduce the procedure for restoring mirror disks on the active and standby instances from a block volume backup.
5.1 Changing Mirror Disk Resource Setting
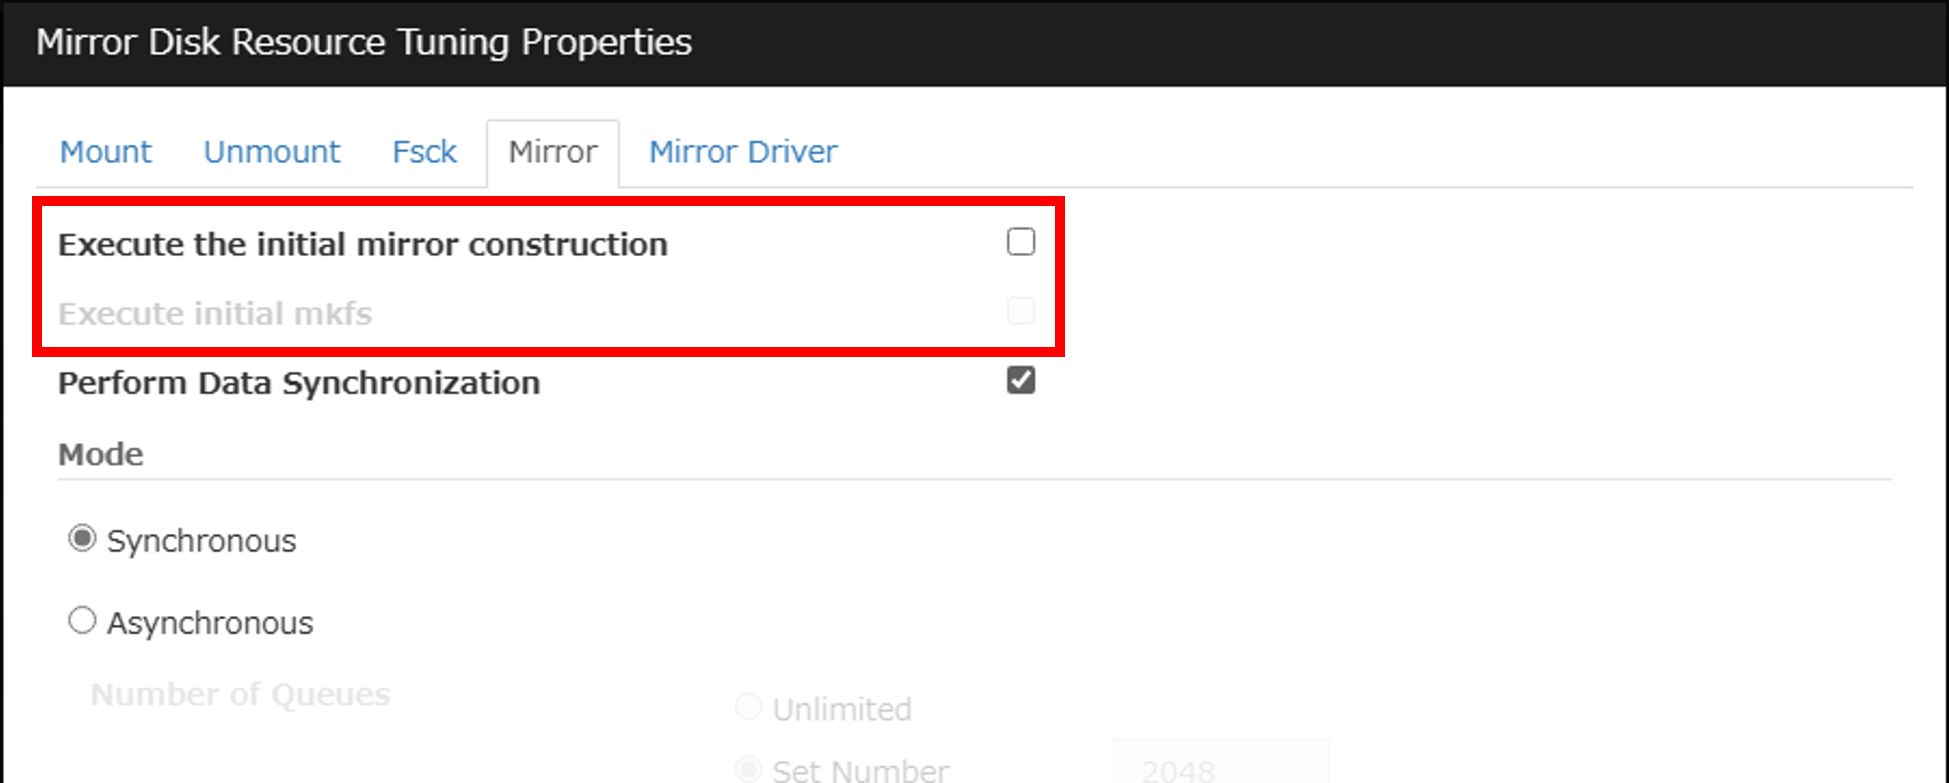
When executing the post-processing command for restore, [Execute the initial mirror construction] must be disabled in the mirror disk resource settings.
(If it is enabled, the post-processing command for restore cannot be executed.)
Connect to Cluster WebUI from the client and switch to "Config mode". In the properties of the mirror disk resource, click the [Tuning] button on the [Details] tab. If [Execute the initial mirror construction] is enabled on the [Mirror] tab, disable it. After changing the settings, click [Apply the Configuration File].
5.2 Creating Block Volumes
Create a new block volume for each mirror disk of the active and the standby instances from the block volume backup taken in "4.4 Obtaining the Block Volume Backup".
Execute the following command on the client. The execution example demonstrates how to create a new block volume for the active instance from a block volume backup.
Execution example
> oci bv volume create --availability-domain ap-tokyo-1 --compartment-id ocid1.compartment.oc1.xxxxxxxxxx --display-name Mirror-Disk-Restore1 --volume-backup-id ocid1.volume.oc1.ap-tokyo-1.xxxxxxxxxx
| Parameters | Description |
|---|---|
| --availability-domain | Availability domain. The value can be obtained by executing the oci iam availability-domain list command and looking at the value of [name] in the command execution result. |
| --compartment-id | Compartment OCID. |
| --display-name | Name of the new block volume to be created. Example: For the active instance: Mirror-Disk-Restore1, For the standby instance: Mirror-Disk-Restore2. |
| --volume-backup-id | OCID of the block volume backup created in "4.4 Obtaining the Block Volume Backup". |
Confirm in the OCI console etc, that the block volume has been created. Note the OCID of the created block volume since it will be used later. The OCID of the block volume can also be obtained from the [id] value included in the command execution result.
5.3 Stopping a Failover Group
Stop the failover group.
Execute the following command on the active instance.
Execution example
# clpgrp -t failover
Command succeeded.
5.4 Executing Pre-processing Command for Restore(Stopping the Active/Standby Instance)
Execute the following command on both the active and the standby instances.
Execution example
# clprestore.sh --pre
clprestore.sh : Changing the setting of cluster services to Manual Startup.
clprestore.sh : Shutting down...
Command succeeded.
clprestore.sh : Command succeeded.
After executing the above command, EXPRESSCLUSTER services are set to start manually, and the instance will shut down.
5.5 Detaching Block Volumes
Obtain the OCID of the attachment, which is required when detaching. Obtain it from both the active and the standby instances. The OCID of the attachment can be obtained from the [id] value included in the command execution result.
Execute the following command on the client.
Execution example
> oci compute volume-attachment list --compartment-id ocid1.compartment.oc1.xxxxxxxxxx --instance-id ocid1.instance.oc1.ap-tokyo-1.xxxxxxxxxx
| Parameters | Description |
|---|---|
| --compartment-id | Compartment OCID. |
| --instance-id | OCID of the active/standby instance. |
Before detaching the block volume of the mirror disk of each instance, check the existing configuration. This is to ensure that you can set the same configuration after replacing the block volume. Obtain it from both the active and the standby instances.
Execute the following command on the client.
Execution example
> oci compute volume-attachment get --volume-attachment-id ocid1.volumeattachment.oc1.ap-tokyo-1.xxxxxxxxxx
| Parameters | Description |
|---|---|
| --volume-attachment-id | The OCID of the attachment obtained from the active/standby instances in "5.5 Detaching Block Volumes". |
Note the values of [attachment-type], [device], and [is-shareable] from the command execution result, as these will be used as the configuration values when attaching the block volumes created in "5.2 Creating Block Volumes" to the active and the standby instances.
Detach the block volumes for the mirror disk on both instances.
Execute the following command on the client.
Execution example
> oci compute volume-attachment detach --volume-attachment-id ocid1.volumeattachment.oc1.ap-tokyo-1.xxxxxxxxxx
| Parameters | Description |
|---|---|
| --volume-attachment-id | The OCID of the attachment obtained from the active/standby instances in "5.5 Detaching Block Volumes". |
Confirm in the OCI console etc, that the block volumes have been detached from both the active and the standby instances.
5.6 Attaching Block Volumes
Attach the block volumes created in "5.2 Creating Block Volumes" to both instances.
Execute the following command on the client.
Execution example
> oci compute volume-attachment attach --instance-id ocid1.instance.oc1.ap-tokyo-1.xxxxxxxxxx --type paravirtualized --volume-id ocid1.volume.oc1.ap-tokyo-1.xxxxxxxxxx --device /dev/oracleoci/oraclevdb --is-shareable false
| Parameters | Description |
|---|---|
| --instance-id | OCID of the active/standby instances to which you want to attach the block volume created in "5.2 Creating Block Volumes". |
| --type | The value of [attachment-type] for the active/standby instances that you noted down in "5.5 Detaching Block Volumes". |
| --volume-id | OCID of the block volume for the active/standby instances created in "5.2 Creating Block Volumes". |
| --device | The value of [device] for the active/standby instances that you noted down in "5.5 Detaching Block Volumes". |
| --is-shareable | The value of [is-shareable] for the active/standby instances that you noted down in "5.5 Detaching Block Volumes". * If set to false, this parameter does not need to be specified. |
Confirm in the OCI console etc, that the block volumes have been successfully attached to both the active and standby instances.
5.7 Starting the Active/Standby Instance
Execute the following command on the client, start both the active and the standby instances.
Execution example
> oci compute instance action --instance-id ocid1.instance.oc1.ap-tokyo-1.xxxxxxxxxx --action start
| Parameters | Description |
|---|---|
| --instance-id | OCID of the active/standby instances. |
5.8 Confirming the Mirror Disk Setting
After starting both the active and the standby instances, check the device file names of the restored cluster partition and the data partition with the lsblk command. In this verification, when the OS was stopped and then started, the device file name of the mirror partition was changed from sdb to sda. However, because the mirror disk resource was configured using a consistent device path, there is no need to change the settings of the cluster partition device name and data partition device name.
Execution example
# lsblk
NAME MAJ:MIN RM SIZE RO TYPE MOUNTPOINTS
sda 8:0 0 50G 0 disk
├─sda1 8:1 0 1G 0 part ← Cluster partition(device name changed from sdb1)
└─sda2 8:2 0 4G 0 part ← Data partition(device name changed from sdb2)
sdb 8:16 0 46.6G 0 disk
├─sdb1 8:17 0 100M 0 part /boot/efi
├─sdb2 8:18 0 2G 0 part /boot
└─sdb3 8:19 0 44.5G 0 part
├─ocivolume-root 253:0 0 29.5G 0 lvm /
└─ocivolume-oled 253:1 0 15G 0 lvm /var/oled
lrwxrwxrwx 1 root root 6 Jul 22 03:06 /dev/oracleoci/oraclevda -> ../sdb
lrwxrwxrwx 1 root root 7 Jul 22 03:06 /dev/oracleoci/oraclevda1 -> ../sdb1
lrwxrwxrwx 1 root root 7 Jul 22 03:06 /dev/oracleoci/oraclevda2 -> ../sdb2
lrwxrwxrwx 1 root root 7 Jul 22 03:06 /dev/oracleoci/oraclevda3 -> ../sdb3
lrwxrwxrwx 1 root root 6 Jul 22 03:06 /dev/oracleoci/oraclevdb -> ../sda
lrwxrwxrwx 1 root root 7 Jul 22 03:06 /dev/oracleoci/oraclevdb1 -> ../sda1 ← Cluster partition
lrwxrwxrwx 1 root root 7 Jul 22 03:06 /dev/oracleoci/oraclevdb2 -> ../sda2 ← Data partition
If the device file name set in the mirror disk resource has changed, change the mirror disk settings.
Connect to Cluster WebUI and switch to "Config mode".
In the properties of the mirror disk resource, enter the correct device file name in [Data Partition Device Name] and [Cluster Partition Device Name] on the [Details] tab. After entering, click [Apply the Configuration File].
5.9 Executing Post-processing Command for Restore(Rebooting the Active/Standby Instance)
Execute the following command on both the active and the standby instances.
Execution example
# clprestore.sh --post --skip-copy
Mirror info will be set as default.
The main handle on initializing mirror disk <md> success.
Initializing mirror disk complete.
clprestore.sh : Changing the setting of cluster services to Auto Startup.
clprestore.sh : Rebooting...
After executing the above command, the EXPRESSCLUSTER services are set to start automatically, and the instances are rebooted.
In this case, since the block volumes for both the active and the standby instances were created from the same backup, the contents of the cluster partition and the data partition are the same, and so a full copy of the mirror disk is not necessary. Executing clprestore.sh command with the --skip-copy option skips the full copy and starts the mirror disk normally.
5.10 Checking the Result of Restore
Confirm that EXPRESSCLUSTER has started successfully and that the status of the mirror disk resource is normal. Execute the "clpmdstat --mirror md" command on either the active or standby instance.
Confirm that the restore has successfully recovered the data from the backup.
If necessary, switch to the standby instance and confirm that the failover group and all services are functioning correctly. Then, complete the restore operation.
Conclusion
In this article, we introduced the procedure for backing up and restoring mirror disks on OCI using Block Volume Backups feature. We think this method is highly useful to be able to easily take backups and restore them.
Since mirror disks often store important business operation data, it is essential for operation to prepare backup procedures in case data is destroyed or deleted due to failures or work errors. For actual operation, please also refer to the backup and restoration procedures described in “2. The system maintenance information” in the EXPRESSCLUSTER X Maintenance Guide.
If you consider introducing the configuration described in this article, you can perform a validation with the trial module of EXPRESSCLUSTER. Please do not hesitate to contact us if you have any questions.