
Global Site
Displaying present location in the site.
March 16th, 2023
Machine translation is used partially for this article. See the Japanese version for the original article.
Introduction
This time, we introduce non-stop expansion of mirror disk capacity on cloud environments, which is one of the functions of EXPRESSCLUSTER X 4.2 and later.
For other enhancements, please refer to  here.
here.
Contents
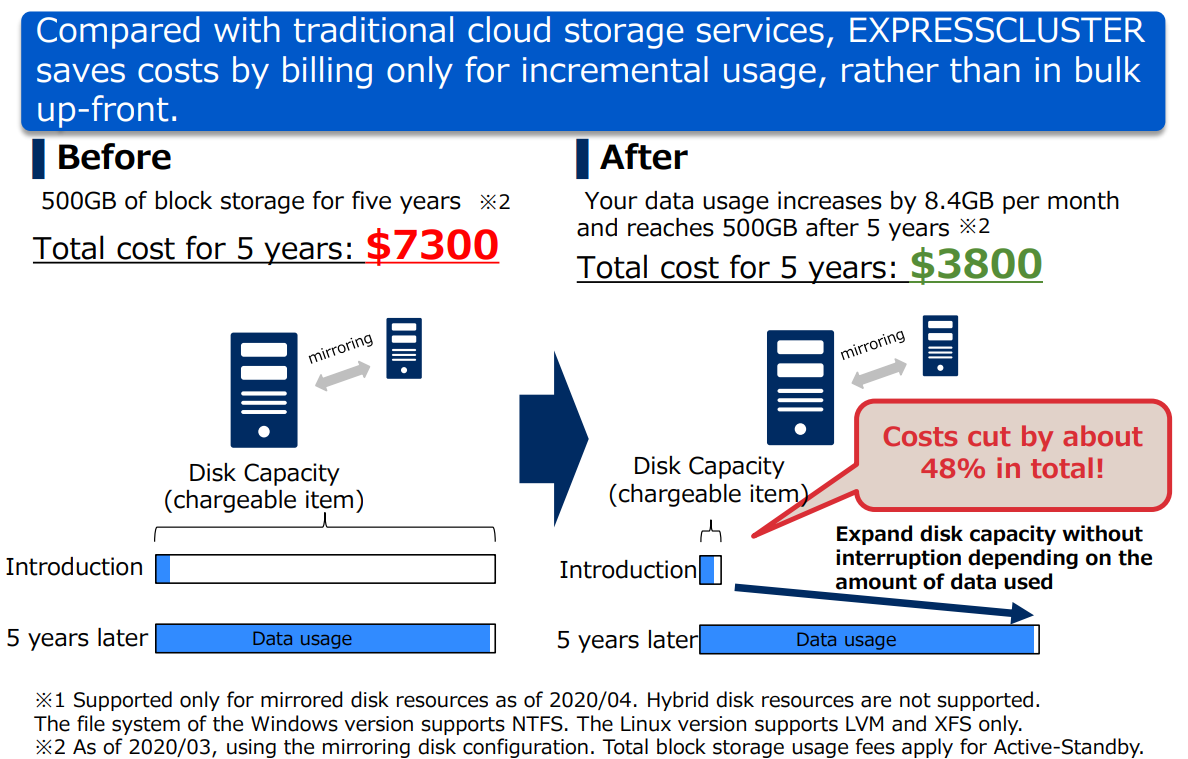
1. Benefits of Non-Stop Expansion of Mirror Disk Capacity on Cloud Environments
For example, for disk where it is estimated that a capacity of 500GB will be required in five years, it is reasonable to expand it according to the required capacity on cloud environments.
However, EXPRESSCLUSTER X 4.1 and earlier could not expand the mirror disk capacity non-stop, so it was necessary to reserve 500GB from the beginning of introduction in an environment where planned shutdowns were unacceptable.
Using the function added in EXPRESSCLUSTER X 4.2 to non-stop expand the mirror disk capacity on cloud, reasonable operation is possible.
Please refer to the figure below for details.
2. Procedure of Non-Stop Expansion of Mirror Disk Capacity on Cloud Environments
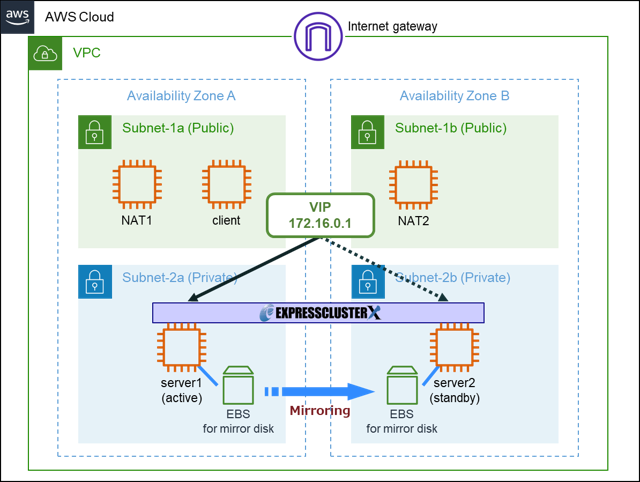
This time, we will perform non-stop expansion of mirror disk capacity for HA clusters built on Amazon Web Service (hereinafter called "AWS").
AWS supports non-stop expansion of Amazon EBS volume (hereinafter called "EBS volume"), and after expanding EBS volume, we expand the mirror disk capacity non-stop in EXPRESSCLUSTER.
2.1 HA Cluster Configuration
The configuration diagram of AWS is as follows. The active and the standby instances use Windows or Linux.
For details on the building procedure, refer to the HA Cluster Configuration Guide.
- *Please note that when performing non-stop expansion of mirror disk capacity on Linux, a partition for the mirror disk must be created in LVM and XFS must be used as the file system.
[Reference]
Documentation - Setup Guides
Documentation - Setup Guides- Windows > Cloud > Amazon Web Services
> EXPRESSCLUSTER X 5.0 for Windows HA Cluster Configuration Guide for Amazon Web Services
- -> 5. Constructing an HA cluster based on VIP control
- Linux > Cloud > Amazon Web Services
> EXPRESSCLUSTER X 5.0 for Linux HA Cluster Configuration Guide for Amazon Web Services
- -> 5. Constructing an HA cluster based on VIP control
2.2 Procedure of Non-Stop Expansion (Windows)
The configuration process is as follows:
- 1. Expand the EBS volume
- 2. Suspend the mirror disk monitor resource
- 3. Expand the disk
- 4. Expand the file system
- 5. Resume the mirror disk monitor resource
For details on increasing the mirror disk size, please refer to the Maintenance Guide.
[Reference]
Documentation - Manuals
Documentation - Manuals- EXPRESSCLUSTER X 5.0 > EXPRESSCLUSTER X 5.0 for Windows > Maintenance Guide
- -> 2 The system maintenance information
- -> 2.29 Increasing the mirror disk size
2.2.1 Expand the EBS Volume
From the AWS Management Console, expand the EBS volume to the required capacity.
For expanding EBS volume, refer to the following site.
[Reference]
Request modifications to your EBS volumes
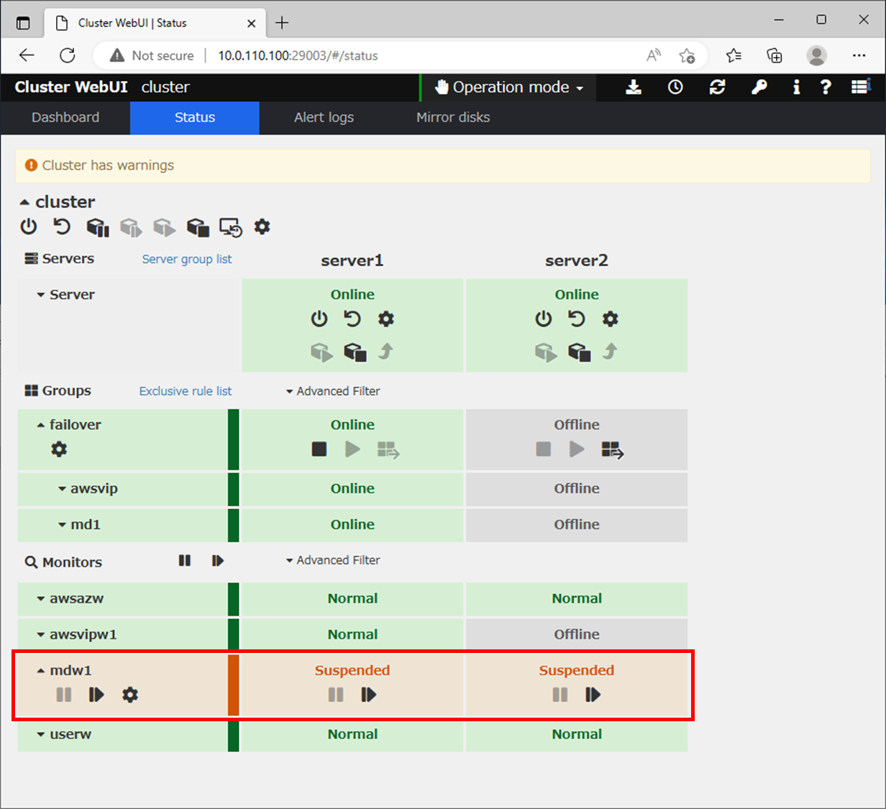
Request modifications to your EBS volumes 2.2.2 Suspend the Mirror Disk Monitor Resource
Suspend the mirror disk monitor resource of server1(active) and server2(standby).
2.2.3 Expand the Disk
- 1. Check that the mirror disk resource is not activated on server2(standby).
- 2. Run the following command on server2(standby).
> clpmdctrl --resize <mirror disk resource name> <expanded capacity (*)>
- *Depending on the block volume specifications and volume expansion method, you may not be able to use all the sizes of EBS volume reserved on the AWS Management Console. In such cases, you should expand the disk with a size smaller than the size of the EBS volume you have reserved.
e.g. mirror disk resource name: md1, expanded capacity: 10GB (10240MB)
> clpmdctrl --resize md1 10239M
> clpmdctrl --resize md1 10239M
- 3. Run the same command as in step 2 on server1(active).
> clpmdctrl --resize <mirror disk resource name> <expanded capacity>
- 4. Run the following command on both servers and check that they are the same size.
> clpvolsz <drive letter for the expanded volume (e.g. M:)>
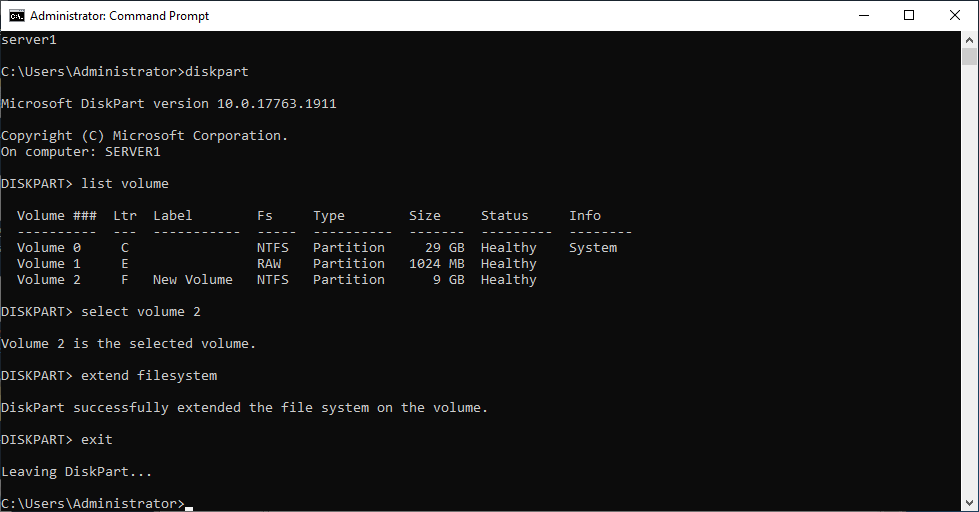
2.2.4 Expand the File System
- 1. Check that the mirror disk resource is activated on server1(active).
- 2. Run the following command on server1(active).
> diskpart
- 3. Run the following command on server1(active) and check number of the expanded volume.
> list volume
- 4. Run the following command on server1(active) to select the target volume.
> select volume <volume number (e.g. 2)>
- 5. Run the following command on server1(active) to expand the file system.
> extend filesystem
- 6. Run the following command on server1(active) to exit diskpart.
> exit
2.2.5 Resume the Mirror Disk Monitor Resource
Resume the mirror disk monitor resource of server1(active) and server2(standby).
2.3 Procedure of Non-Stop Expansion (Linux)
LVM space can be expanded by expanding an existing EBS volume or by creating a new EBS volume.
This time, we are expanding the LVM space by expanding the existing EBS volume.
The configuration process is as follows:
- 1. Expand the EBS volume
- 2. Expand the LVM space
- 3. Suspend the mirror disk monitor resource
- 4. Expand the disk
- 5. Expand the file system
- 6. Resume the mirror disk monitor resource
For details on increasing the mirror disk size, please refer to the Maintenance Guide.
[Reference]
Documentation - Manuals
Documentation - Manuals- EXPRESSCLUSTER X 5.0 > EXPRESSCLUSTER X 5.0 for Linux > Maintenance Guide
- -> 2 The system maintenance information
- -> 2.20 Changing offset or size of a partition on mirror disk resource
2.3.1 Expand the EBS Volume
From the AWS Management Console, expand the EBS volume to the required capacity.
For expanding EBS volume, refer to the following site.
[Reference]
Request modifications to your EBS volumes
Request modifications to your EBS volumes 2.3.2 Expand the LVM Space
Expand the target partition and expand the logical volume.
- *We perform the same procedure for both server1(active) and server2(standby).
For expanding partition, refer to the following site.
This time, we assume that the following volume group and logical volumes are created for the partition (/dev/nvme1n1p1).
- Volume group : lvg-test
- Logical volume : lvm-test1 (Used as a cluster partition)
lvm-test2 (Used as a data partition)
The configuration process is as follows:
- 1. Run the following command and check the target partition size.
# lsblk
(Partially omitted)
nvme1n1 259:0 0 11G 0 disk
└─nvme1n1p1 259:1 0 6G 0 part <- Partition to be expanded
├─lvg--test-lvm--test1 253:0 0 1G 0 lvm
└─lvg--test-lvm--test2 253:1 0 5G 0 lvm
(Partially omitted)
nvme1n1 259:0 0 11G 0 disk
└─nvme1n1p1 259:1 0 6G 0 part <- Partition to be expanded
├─lvg--test-lvm--test1 253:0 0 1G 0 lvm
└─lvg--test-lvm--test2 253:1 0 5G 0 lvm
- 2. Run the following command to expand the target partition.
# growpart <device file name to be expanded> <partition number to be expanded>
e.g. Device file name: /dev/nvme1n1, Partition number: 1
# growpart /dev/nvme1n1 1
# growpart /dev/nvme1n1 1
- 3. Run the following command and check that the target partition has been expanded.
# lsblk
(Partially omitted)
nvme1n1 259:0 0 11G 0 disk
└─nvme1n1p1 259:1 0 11G 0 part <- Expanded partition
├─lvg--test-lvm--test1 253:0 0 1G 0 lvm
└─lvg--test-lvm--test2 253:1 0 5G 0 lvm
(Partially omitted)
nvme1n1 259:0 0 11G 0 disk
└─nvme1n1p1 259:1 0 11G 0 part <- Expanded partition
├─lvg--test-lvm--test1 253:0 0 1G 0 lvm
└─lvg--test-lvm--test2 253:1 0 5G 0 lvm
- 4. Run the following command to expand the physical volume.
# pvresize /dev/nvme1n1p1
- 5. Run the following command to expand the logical volume.
# lvresize -l +100%FREE /dev/lvg-test/lvm-test2
2.3.3 Suspend the Mirror Disk Monitor Resource
Suspend the mirror disk monitor resource of server1(active) and server2(standby).

2.3.4 Expand the Disk
- 1. Check that the mirror disk resource is not activated on server2(standby).
- 2. Run the following command on server2(standby) and check the disk size.
# clpmdstat --detail <mirror disk resource name>
(Partially omitted)
[Server : server2]
NMP/Disk Size(MB) : 5116/10236 <- Check the disk size
DP Device : /dev/lvg-test/lvm-test2
CP Device : /dev/lvg-test/lvm-test1
(Partially omitted)
[Server : server2]
NMP/Disk Size(MB) : 5116/10236 <- Check the disk size
DP Device : /dev/lvg-test/lvm-test2
CP Device : /dev/lvg-test/lvm-test1
- 3. Run the following command on server2(standby).
# clpmdctrl --resize <expanded capacity (*)> <mirror disk resource name>
- *For the expanded capacity, specify the disk size checked in Step 2.
Depending on the block volume specifications and volume expansion method, you may not be able to use all the sizes of EBS volume reserved on the AWS Management Console.
e.g. expanded capacity: 10236MB, mirror disk resource name: md1
# clpmdctrl --resize 10236M md1
# clpmdctrl --resize 10236M md1
- 4. Run the same command as in step 2 on server1(active).
# clpmdctrl --resize <expanded capacity> <mirror disk resource name>
2.3.5 Expand the File System
- 1. Check that the mirror disk resource is activated on server1(active).
- 2. Run the following command on server1(active).
# xfs_growfs <mount point of mirror disk (e.g. /mnt/mirror)>
- 3. Run the following command on server1(active) and check that the capacity of mount point run in step 2 has been expanded.
# df -h
2.3.6 Resume the Mirror Disk Monitor Resource
Resume the mirror disk monitor resource of server1(active) and server2(standby).
Conclusion
This time, we introduced non-stop expansion of mirror disk capacity on cloud environments, which is one of the functions of EXPRESSCLUSTER X 4.2 and later.
By expanding the capacity step by step, you can use the cloud environment at a reasonable price, so please consider EXPRESSCLUSTER when building an HA cluster on cloud environments.
If you consider introducing the configuration described in this article, you can perform a validation with the trial module of EXPRESSCLUSTER. Please do not hesitate to contact us if you have any questions.