
Global Site
Displaying present location in the site.
November 1st, 2022
Machine translation is used partially for this article. See the Japanese version for the original article.
Introduction
We tried to build an HA cluster on Microsoft Azure (hereinafter called “Azure”) using a secondary IP to switch HA cluster connection.
For Linux, please refer to  here.
here.
Using a secondary IP to switch HA cluster connection allows switching connection to server applications from within the same HA cluster.
As server applications and client applications can coexist on the Virtual Machines (hereinafter called "VM") that constituting an HA cluster, this makes it possible to build a client-server type system with fewer VMs.
Contents
1. What is Secondary IP?
Azure VM allows multiple private IP addresses (a primary IP address and secondary IP addresses) to be assigned to a single network interface (hereinafter called "NIC").
Azure VMs always have one or more NICs. And one or more IP configurations are assigned to the NICs.
There are two types of IP configurations: primary IP configuration and secondary IP configuration.
A NIC is always assigned one primary IP configuration, and by additionally assigning a secondary IP configuration, multiple IP addresses can be assigned to a VM.
This time, we will build an HA cluster using a secondary IP to switch HA cluster connection.
For traditional IP address switching using the Azure probe port resource, VMs constituting an HA cluster cannot switch connections to server applications from within the same HA cluster because they cannot access themselves by virtual IP address.
By assigning a secondary IP using Azure CLI, VMs can access own secondary IP address so it can switch connections to the server application from within the same HA cluster.
As server applications and client applications can coexist on the VMs that constituting an HA cluster, this makes it possible to build a client-server type system with fewer VMs.
Please note that the switching secondary IP will take several minutes.
As the system failover time will be extended, please consider in advance whether the time required is acceptable for your system.
For a validation in advance, you can use the trial module of EXPRESSCLUSTER.
2. HA Cluster Configuration
Build an HA cluster using secondary IP.
The configuration is as follows:
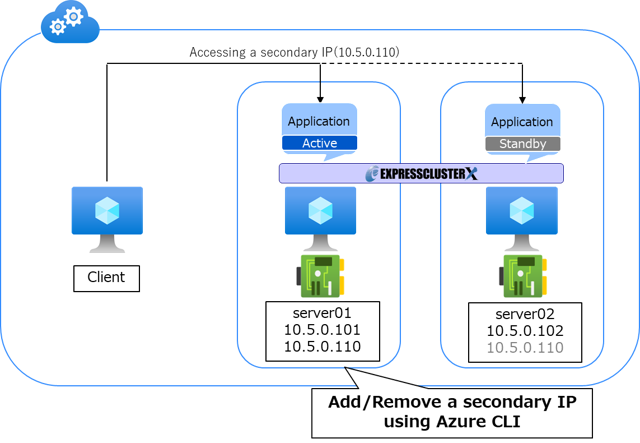
Use Azure CLI to add/remove a secondary IP(e.g. 10.5.0.110) to/from the NIC of the VM constituting an HA cluster.
In addition, along with adding/removing a secondary IP to/from the NIC, assign/release a IP address on the OS using floating IP resource.
The procedure for adding/removing a secondary IP was referenced below:
3. HA Cluster Building Procedure
Build a "mirror disk type HA cluster" on Azure.
3.1 Setting Azure Environment
3.1.1 Creating a Resource Group and a Virtual Network
First, create a resource group to manage the resources, and then create a virtual network.
The settings of the resource group and the virtual network created this time are as follows.
| Settings of Resource group | |
|---|---|
| Name | TestGroup1 |
| Region for resource group | West Central US |
| Settings of Virtual network | |
| Name | Vnet1 |
| Region | West Central US |
| Address space | 10.5.0.0/24 |
| Subnet name | Vnet1-1 |
| Subnet address range | 10.5.0.0/24 |
3.1.2 Creating Virtual Machines
Create VMs constituting an HA cluster in the West Central US region. This time, we selected an Availability set as the Availability options, but you can also select the Availability zones and build an HA cluster.
Since the IP address of a VM is dynamic assignment by default, change it to static assignment.
| Settings of VM | ||
|---|---|---|
| Hostname | Server1 : server01 | Server2 : server02 |
| Region | West Central US | West Central US |
| Settings of NIC | ||
| Hostname (server01) | Hostname (server02) | |
| NIC - Name | server01606 | server02263 |
| NIC - IP configurations | ipconfig1 (primary) : 10.5.0.101 | ipconfig1 (primary) : 10.5.0.102 |
Also, use the Azure CLI to add/remove secondary IP, so install the Azure CLI.
[Reference]
How to install the Azure CLI
How to install the Azure CLI3.1.3 Setting Managed identity
This time, we used a system-assigned managed identity (hereinafter called "managed identity") for authentication when running the Azure CLI.
The managed identity allows Azure resources to authenticate to cloud services without storing credentials in code.
Create an Azure custom role and add individually the permissions that you need to grant to the VMs for the HA cluster using a secondary IP.
By assigning the Azure custom role you created to the managed identity, you add operational permissions to the network and NIC to the VMs constituting the HA cluster.
The procedure for setting a managed identity is as follows:
- (1) Enable managed identities for each VM constituting the HA cluster.
- (2) Create an Azure custom role and add the necessary permissions.
- (3) Assign a created Azure custom role to managed identity.
The details of each step are described below.
- (1) Enable managed identities for each VM constituting the HA cluster.
For each VM, execute the following operations:
- 1. By using Microsoft Azure portal (hereinafter called “Azure portal”), select the VM constituting an HA cluster (server01 or server02).
- 2. Click to [Identity] in the left panel.
- 3. Set the [Status] of [System assigned] to [On] and click the [Save].
- (2) Create an Azure custom role and add the necessary permissions.
Execute the following operations:
- 1. By using Azure portal, select the resource group (TestGroup1) created for the VMs constituting an HA cluster.
- 2. Click to [Access control (IAM)] in the left panel.
- 3. Under [Create a custom role], click [Add].
- 4. Enter and save the following:
Under [Basics], enter a [Custom role name].
Under [Permissions], click [+ Add Permissions] and select the permissions you want to add to your Azure custom role.
The permissions that need to be granted to the VMs for the HA cluster using secondary IP are as follows.
- "Microsoft.Network/networkInterfaces/write"
- "Microsoft.Network/networkInterfaces/delete"
- "Microsoft.Network/virtualNetworks/checkIpAddressAvailability/read"
- "Microsoft.Network/networkInterfaces/read"
- "Microsoft.Network/networkSecurityGroups/join/action"
- "Microsoft.Network/virtualNetworks/subnets/join/action"
Under [Review + create], click [Create].
- (3) Assign Azure custom role created to managed identity.
Execute the following operations:
- 1. By using Azure portal, select the resource group (TestGroup1) created for the VMs constituting an HA cluster.
- 2. Click to [Access control (IAM)] in the left panel.
- 3. Under [Grant access to this resource], click [Add role assignment].
- 4. Under [Role], select custom role created in (2) and click [Next].
- 5. Under [Members], select [Managed identity] for [Assign access to]. And click [+ Select members] next to [Members].
- 6. Under [Select managed identities], select the following values and click [Select] at the bottom of the screen.
[Managed identity] : Virtual machine
[Select] : VMs constituting an HA cluster (server01, server02) - 7. Click [Review + assign] twice to save the file.
3.2 Building an HA Cluster
Install EXPRESSCLUSTER X on each VM constituting an HA cluster.
This time, we added the following resources to EXPRESSCLUSTER X 5.0 for Windows (Internal Ver. 13.00). The configuration of EXPRESSCLUSTER is as follows.
Register three resources in the failover group of EXPRESSCLUSTER: "floating IP resource", "mirror disk resource", and "script resource".
| Configuration of EXPRESSCLUSTER | ||
|---|---|---|
| Server name | server01 | server02 |
| Failover group (failover) | ||
| Floating IP resource | IP address : 10.5.0.110 | |
| Mirror disk resource | Data partition : F:\ | |
| Cluster partition : E:\ | ||
| Script resource | Start Script : start.bat | |
| Stop Script : stop.bat | ||
Register the mirror disk resource.
For more information, see "Understanding mirror disk resources" in the Reference Guide.
[Reference]
Documentation - Manuals
Documentation - Manuals- EXPRESSCLUSTER X 5.0 > EXPRESSCLUSTER X 5.0 for Windows > Reference Guide
- -> 3 Group resource details
- -> 3.8 Understanding mirror disk resources
Register scripts in the script resource to add/remove a secondary IP to/from the NIC of each VM as follows.
| Settings of NIC | ||
|---|---|---|
| Hostname (server01) | Hostname (server02) | |
| NIC - Name | server01606 | server02263 |
| NIC - IP configurations | ipconfig1 (primary) : 10.5.0.101 | ipconfig1 (primary) : 10.5.0.102 |
| ipconfig2 (secondary) : 10.5.0.110 (When the failover group and script resource is activated) |
ipconfig2 (secondary) : 10.5.0.110 (When the failover group and script resource is activated) | |
Set the dependency of the script resource to no dependent resources (Depth 0).
- * The scripts below are samples and are not guaranteed to work.
- * Variable values should be set according to the environment.
Start Script (start.bat)
@echo off
setlocal ENABLEDELAYEDEXPANSION
set HostName1=server01 <-- Hostname of server1
set HostName2=server02 <-- Hostname of server2
set NicName1=server01606 <-- NIC name of server1
set NicName2=server02263 <-- NIC name of server2
set AZPath="C:\Program Files (x86)\Microsoft SDKs\Azure\CLI2\wbin\az.cmd" <-- Path of az command
set ResourceGroup=TestGroup1 <-- Resource group name
set VnetName=Vnet1 <-- Virtual network name
set SecondaryIP=10.5.0.110 <-- Secondary IP address
set IPConfig=ipconfig2 <-- IP configuration to assign a secondary IP address
for /f "usebackq tokens=*" %%i in (`hostname`) do @set CurrentHostName=%%i
if /i %CurrentHostName%==%HostName1% (
set NicName=%NicName1%
) else if /i %CurrentHostName%==%HostName2% (
set NicName=%NicName2%
) else (
echo "Server is not found."
exit 1
)
call %AZPath% login --identity
if not %ERRORLEVEL%==0 (
echo "Failed to az login"
exit 1
)
rem Check secondary IP
for /f "usebackq tokens=2 delims= " %%i in (`%AZPath% network vnet check-ip-address -g %ResourceGroup% -n %VnetName% --ip-address %SecondaryIP% --output yaml ^| findstr available:`) do @set CheckInUse=%%i
if !CheckInUse!==true (
echo "Address not in use"
) else if !CheckInUse!==false (
echo "Address in use"
rem Get nic-name
for /f "usebackq tokens=9 delims=/" %%i in (`%AZPath% network vnet check-ip-address -g %ResourceGroup% -n %VnetName% --ip-address %SecondaryIP% --output yaml ^| findstr inUseWithResource`) do @set NicInUse=%%i
if "!NicInUse!"=="" (
echo "Failed to get nic-name"
call %AZPath% logout
exit 1
) else if !NicInUse!==%NicName% (
echo "Address already in use for %CurrentHostName%"
call %AZPath% logout
exit 0
) else (
echo "Delete secondary IP"
rem Delete secondary IP
call %AZPath% network nic ip-config delete -g %ResourceGroup% -n %IPConfig% --nic-name !NicInUse!
if not !ERRORLEVEL!==0 (
echo "Failed to delete secondary IP"
call %AZPath% logout
exit 1
)
)
) else (
echo "Failed to check secondary IP"
call %AZPath% logout
exit 1
)
rem Create secondary IP
call %AZPath% network nic ip-config create -g %ResourceGroup% -n %IPConfig% --nic-name %NicName% --private-ip-address %SecondaryIP%
if %ERRORLEVEL%==0 (
echo "Success to create secondary IP"
call %AZPath% logout
exit 0
) else (
echo "Failed to create secondary IP"
call %AZPath% logout
exit 1
)
Stop Script (stop.bat)
@echo off
set HostName1=server01 <-- Hostname of server1
set HostName2=server02 <-- Hostname of server2
set NicName1=server01606 <-- NIC name of server1
set NicName2=server02263 <-- NIC name of server2
set AZPath="C:\Program Files (x86)\Microsoft SDKs\Azure\CLI2\wbin\az.cmd" <-- Path of az command
set ResourceGroup=TestGroup1 <-- Resource group name
set IPConfig=ipconfig2 <-- IP configuration to assign a secondary IP address
for /f "usebackq tokens=*" %%i in (`hostname`) do @set CurrentHostName=%%i
if /i %CurrentHostName%==%HostName1% (
set NicName=%NicName1%
) else if /i %CurrentHostName%==%HostName2% (
set NicName=%NicName2%
) else (
echo "Server is not found."
exit 1
)
call %AZPath% login --identity
if not %ERRORLEVEL%==0 (
echo "Failed to az login"
exit 1
)
rem Delete secondary IP
call %AZPath% network nic ip-config delete -g %ResourceGroup% -n %IPConfig% --nic-name %NicName%
if %ERRORLEVEL%==0 (
echo "Success to delete secondary IP"
call %AZPath% logout
exit 0
) else (
echo "Failed to delete secondary IP"
call %AZPath% logout
exit 1
)
Along with adding/removing a secondary IP, register a floating IP resource to assign/release a secondary IP on the OS.
Set the script resource added above as Dependent Resource of the floating IP resource.
4. Checking the Operation
Check that you can connect to the secondary IP you have assigned to the VM before and after the failover.
- 1. Start the failover group on server01.
- 2. From the client machine, access the secondary IP (10.5.0.110) and check that you can connect to server01.
- 3. From the active server, access the secondary IP (10.5.0.110) and check that you can connect to server01.
- 4. By using Cluster WebUI, manually move the failover group from server01 to server02
- 5. From the client machine, access the secondary IP (10.5.0.110) and check that you can connect to server02.
- 6. From the standby server, access the secondary IP (10.5.0.110) and check that you can connect to server02.
Conclusion
This time, we have introduced the procedure for building an HA cluster using a secondary IP in the Windows environment.
If IP address distinction is necessary due to the requirements for applications to be HA clustered, etc., please refer to this procedure to build the HA cluster.
If you consider introducing the configuration described in this article, you can perform a validation with the trial module of EXPRESSCLUSTER. Please do not hesitate to contact us if you have any questions.