
Global Site
Displaying present location in the site.
March 25th, 2022
Machine translation is used partially for this article. See the Japanese version for the original article.
Introduction
When building on cloud, resources can usually be created by manipulating a large number of screens and input forms on the console. However manual work is required each time so that there are problems such as increased work time and configuration errors.
In recent years, IaC(Infrastructure as Code) has been attracting attention and utilized a method of managing and provisioning infrastructure using code to solve these problems.
On Oracle Cloud Infrastructure (hereinafter called OCI), the Resource Manager can be used to automate the provisioning process of OCI resources.
This time, we tried an HA cluster configuration partially automated with Resource Manager on OCI.
Contents
1. What is Resource Manager?
Resource Manager is the service for automating the provisioning of OCI resources.
With Resource Manager, simply uploading Terraform configuration files allows you to configure OCI resources.
You need to create and maintain configuration files, but you can build a variety ofenvironments programmatically.
Furthermore, it is quickly and less error-free than manual work and can reduce work costs and mistakes.
[Reference]
 Overview of Resource Manager
Overview of Resource Manager Terraform
It is an open source infrastructure automatic configuration tool developed by HashiCorp.
Resource Manager is a Terraform-based service that allows you to automate the provisioning of OCI resources by creating a file called a Terraform configuration file and running it from Resource Manager.
Stacks
An execution environment for Terraform commands managed by the Resource Manager. By creating a stack, the execution environment of the uploaded Terraform configuration file is configured on the cloud.
Jobs
It is created when you execute the Terraform action (apply, plan, destroy) on stacks. Only one job can be run on a particular stack at a time.
2. HA Cluster Configureation
In this article, we configure an HA Cluster using a load balancer in the ashburn region on OCI.
The following diagram shows the HA cluster configuration:
Resource Manager automates the provisioning of all OCI resources described in the configuration diagram below.
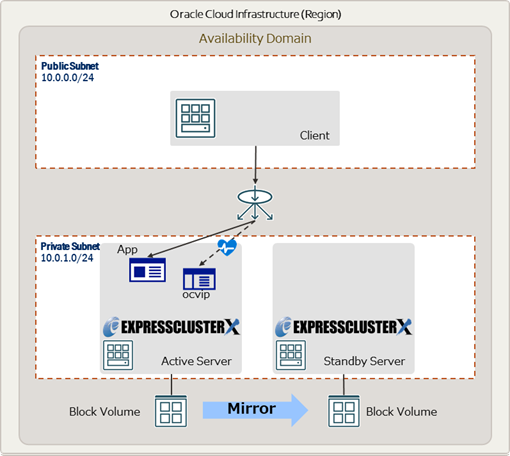
The following, which are not indicated in the figures above, are also automatically configured in this article:
Route Table- Create Route Tables to communicate with each other between different instances
- Create NAT gateways required for active and standby servers to access the Internet*
Security List
- Client
Permission settings for remote desktop access from the Internet - Active server, Standby server
Permission settings for EXPRESSCLUSTER to communicate between active and standby servers
- Add configurations required for load balancing, such as backend sets
3. Building an Environment Used Resource Manager
With Resource Manager, the procedure of configuring HA cluster using a load balancer, as explained above, is described.
3.1 Obtaining Terraform Configuration Files
This time, we will use the Terraform configuration file prepared in advance.
Download the Terraform configuration file from the link below:
 Template file for Windows
3.2 Running Resource Manager
- Automatically create and configure the OCI resources used to build the HA cluster environment using the obtained Terraform configuration file.
- * The screens below are as of the date when this article was written and may be different from those as of now.
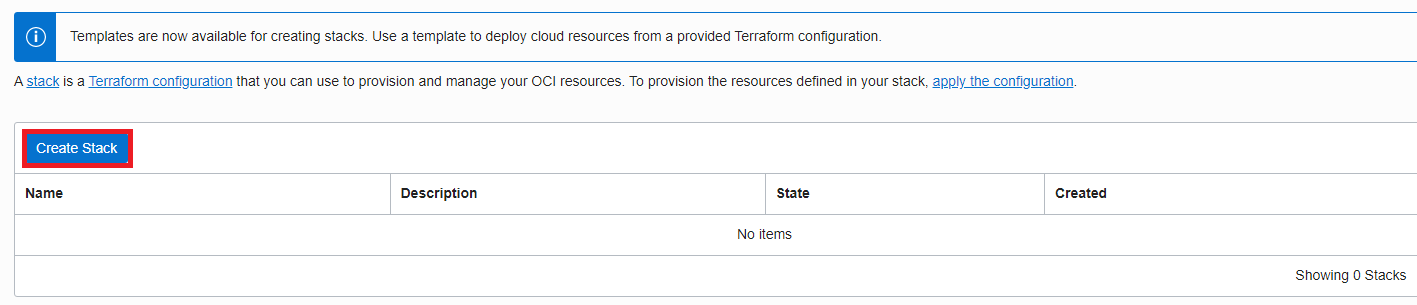
- 1. On the OCI console, select [Developer Services] > [Resource Manager] > [Stacks].

- 2. Click [Create Stack].
- 3. Go to [Create Stack] - [Stack Information].
Select as a stack configuration [. Zip File] and upload the Terraform configuration file that you just downloaded. After the upload is complete, Click [Next].

- 4. Go to [Create Stack] - [Configure Variables].
In this section, you set values to the variables described in the Terraform configuration file. Set the required information for each variable and then click [Next].
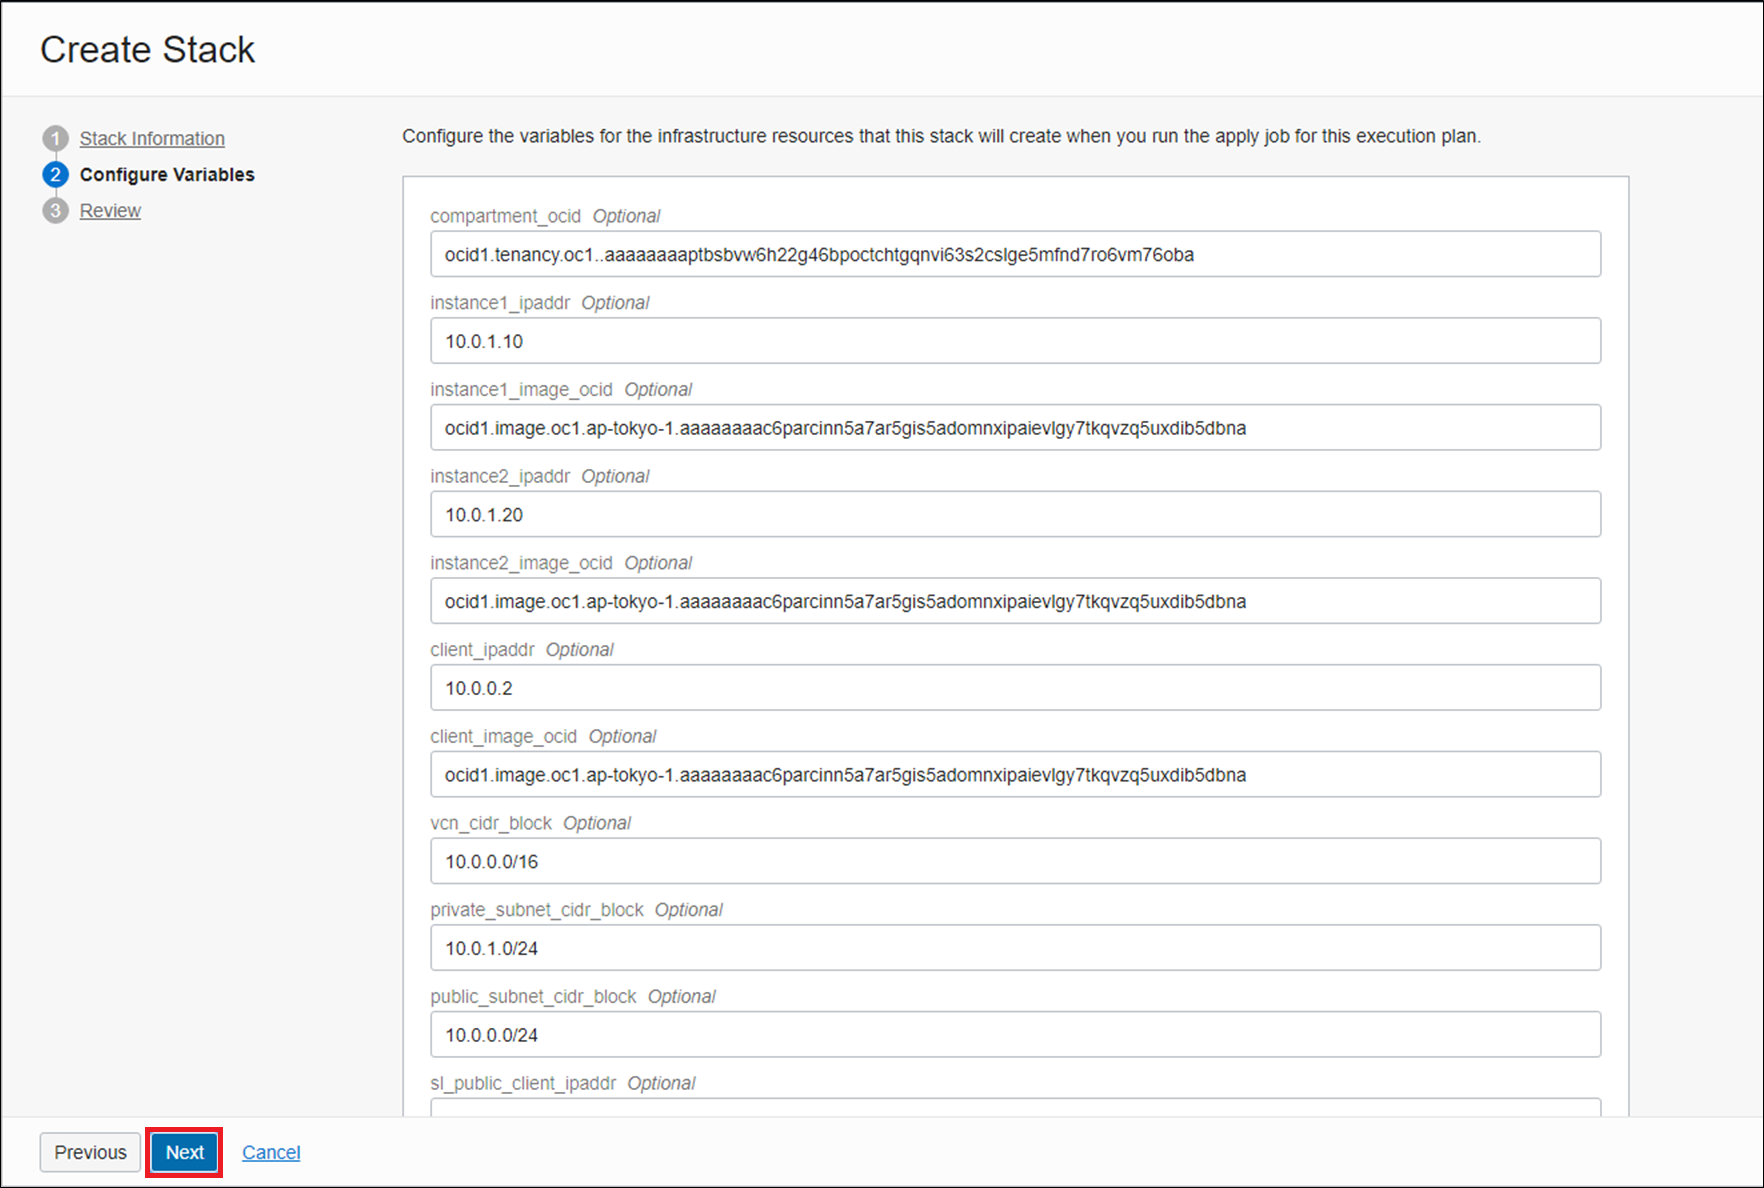
- The following table shows the list of variables defined in the Terraform configuration file used in this article.
Note that there is no problem if you use the value already entered in the default value as it is.
| variable name | explanation | default value |
|---|---|---|
| Compartment_ocid | OCID of compartment to create the stack | Automatic data acquisition |
| Instance1_ipaddr | IP address of active server | 10.0.1.10 |
| Instance1_Image_ocid | Image OCID of active server | ocid1.image.oc1.iad.aaaaaaaashyy2whsxs65paokuhg5uyjjqq3x54tnix5all4jjxzvdlz6kltq |
| Instance1_ssh_public_key* | Public key information for logging in to active server | |
| Instance2_ipaddr | IP address of standby server | 10.0.1.20 |
| Instance2_Image_ocid | Image OCID of standby server | ocid1.image.oc1.iad.aaaaaaaashyy2whsxs65paokuhg5uyjjqq3x54tnix5all4jjxzvdlz6kltq |
| Instance2_ssh_public_key(*) | Public key information for logging in to standby server | |
| Client_ipaddr | IP address of the client | 10.0.0.2 |
| Client_Image_ocid | Image OCID of the client | ocid1.image.oc1.iad.aaaaaaaa6p4pwoqjgpto342dcnhcdsa3cmez3aps2v6tayn2km5ukkk2wqca |
| VCN_cidr_block | VCN CIDR Block | 10.0.0.0/16 |
| Private_subnet_cidr_block | CIDR Block of a private subnet | 10.0.1.0/24 |
| Public_subnet_cidr_block | CIDR Block of a public subnet | 10.0.0.0/24 |
| Sl_public_client_ipaddr | Network that allows connection to the operating client (e.g. 192.168.0.1/32) | |
| Tenancy_ocid | OCID of the tenancy creating the stack | Automatic data acquisition |
| Region | Region name where the stack is created | us-ashburn-1 |
- * It is defined only in the Linux version of the template file.
For the public key information, enter the authentication information of the public key, not the key name.
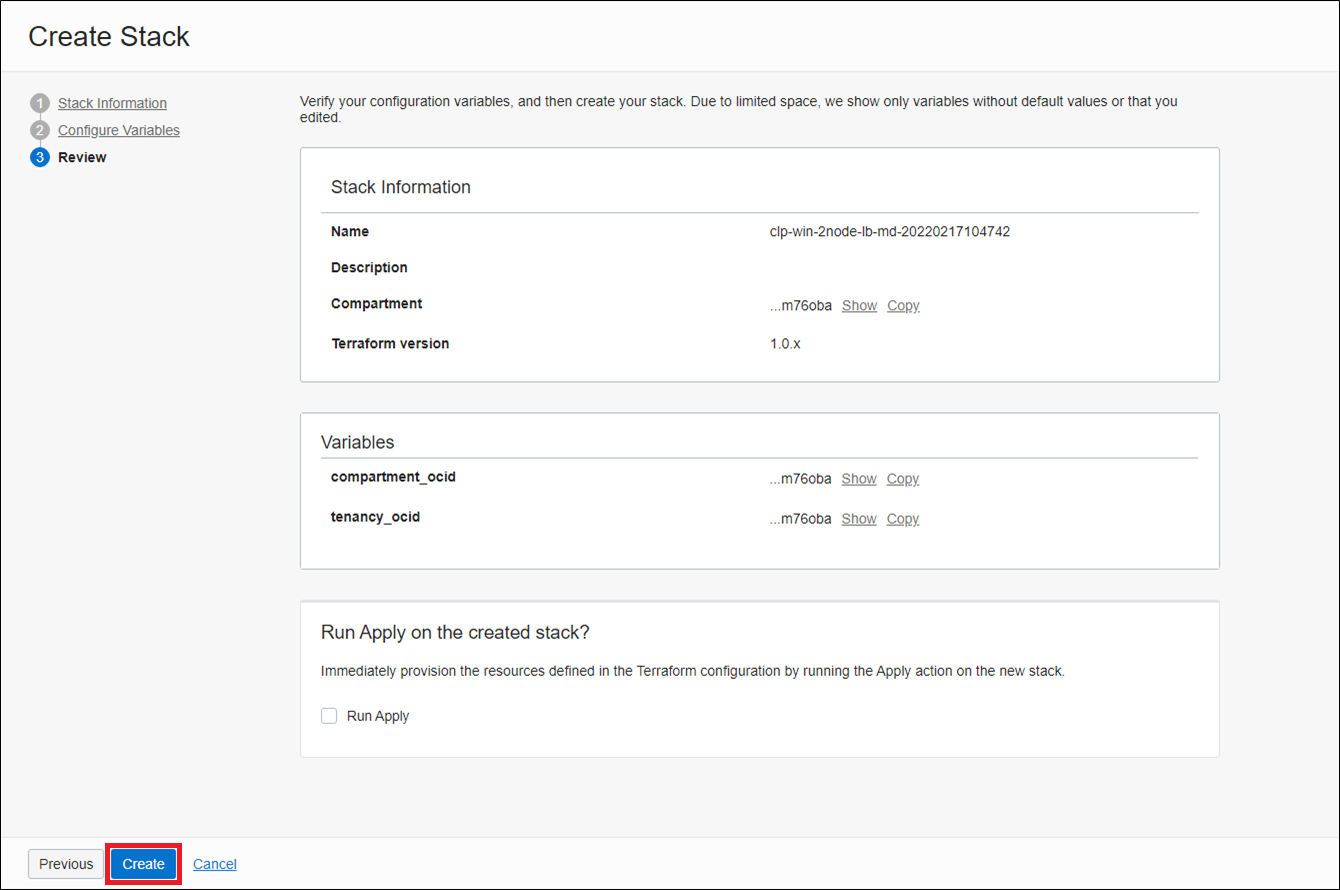
- 5. Go to [Create Stack] - [Review].
After confirming the information you have set, click [Create].
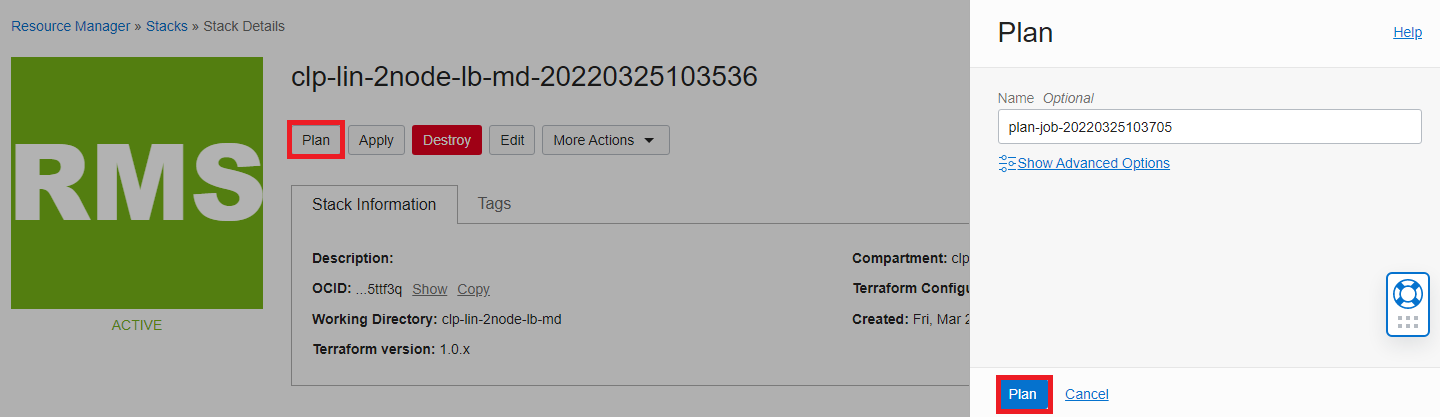
- 6. From the stacks details screen created under section 5, click [Plan] to create a job.
- 7. From the stacks details screen created under section 5, click [Apply]. From [Apply Job Plan Resolution], select the job that you created under section 6, and then click [Apply].
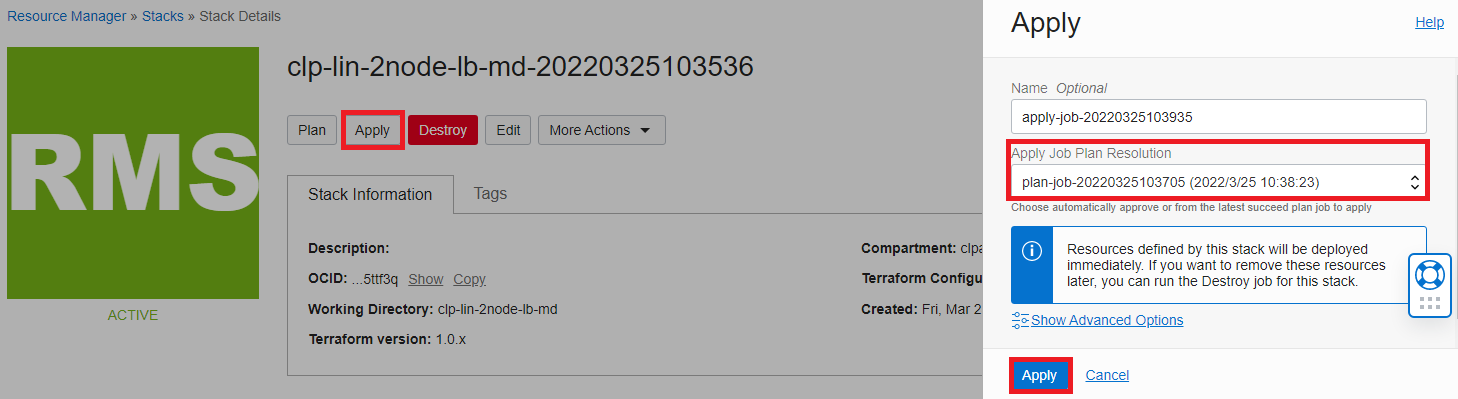
- After you apply it, confirm that the job completed successfully. If the job fails, check the error message and try again.
3.3 HA Cluster Configuration Procedure
Log in to the operation client to configure an HA cluster and check its operation.
For information on the subsequent procedures, see the following guide:
[Reference]
Documentation – Setup Guides
Documentation – Setup Guides- Windows > Cloud > Oracle Cloud Infrastructure > EXPRESSCLUSTER X 4.3 HA Cluster Configuration Guide for Oracle Cloud Infrastructure (Windows)
→ Chapter 4 Mirror Disk Type Cluster Creation Procedure - Linux > Cloud > Oracle Cloud Infrastructure > EXPRESSCLUSTER X 4.3 HA Cluster Configuration Guide for Oracle Cloud Infrastructure (Linux)
→ Chapter 4 Mirror Disk Type Cluster Creation Procedure
Also, please confirm the IP address and load balancer settings used when building the HA cluster from the detailed screen of each service on the OCI console.
4. After Creating Stacks
The following is consideration after creating the environment. When you need to make changes (e.g. addition, updates, and deletion) to OCI resources created using a Resource Manager, use the "Modify Terraform Configuration File" and "Reedit Stacks" are recommended instead of manipulating the resource directly on the OCI console.
This is because, Resource Manager controls the "OCI resources defined in that stack".
Making any changes on the OCI console produces inconsistencies between the current status and its updates, which can cause an error.
To edit stacks, go to [Resource Manager] > [Stacks], select the stack you created, click [Edit], and re-upload the Terraform configuration file.
Conclusion
We have partially automated the configuration of an HA cluster with Resource Manager.
Only the creation of OCI resources has been automated, which could be completed in a shorter time than that with conventional manual operation.
Automatic configuration with Resource Manager can save time and effort, and reduce mistakes, caused by manual operation, even if its Terraform configuration file needs to be created and maintained.
If you consider introducing the configuration described in this article, you can perform a validation with the trial module of EXPRESSCLUSTER. Please do not hesitate to contact us if you have any questions.