
Global Site
Displaying present location in the site.
December 3rd, 2021
Machine translation is used partially for this article. See the Japanese version for the original article.
Introduction
Azure Shared Disk is a new feature in managed disks that allows Azure managed disks (hereinafter called "managed disk") to be connected to multiple virtual machines (hereinafter called "VM") at the same time.
We tried building a shared disk type HA cluster on Microsoft Azure (hereinafter called "Azure") using Azure shared disk.
Previously, it could not be treated as a disk connected to multiple VMs, such as a shared disk on Azure.
This time, we will build a shared disk type HA cluster using Azure shared disk.
Contents
1. What is an Azure Shared Disk?
Azure shared disks are the ability to connect managed disks to multiple VMs at the same time. Managed disks with shared disks enabled provide shared block storage that can be accessed by multiple VMs.
Previously, managed disks could only be attached to a single VM, so they could not be used to build shared disk clusters because they could not be attached to multiple VMs.
From now on, Azure shared disk features allows managed disks to be treated like shared disks. EXPRESSCLUSTER X shared disk clusters are an option in environments where I/O performance is important because there is no write performance degradation associated with synchronizing I/O data, such as mirror disk clusters.
Azure shared disk features provides these benefits, but the application must maintain the write order to ensure that the data in managed disks is consistent. If you write data from multiple VMs without controlling the writes, the data may appear to be written successfully at first glance, but you may actually be destroying the file system.
Therefore, it is necessary to take measures such as controlling VMs that can write data, such as EXPRESSCLUSTER X disk resources (shared disk control resources).
2. Shared Disk Type HA Cluster Configuration
In this case, we built a "shared disk type HA cluster" in the West Central US region environment, and confirmed that managed disks attached to multiple VMs can be controlled by disk resources.
In this configuration, a two-node shared disk type cluster is built, and the VMs that can access the managed disk enabled is switched by disk resources that controls the shared disk.
We build an "HA cluster using an internal load balancer".
The configuration is as follows:
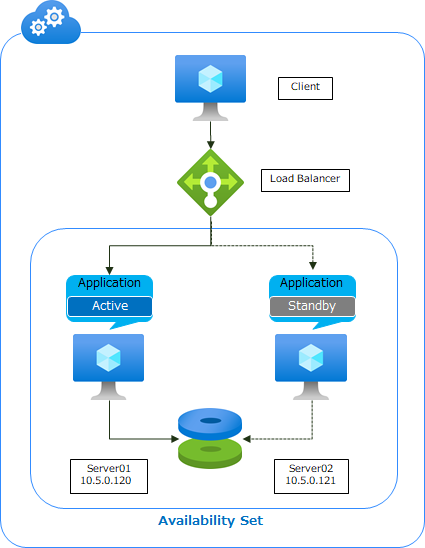
-Azure shared disk capabilities enable managed disks that can be connected from multiple VMs at the same time to take over business data
-Use the Azure load balancer to switch destinations to active VMs
Managed disk is attached to both nodes, but is accessible only from the nodes where disk resources are running (the active VM in the case of figure) due to disk resource control. Managed disk cannot be referenced or written from the standby VM.
If the active VM fails, the standby VM starts the disk resource and can reference and write managed disk from the standby VM.
By specifying the virtual IP address set in the Azure load balancer to access the business application, the client can access it without being aware of which node is running.
3. Shared Disk Type HA Cluster Construction Prucedure
3.1 Preparation for HA Cluster Construction
There are limitations on the types of disks that can be enabled for shared disks.
For more information on limitations, please refer to the following website:
In this case, we use Premium SSD for the disk type.
※As of July 16, 2020, only the West Central US region will be supported when using Premium SSD as a shared disk.
If you wish to use it in other regions, you will need to use Ultra Disk.
3.1.1 Create a Proximity Placement Group
This time, we will build VMs as a proximity placement group.
Proximity placement groups can be used to reduce network latency between VMs and improve overall application performance. When you place VMs in a proximity placement group, all VMs that share the disk must be in the same proximity deployment group.
Specify "West Central US" as the region.
The procedure for creating a proximity placement group was refered to the following site.
[Reference]
 Create a proximity placement group using the Azure portal
Create a proximity placement group using the Azure portal- Create the proximity placement group

3.1.2 Create an Azure Shared Disk
Create a managed disk with shared disk enabled.
You can create it in the following steps:
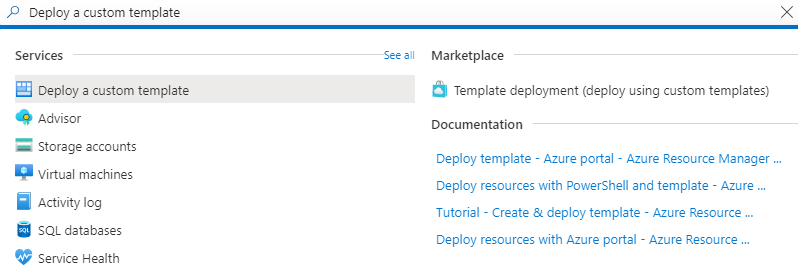
- 1.Open the Azure portal, search for "Deploy a custom template" from the search for resources, services, and docs at the top, and select it.
- 2.Select "Build your own template in the editor".
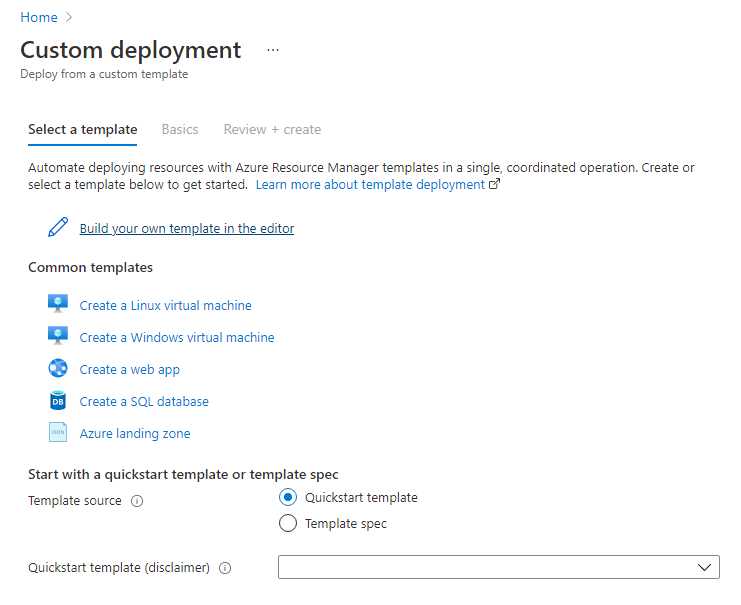
- 3.Use the following JSON template to create a managed disk:
[Reference]
Deploy shared disks
Deploy shared disks- → Deploy a premium SSD as a shared disk
- → Resource Manager Template
- → Premium SSD shared disk template
- → raw data
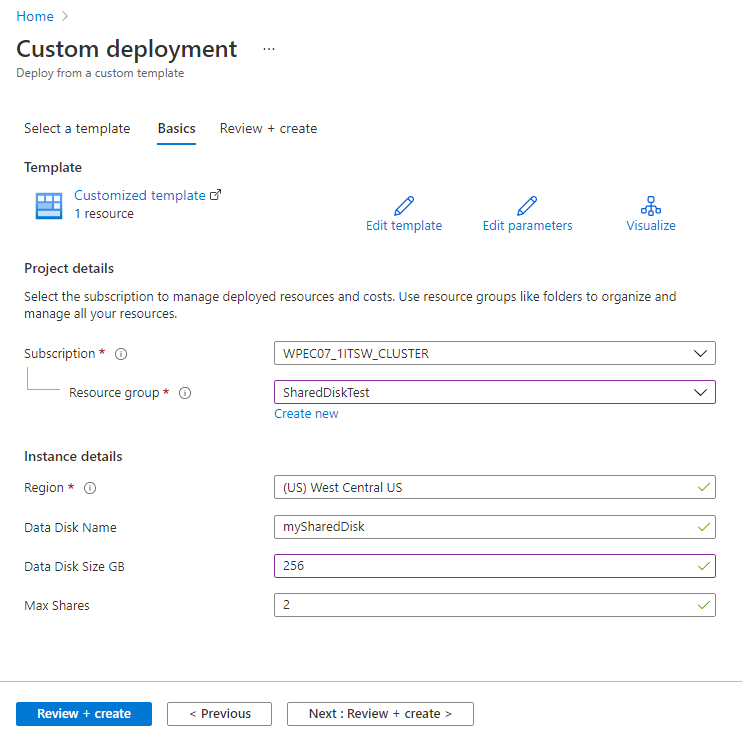
Change the deployment settings accordingly and click the "Review & Create" button.
We use Data Disk Size GB for "256" and Max Shares in "2".
3.2 Procedure for Building a Shared Disk Type HA Cluster
We build an "HA cluster using an internal load balancer".
For construction steps, see Chapter 6 Cluster Creation Procedure (for an HA Cluster Using an Internal Load Balancer) in the HA Cluster Configuration Guide.
[Reference]
Documentation - Setup Guides
Documentation - Setup Guides- Windows > Cloud > Microsoft Azure
- Linux > Cloud > Microsoft Azure
• It does not add disks used for mirror disks (cluster partitions, data partitions), sets partitions for mirror disks (mirror disk resources), and adds mirror disk resources.
• Refer to this blog "3.2.1 VM Settings” to set regions, VM sizes, availability sets, and proximity placement groups.
• Refer to this blog "3.2.2 Adding a Data Disk" and add disks to be used for shared disks (partition for disk heartbeat and mirror partition). The disk will be added after the VM is created.
• Refer to "3.2.3 Building HA Clusters" in this blog and configure the partitions for shared disks (disk resources).
• Refer to "3.2.3 Building HA Clusters" in this blog and add disk resources.
3.2.1 VM Settings
Specify "West Central US" as the region.
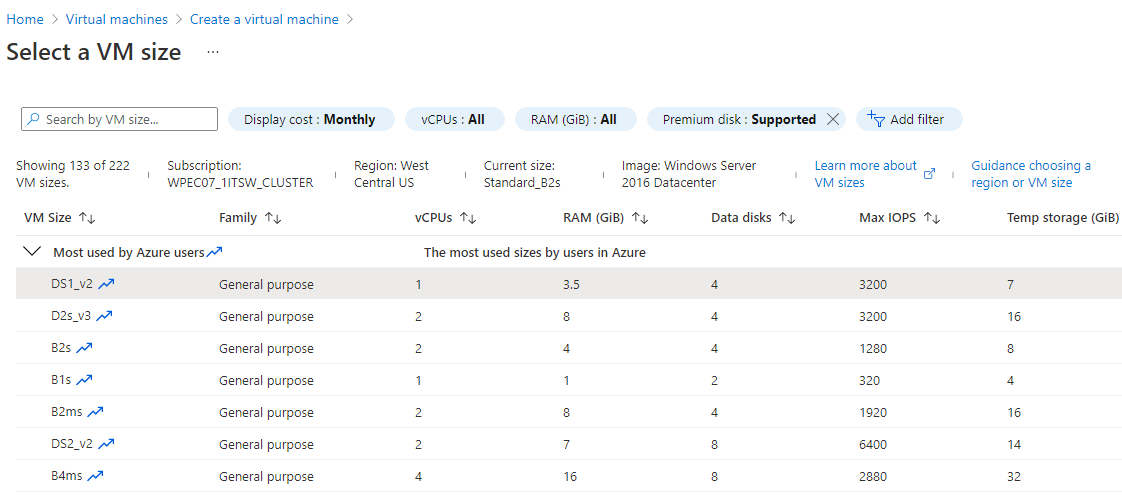
You must choose a VM that supports Premium Storage for the size of the VM.
Set "Premium Disk: Supported" in the filter and select from the displayed VM size.
VMs are placed in a proximity placement group.
Note that if you have selected an existing availability set, and the selected availability set is not included in the proximity deployment group, you need to place the availability set in the proximity deployment group in advance.
If you create a new availability set when you create a VM and specify a proximity placement group, the new availability set is also placed in the proximity deployment group.

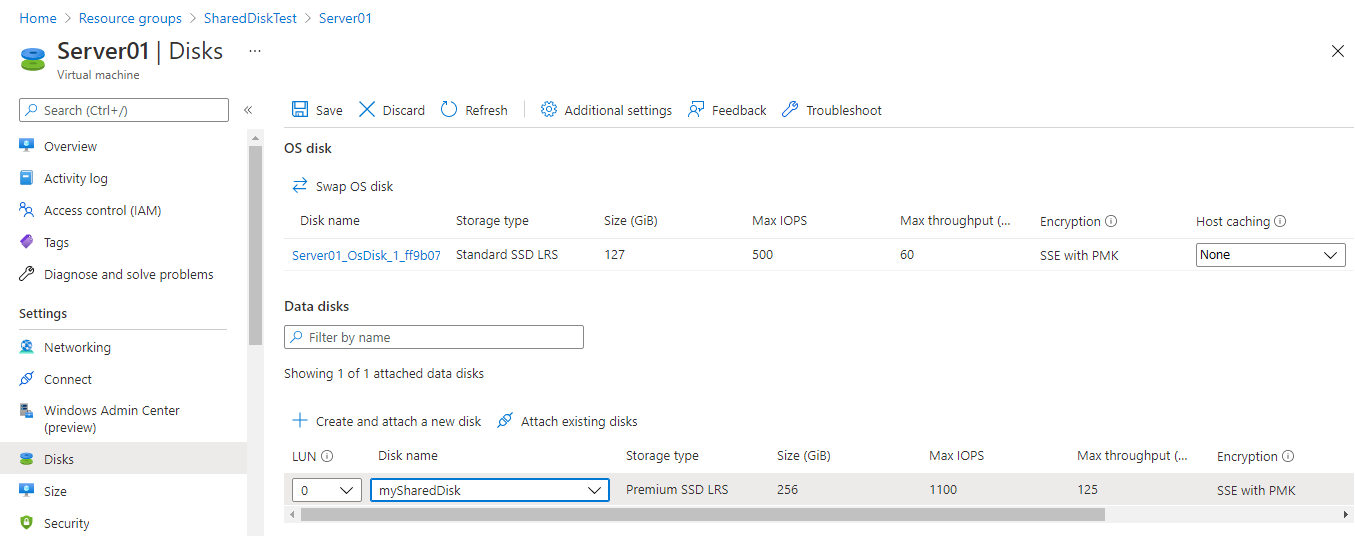
3.2.2 Adding a Data Disk
Select the VM you want to connect to the managed disk you created and add the data disk. Select "None" for the host caching. The procedure for adding the data disk was refer to the following website:
3.2.3 Building HA Clusters
Build a "shared disk type HA cluster".
Please refer to the "Installation & Configuration Guide" of EXPRESSCLUSTER X for the construction procedure.
Create the disk partitions, switchable partitions, and add disk resources that are required for shared disks.
[Reference]
Documentation - Previous Versions
Documentation - Previous Versions- Manuals > EXPRESSCLUSTER X > EXPRESSCLUSTER X 4.3 for Windows > Installation and Configuration Guide
- → 2. Determining a system configuration
- → 2.6 Settings after configuring hardware
- → 2.6.1. Shared disk settings (Required for shared disk)
- → 6. Creating the cluster configuration data
- → 6.4 Procedure for creating the cluster configuration data
- → add a group resource (Disk resource/Mirror disk resource/Hybrid disk resource)
- Manuals > EXPRESSCLUSTER X > EXPRESSCLUSTER X 4.3 for Linux > Installation and Configuration Guide
- → 2. Determining a system configuration
- → 2.8 Settings after configuring hardware
- → 2.8.1. Shared disk settings for disk resource (Required for disk resource)
- → 6. Creating the cluster configuration data
- → 6.4 Creating the configuration data of a 2-node cluster
- → 6.4.2 Creating a failover group
- → Add a group resource (Disk resource)
4. Checking the Operation
Before and after failover, verify that access to the shared disk is in place and that data is being taken over.
- 1.Start failover group in the active VM.
- 2.Verify that you can access the switchable partition on the active VM.
Also, verify that the switchable partition cannot be accessed from the standby VM. - 3.Create a test.txt in the switchable partition on the active VM.
- 4.Move failover group to the standby VM manually and check on the Cluster WebUI that the group has been started on the moving destination VM.
- 5.Verify that you can access the switchable partition on the standby VM.
Also, verify that the switchable partition cannot be accessed from the active VM.
We've verified that we could build a shared disk type HA cluster using Azure shared disks.
Conclusion
We built a shared disk type HA cluster using a managed disk that allows multiple VMs to connect at the same time with Azure shared disk functionality.
We think it's very useful to make it easy to build shared disk type HA clusters on Azure.
If you would like to build a shared disk type HA cluster, please try it.
If you consider introducing the configuration described in this article, you can perform a validation with the trial module of EXPRESSCLUSTER. Please do not hesitate to contact us if you have any questions.